Sharing and the QR code
Where to find the link to your booking page, how to share it on social media and at your business, and how the Client verification QR and the A5 flyer work.
 Video guideSalon samo za članove — odobravanje novih klijenata + QR prečacWatch on YouTube · The video is in Croatian.
Your public page only brings in bookings once clients find their way to it. On this page you'll learn where your booking link and QR code are, where it pays to share them, how the Client verification QR works for accepting clients at the front desk straight away, and how to print an A5 flyer.
Before you start
- The Sharing & app tab is in Settings, which users with the Owner and Manager roles can see.
- The link only works once your business has been launched at the end of the business setup.
- This tab has no save button: everything on it is ready to use straight away.
Booking link
- In the sidebar, click the business card at the top and choose Settings.
- Open the Sharing & app tab.
- In the Public booking link & QR section you'll see your link, in the form
https://appointa.hr/s/<slug>. - Click Copy. The button briefly shows Copied! and the link is ready to paste.
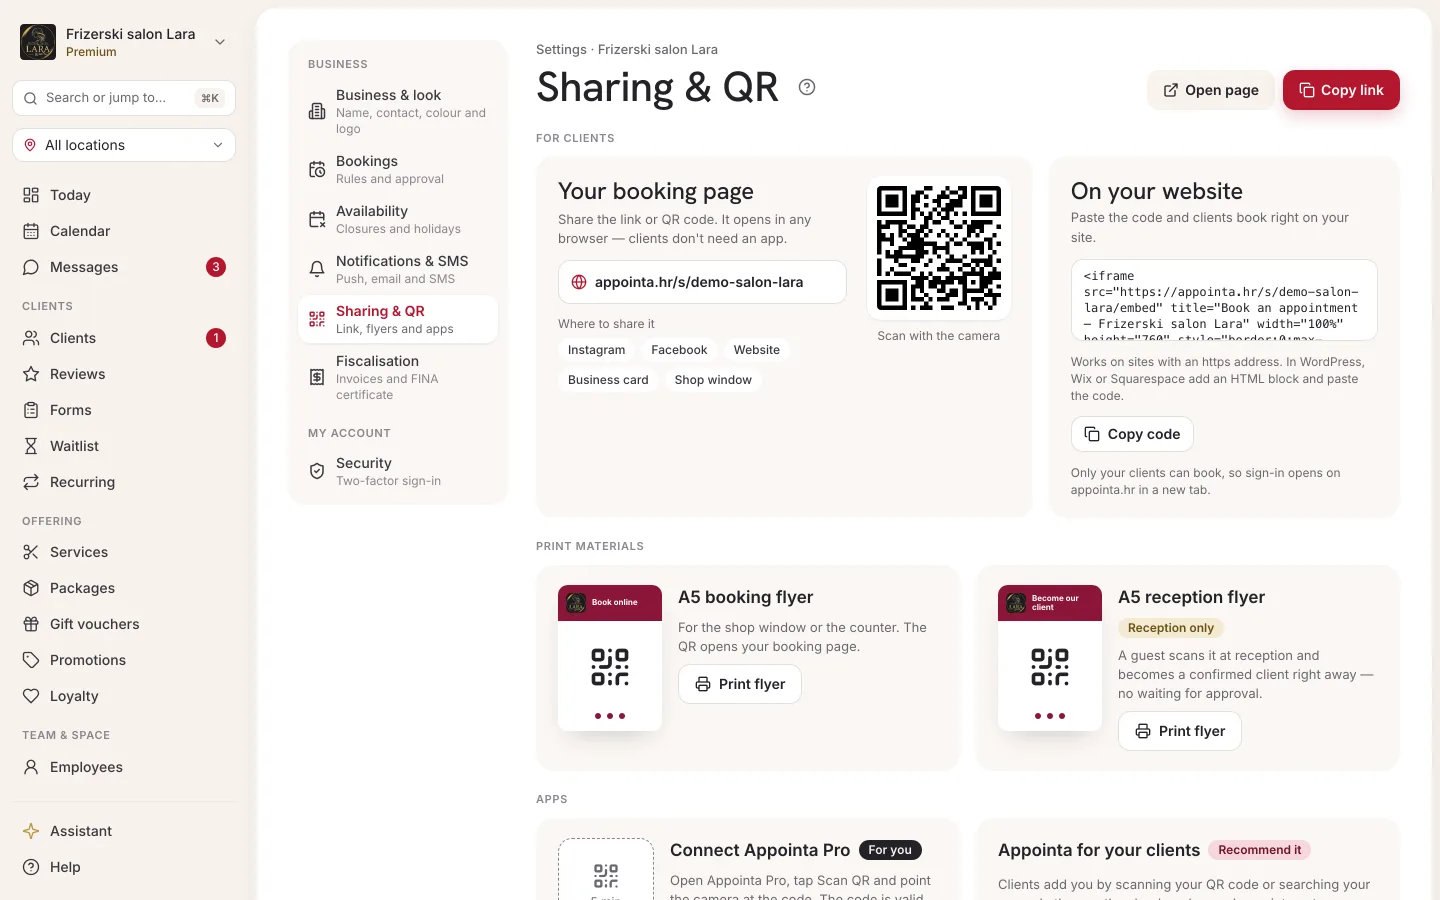
The link doesn't change: the identifier in it (the Slug (URL) field) is locked after setup, so a link you share today and a QR code you print today stay valid permanently. If you change your business name, the link stays the same.
Link to a specific service or staff member
You can send a client straight to booking one service or with one staff member:
- Open your public page.
- Click a service in the Our services section or a staff member in the Our team section.
- Copy the address from the browser's address bar and share it.
A client who opens such a link starts booking with that service, or that staff member, already selected. This is handy for a post about a new service or for one staff member's regular clients.
Booking QR code
Right below the link is a QR code that leads to the same page. The client scans it with their phone camera and the page opens in the browser, without an app. Next to the code it says Scanned with the phone camera and Opens in any browser — no app needed. This QR code is meant for everyone: you can put it in your shop window, on a business card, on a flyer or in a post, because it works anywhere.
The tab has no button for downloading the QR code as a file. For printing, there's a ready-made A5 “Book online” flyer with this code: below the code, click Print A5 booking flyer, see A5 booking flyer. For another format, take a screenshot and crop the code.
Where to share the link
| Channel | How |
|---|---|
| The link in your profile bio. In a story, add a link sticker. | |
| The link in your page details and in posts. | |
| The link in your business profile description, in your status and as a reply when a client asks you about an appointment. | |
| In your business profile on Google, enter the link as your website or as your booking link. | |
| Your own website | A “Book an appointment” button that leads to the link, or the embedded booking form. |
| Shop window, counter, business card | The booking QR code. |
| Phone and messages | Send the link instead of arranging the appointment yourself. |
When you paste the link into a message or post, apps like WhatsApp or Facebook show a preview with your business name, city, logo and brand color. The preview updates when you change the name, logo or color in your business settings, but some apps remember the old preview for a while.
Booking form on your website
If you have your own website, you can embed the booking form right into it. Clients then pick a service, staff member and time without leaving your site.
- In Settings, open the Sharing & app tab.
- In the Embed code for your website section, click Copy.
- In your site editor (WordPress, Wix, Squarespace…), add an HTML block and paste the code.
The code works on any website with an https address. The embedded form always books as a guest: the client enters a name and phone number and doesn't sign in with an Appointa account. Links after booking, such as cancelling, open in a new tab. The waitlist isn't shown in the embedded form, because it needs a sign-in.
If you only take bookings from your own clients, the client picks a service and time in the form, and sign-in opens your booking page on appointa.hr in a new tab, with the time already picked.
Client verification QR
If you only take bookings from your own clients (Anonymous bookings is turned off in the booking rules), the tab also shows the Client verification QR section. A client who is physically at your business scans this code and becomes your verified client. With Auto-approve on scan turned on (the default), this happens without waiting for approval, so the client can book online straight away.
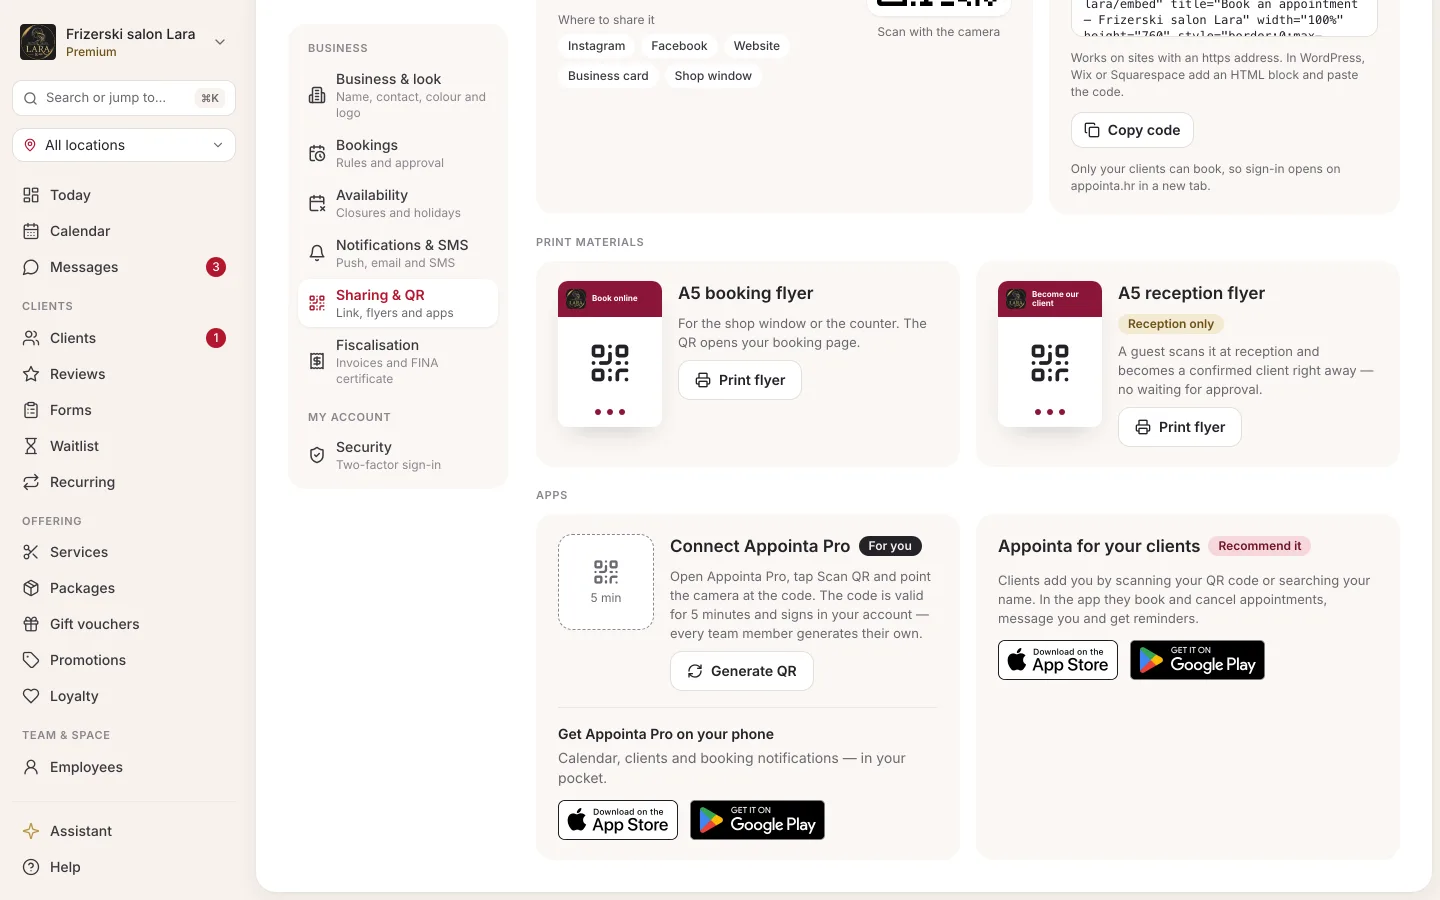
How the client scans it:
- The client needs the Appointa app and must be signed in to it.
- They scan the code with the scanner in the app or with their phone camera. The camera opens the Client verification page, which opens the app by itself. If the app doesn't open, the client taps Open in the app or first downloads it using the links on the same page.
- The app connects them with your business.
| Situation | What happens |
|---|---|
| New client, Auto-approve on scan on | They become a verified client immediately. You get a notification about the new client in the Appointa Pro app. |
| New client, auto-approve off | The request waits for your approval in Clients. You get a notification. |
| Your client list already has a client with the same email | The account is linked to the existing record, without waiting. |
| The client is already yours or has already sent a request through the website or the app | Nothing changes. You still approve a pending request in Clients. |
The section appears only once you've saved anonymous bookings as turned off. If you turn them back on, the section disappears, because anyone can book then anyway.
The two QR codes at a glance
| Booking QR code | Client verification QR | |
|---|---|---|
| Who it's for | Everyone, anywhere | Clients at your business |
| What scans it | The phone camera | The Appointa app or the camera |
| What it does | Opens the public page | Makes the client your verified client |
| When it's visible | Always | Only when anonymous bookings are turned off |
| Validity | Permanent | 30 days |
A5 booking flyer
The “Book online” flyer with the QR code of your booking page is ready for printing in A5 format. It's meant for everyone: a client scans the code with their phone camera and books.
- On the Sharing & app tab, below the booking QR code, click Print A5 booking flyer.
- A preview of the flyer opens. Check the name, logo and contact details.
- Click Print A5 flyer. The browser's print dialog opens.
- In the dialog, choose the A5 paper size and turn off margins.
- Print the flyer and put it on the counter or in the window.
The Back button takes you back to the Sharing & app tab. The Print the flyer guide shows the same path in the app.
The flyer shows your logo and business name in your brand color, the heading Book online, three steps (Scan, Choose, Book), the QR code and the address, phone and email from your business settings.
A5 flyer for the front desk
A flyer with the client verification QR code is ready for printing in A5 format.
- On the Sharing & app tab, in the Client verification QR section, click Print A5 flyer.
- A preview of the flyer opens. Check the name, logo and contact details.
- Click Print A5 flyer. The browser's print dialog opens.
- In the dialog, choose the A5 paper size and turn off margins.
- Print the flyer and stick it up at the front desk or on the counter.
The Back button takes you back to the Sharing & app tab.
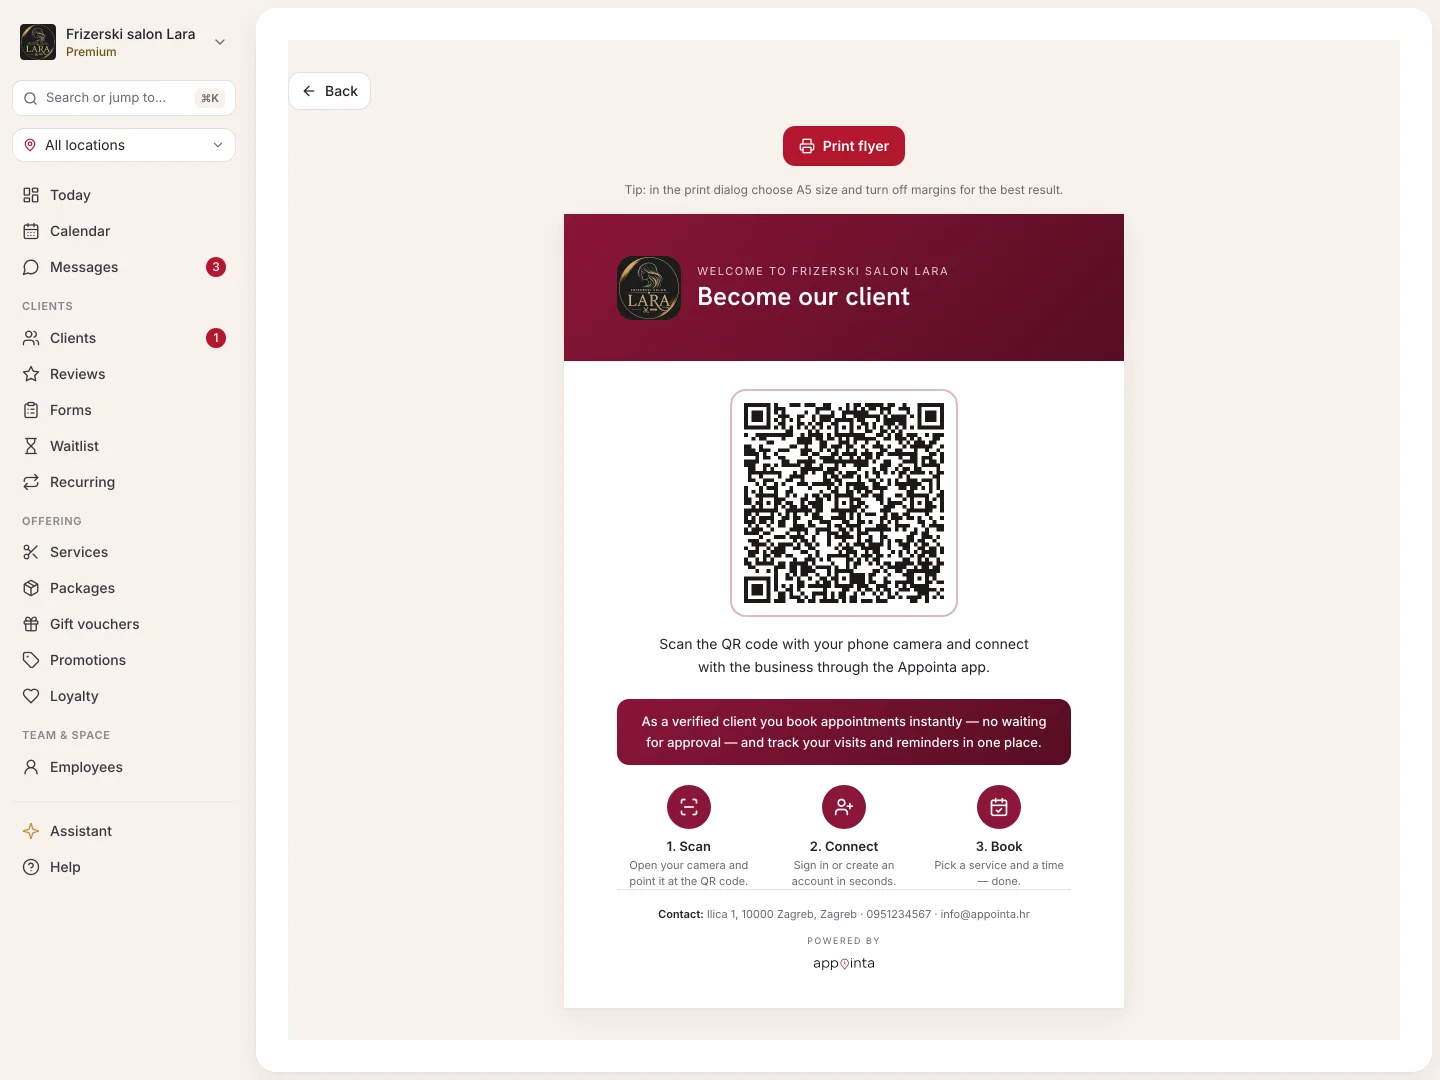
The flyer shows your logo and business name in your brand color, the heading Become our client, a short explanation of the benefits of being a verified client, three steps (Scan, Connect, Book), the QR code and the address, phone and email from your business settings. Background colors print even when background printing is turned off in the browser.
Activating the Appointa Pro app
Near the bottom of the same tab is the Mobile app activation section with the For you badge. This QR code isn't for clients: you and your team use it to connect the Appointa Pro app to your business. You create the code with the Generate QR button, it's valid for 5 minutes, and instead of scanning it you can also type in the code shown. The procedure is described in Appointa Pro.
The Appointa app for clients
The last section of the tab, The Appointa app for your clients, has App Store and Google Play links you can send to clients. In the app they add you by scanning your booking QR code or searching by name, then book, cancel, message you and get reminders. See The Appointa app for clients.
Frequently asked questions
Can I change the address of my page?
No. The identifier in the address is locked after your business is set up, so that shared links and printed QR codes always work.
I can't see the Client verification QR section. Why?
The section only appears when anonymous bookings are turned off and that change has been saved. Check the Bookings tab and click Save changes.
Does a client need the app to book through the QR code?
Not for the booking QR code: the page opens in the browser. The Client verification QR does require the Appointa app, because that's where the client connects with your business.
A client scanned the verification QR but is still waiting for approval. Why?
There are two possible reasons. Either Auto-approve on scan is turned off on the Bookings tab, or the client sent a request through the website or the app before scanning the code, so scanning doesn't change that request. In both cases, approve the client in Clients, in the Client requests list.