Business setup
The wizard step by step: identity, contact, working hours, services and staff, the default booking rules, then launching your public booking page.

Before your first online booking, Appointa takes you through a short wizard that sets up your business and publishes your public booking page. It has five steps and a final review, and takes about five minutes. This page describes every field, what's required, what you can change later and where, and what you get on screen after you launch.
Before you start
- You need a confirmed Appointa account, see Signing up and signing in.
- Have ready your business name, your logo (if you have one), your opening hours for each day, a list of services with their duration and price, and the work schedule of the person who takes appointments.
- Nothing has to be perfect. You can change almost everything later in the admin area, and your progress is saved after every step, so you can stop and carry on another time.
The first choice: demo or a real business
After you sign in for the first time, the Welcome to Appointa screen opens with two cards:
- Explore the demo: a ready-made trial business for the industry you choose, for trying things out without entering any data. See Demo business.
- Set up your business: starts the wizard described on this page.
Click Set up your business. You can still open the demo later.
How the wizard works
At the top there's a bar with the step numbers: the current step is highlighted and completed steps get a green tick. Below the bar you can see how much is done and roughly how long is left (for example “50% done — ~3 min left”), and on a wider screen also the step number, for example “Step 4 / 5”. The first time you open it, you also see the Welcome! Let's set up your business box.
| Button | What it does |
|---|---|
| Next | Saves the step and takes you to the next one. On the last step (Staff) it takes you to the review. |
| Back | Takes you to the previous step without saving the current one. The first step doesn't have it. |
If you close the browser partway through, you'll see the first choice again the next time you sign in. Click Set up your business and the wizard opens on the first unfinished step, with the details you already entered.
Step 1 — Identity
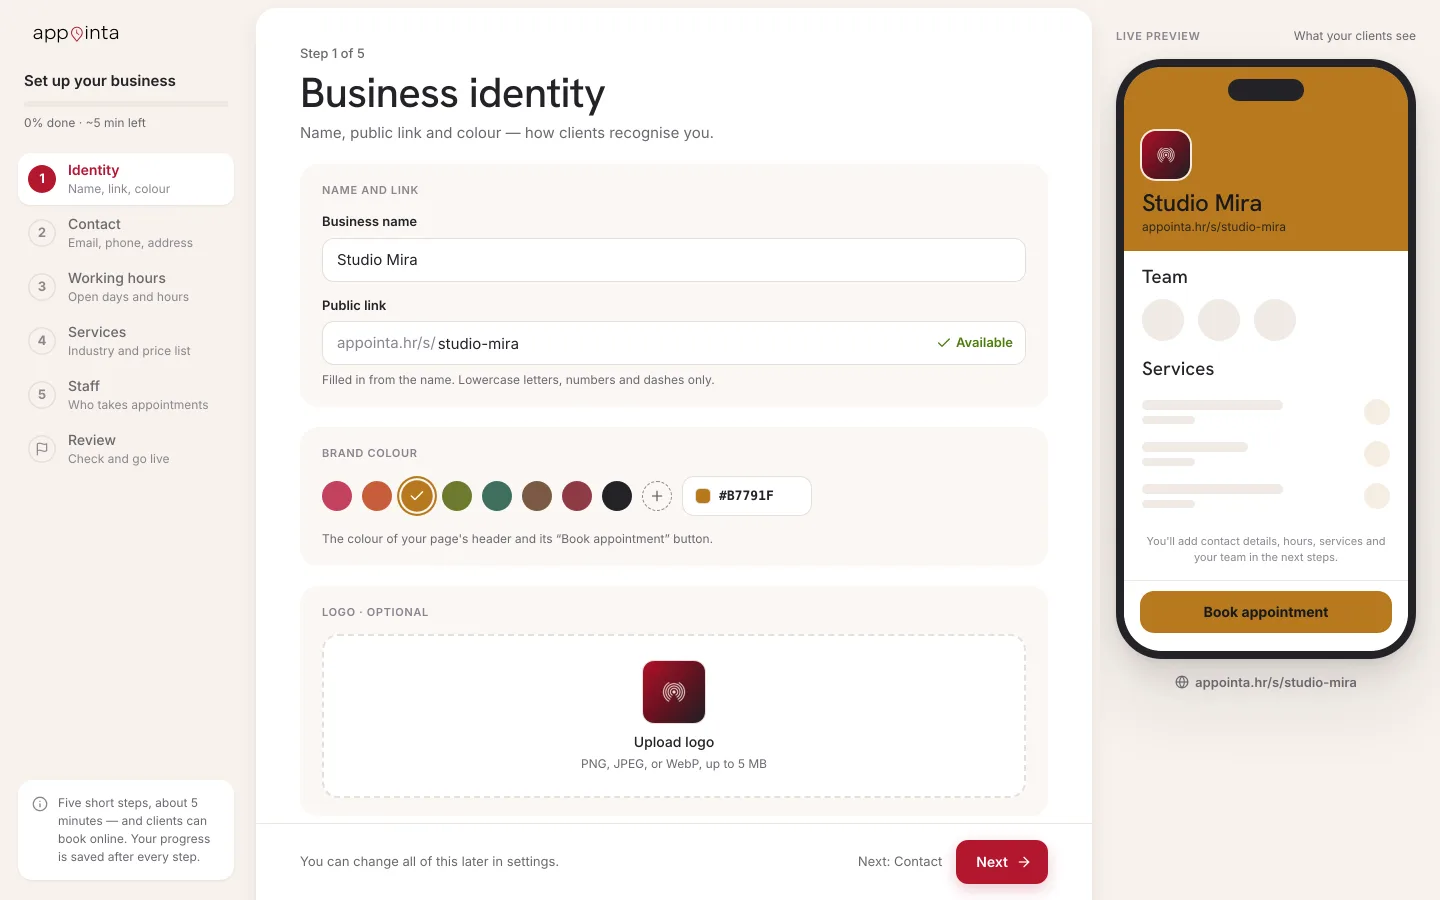
The step is headed Business identity. On the right (on a phone, above the fields), Live preview shows what your business card will look like as you type.
| Field | Required | What you enter |
|---|---|---|
| Business name | Yes | The name clients see, for example “Studio Mira”. |
| Public link (slug) | Yes | The last part of your public page's address: appointa.hr/s/studio-mira. Lowercase letters, numbers and dashes only. |
| Primary color | Yes | Your brand color on the public page. Pick one of the eight on offer, click + for any other color, or type a hex code (for example #C2410C). |
| Logo (optional) | No | The Upload logo button: PNG, JPEG or WebP, up to 5 MB. |
The public link is suggested automatically from the name (letters with diacritics are converted: “Čarolija” becomes “carolija”) until you change it by hand. Availability is checked as you type: a tick means Available, and a cross means the address is taken or invalid. When it's taken, variants ending in -plus, -pro or -hr are offered under Try:. Click one to use it. The Next button only becomes active when all required fields are valid and the address is free.
Step 2 — Contact
Business contact details are shown to clients on your public page. All the fields are optional.
| Field | Note |
|---|---|
| The format of the address is checked (for example [email protected]). | |
| Phone | The format of the number is checked (for example +385 91 234 5678). |
| Street and number, City, Postal code, Country | Your business address. |
You can leave this step empty and click Next. It doesn't block launching. An empty contact stays marked as not set in the review.
Step 3 — Working hours
For each day from Monday to Sunday, use the switch to set whether the business is open, and enter the opening and closing times. A day that's switched off shows Closed.
- The default is Monday–Saturday 09:00–17:00, with Sunday closed.
- Copy to all days copies the times of the first open day to all the other open days. Closed days stay closed.
- Closing must be after opening, otherwise the step shows Closing must be after opening.
These hours are the frame within which appointments are offered: staff shifts have to fit inside them. You don't enter breaks here, but in the staff shifts (step 5).
Step 4 — Services
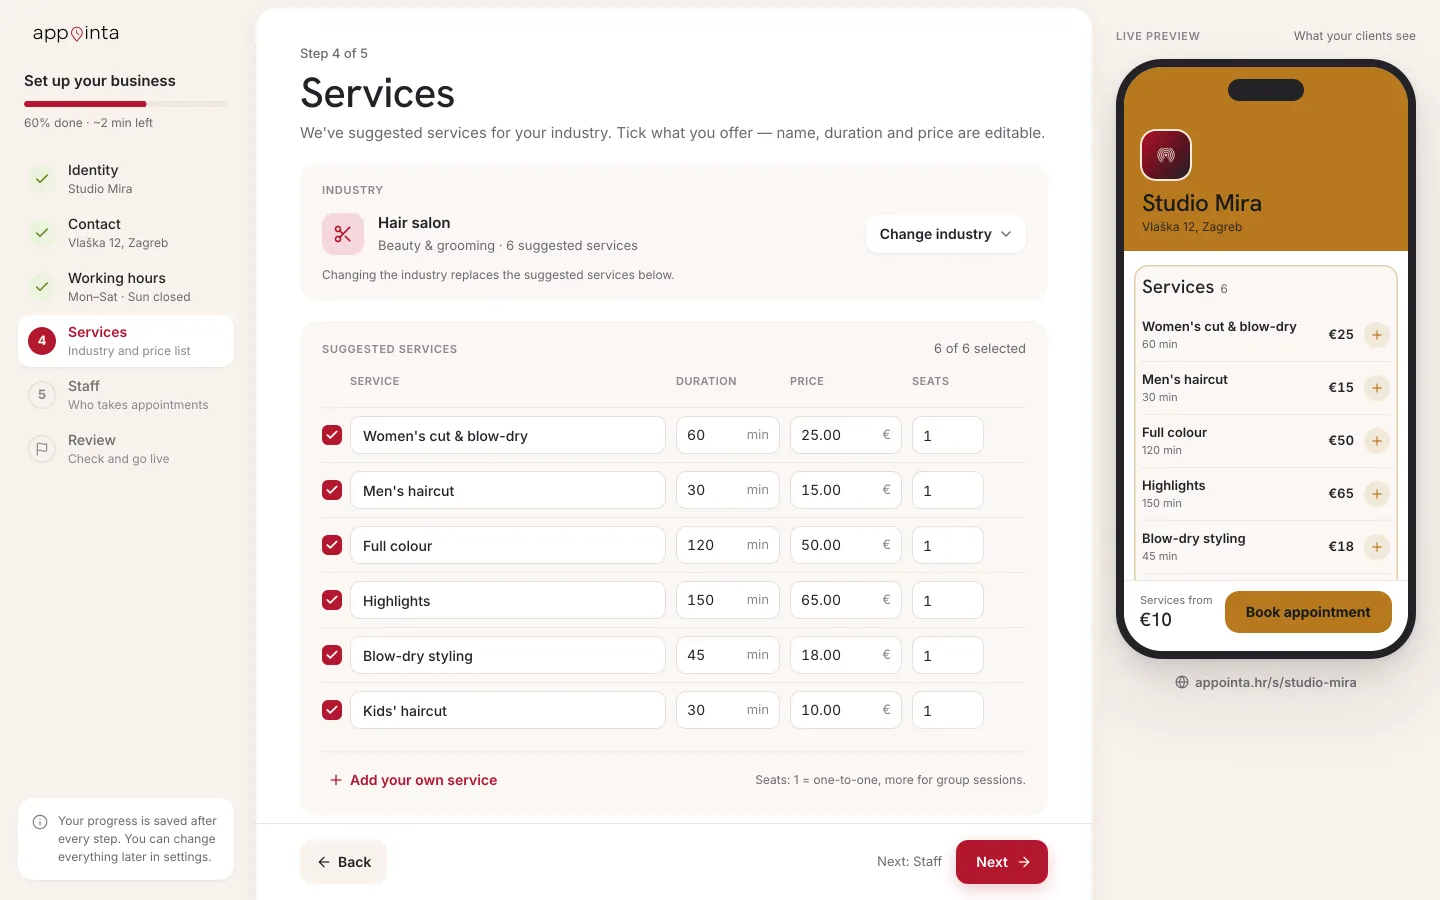
- Under Choose your line of work, click a group (Beauty & grooming, Health & therapy, Fitness & sport, Auto & services) and then your industry. For something that isn't listed, choose Other.
- A list of suggested services for that industry appears, all of them ticked. Untick the ones you don't offer.
- For each ticked service, edit the name, Time (min), Price (EUR) and Seats as needed.
- Use + Add service to add services that aren't on the list, and Remove to take them off.
- Click Next.
| Column | What it means |
|---|---|
| Time (min) | The length of the appointment, from 1 to 1440 minutes. The grid of free slots depends on it, so include time for preparation. |
| Price (EUR) | The price of the service, a number greater than or equal to 0. |
| Seats | How many people can attend one appointment at the same time. 1 = one to one; more for group classes and courses. Suggested group services (for example a group yoga or Pilates class) come with 20 seats. |
Choosing an industry is required, and so is at least one service. If you change the industry, the list of suggested services is replaced with a new one, while the services you added yourself stay. Other has no suggested services: it shows No suggested services — add your own below., so you add services with + Add service.
| Message | Cause |
|---|---|
| Choose your line of work. | No industry has been chosen. |
| Pick at least one service. | Everything is unticked and you haven't added any of your own. |
| Name is required. | A service has no name. |
| Price must be a number ≥ 0. | The price is empty or invalid. |
| Duration must be greater than 0. | The duration is 0. |
You set a service's color, required resource, price display and other options later in Services, see Services and price list.
Step 5 — Staff
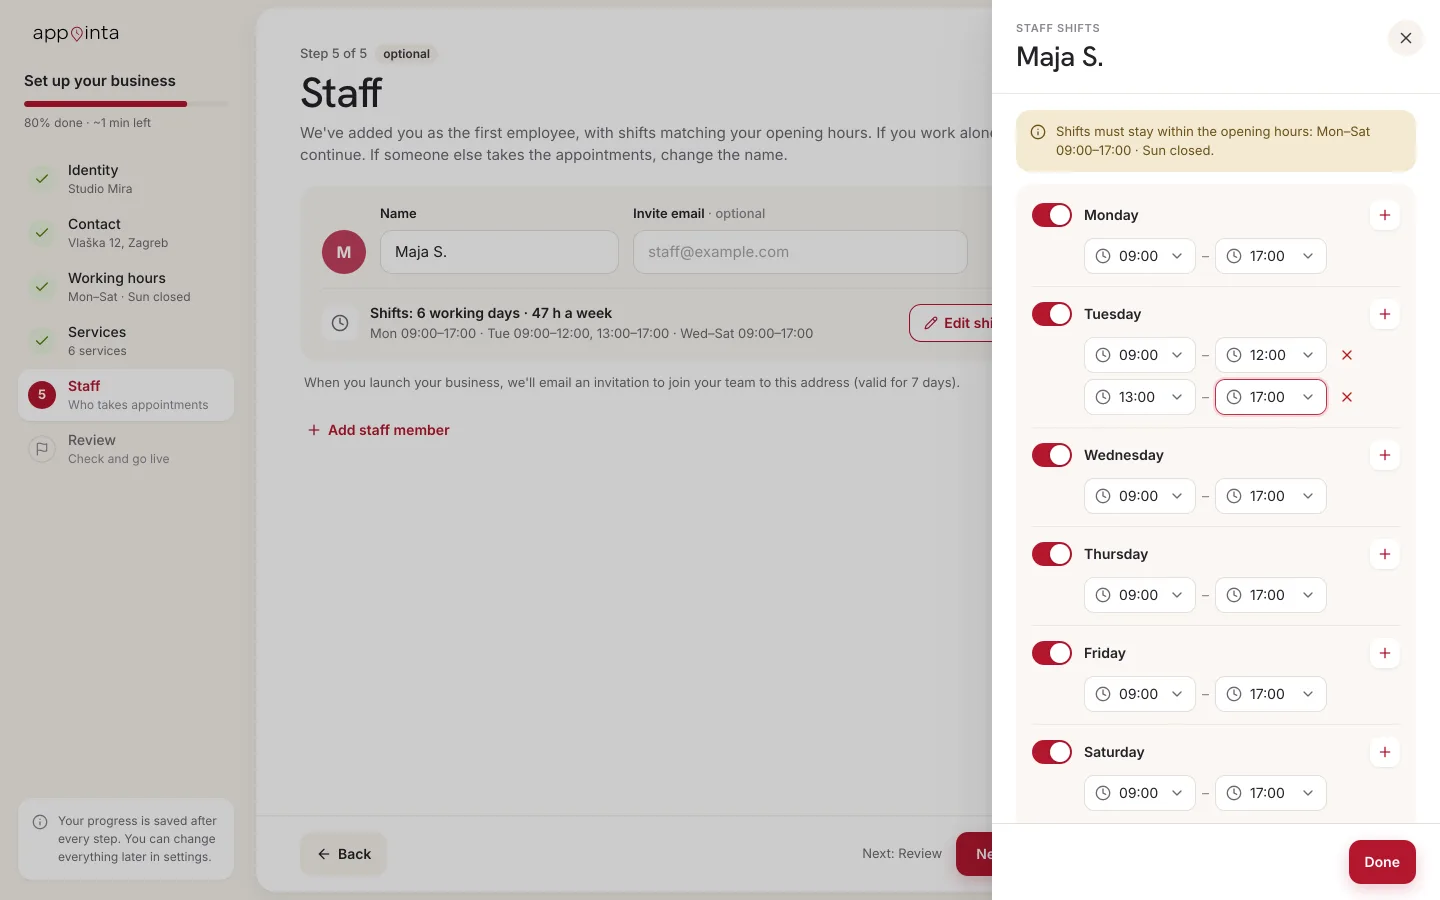
Here you add the person clients can book. While no staff is saved yet, the wizard adds you (the name on your account) as the first staff member, with shifts that match the working hours from step 3. If you work on your own, just click Next.
If someone else takes the appointments:
- Enter their name in the Name field (for example “Maja S.”). This is how clients see them when booking. The avatar color is assigned automatically. If there's no row, click + Add staff member.
- Click Shift. A panel with the days of the week opens on the right: a new staff member gets shifts that match the working hours from step 3.
- For each day, use the Works switch to set whether they work that day, and enter the start and end times. For a break, click + Add interval and split the day into two parts (for example 09:00–12:00 and 13:00–17:00); remove extra ones with Remove interval. A day without work shows Day off.
- Close the panel with Close and click Next.
On the Starter plan, which every new business starts on, you add one staff member in the wizard. You add the rest after launching, with the Pro or Premium plan, see Employees and Starter, Pro and Premium plans.
| Message | Cause |
|---|---|
| Name is required. | An Invite email has been entered but no name. (A row with neither a name nor an email simply isn't saved.) |
| Invalid email. | The Invite email isn't in a valid format. |
| Each staff member needs at least one working day. | All days are switched off. |
| Shift end must be after its start. | An interval ends before it starts. |
| Shift starts before the business opens. / Shift ends after the business closes. | The shift goes outside the working hours from step 3. |
| The business is closed that day. | A shift on a day that's closed in step 3. |
The step is optional: to carry on without staff, remove the row with the bin icon and click Next. You then add staff later from Employees in the menu.
Booking rules: the defaults
Booking rules aren't a wizard step: your business starts with the values in the table. You change them when you need to in Settings → Bookings, see Booking rules. The Booking rules guide in the First steps card on the dashboard shows you where they are.
| Setting | Default | What it controls |
|---|---|---|
| How far ahead clients can book | 30 days | The latest date a client can choose. An empty field = no limit. |
| Earliest online booking (h) | 1 h | How many hours before the start a client can still book. 0 = right up to the start of the appointment. |
| Max active bookings | 3 | How many upcoming appointments one client may have. Empty = no limit. |
| Direct booking | On | On: a free slot is confirmed straight away. Off: every request waits for your confirmation. |
| Anonymous bookings | Off | On: anyone can book without an account. Off: the client first signs in and becomes a client of the business, and you approve them. |
| Auto-approve on scan | On | On: a client who scans your business's QR code becomes your client straight away. Sign-ups through the web or the app always wait for your approval. |
Review and launch
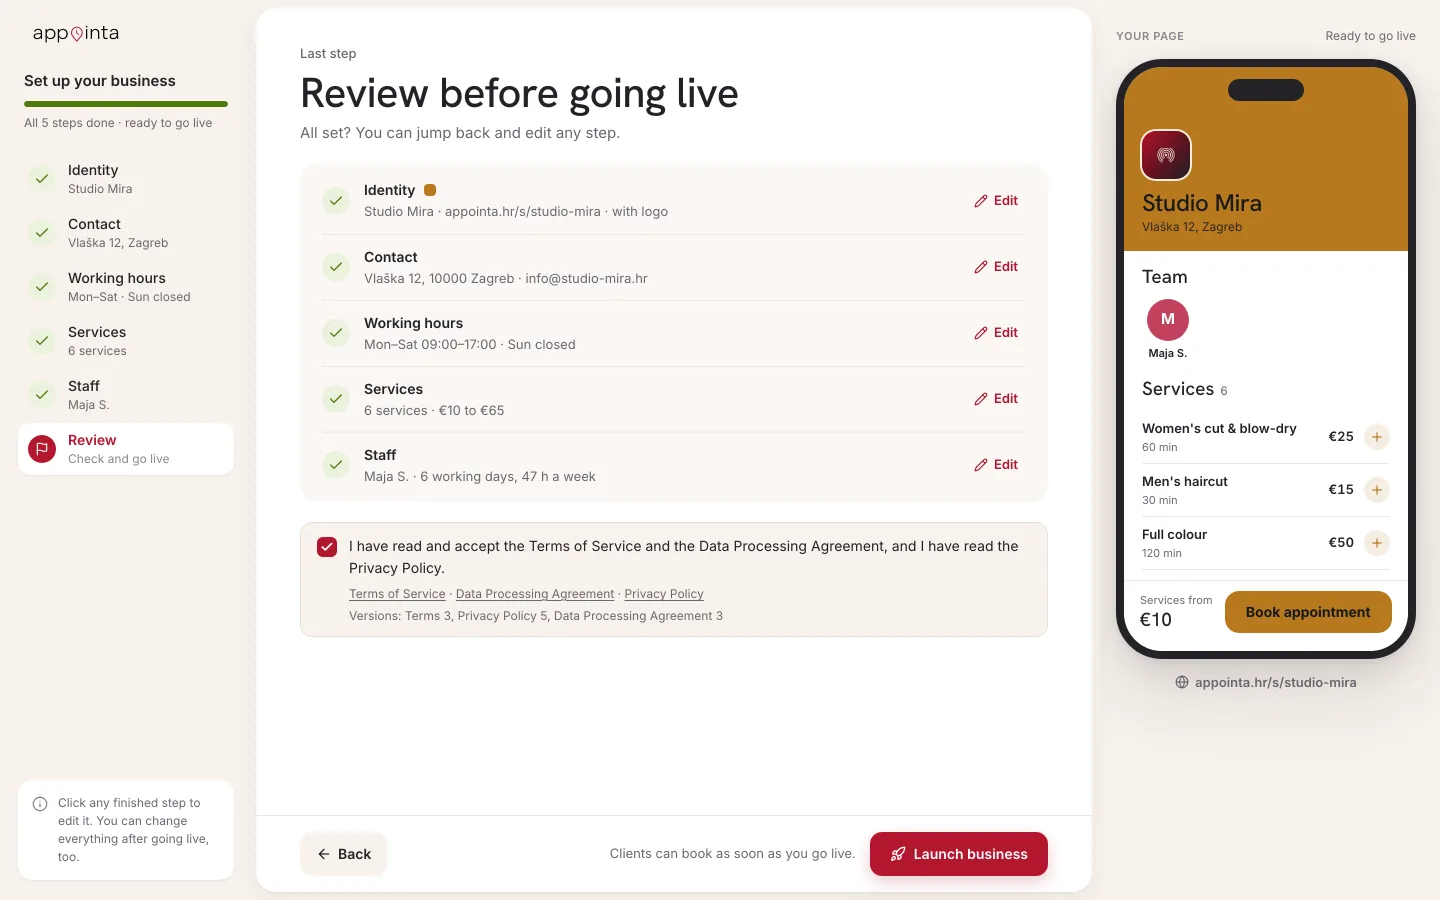
The Review before going live screen lists all five steps. A green tick means a step is set up, and a cross means it isn't. The Edit button next to each step takes you back to it.
- Check the list. Identity, Working hours and Services are required; Contact and Staff are not.
- If there are no staff, you'll see a warning that without staff with shifts, clients won't see a single free slot, and an Add employees shortcut.
- Tick the checkbox to confirm that you accept the Terms of Service and the Data Processing Agreement, that you have read the Privacy Policy, and that you're authorised to represent the business. All three documents open in a new tab.
- Click Launch business. The button only becomes active once the checkbox is ticked.
| Message | What to do |
|---|---|
| Some required steps are missing: … | Click Edit next to the step named and save it. |
| The legal documents changed in the meantime… | Reload the page, review the documents and tick the checkbox again. |
On launch, the staff member from the wizard is automatically linked to all services, so appointments are available straight away. You set who performs which service later in Employees.
The “Your business is live!” screen
After you launch, your business is active and your public page is available to clients. The success screen is short: confetti falls from the top, and below the Your business is live! heading it says Clients can already book online. Then you choose:
| Button | What it does |
|---|---|
| Show me Appointa (the Take the tour card) | Opens the dashboard and starts the Get to know Appointa guide: menu, account, help, guides and the assistant. |
| Go to dashboard | Takes you into the admin area without a guide. |
Everything else you need after launch waits on the dashboard, in the First steps card, as interactive guides in this order:
- Get to know Appointa — finding your way around the admin area.
- Connect Appointa Pro — the business app on your phone, signing in by scanning a QR code.
- The client app — what clients do in the Appointa app and how they find you there.
- Share your booking link — the public link, QR code and the embed code for your website.
- Print the flyer — an A5 flyer with the QR code for your desk or window.
- Protect your account (2FA) — two-factor sign-in.
- Booking rules — how far ahead and until when clients book and cancel.
A finished guide gets a tick, and the card disappears once you've done them all or hide it. All guides are also in the Guides menu item.
A welcome email also arrives at your address, with links to your public page and to the admin area.
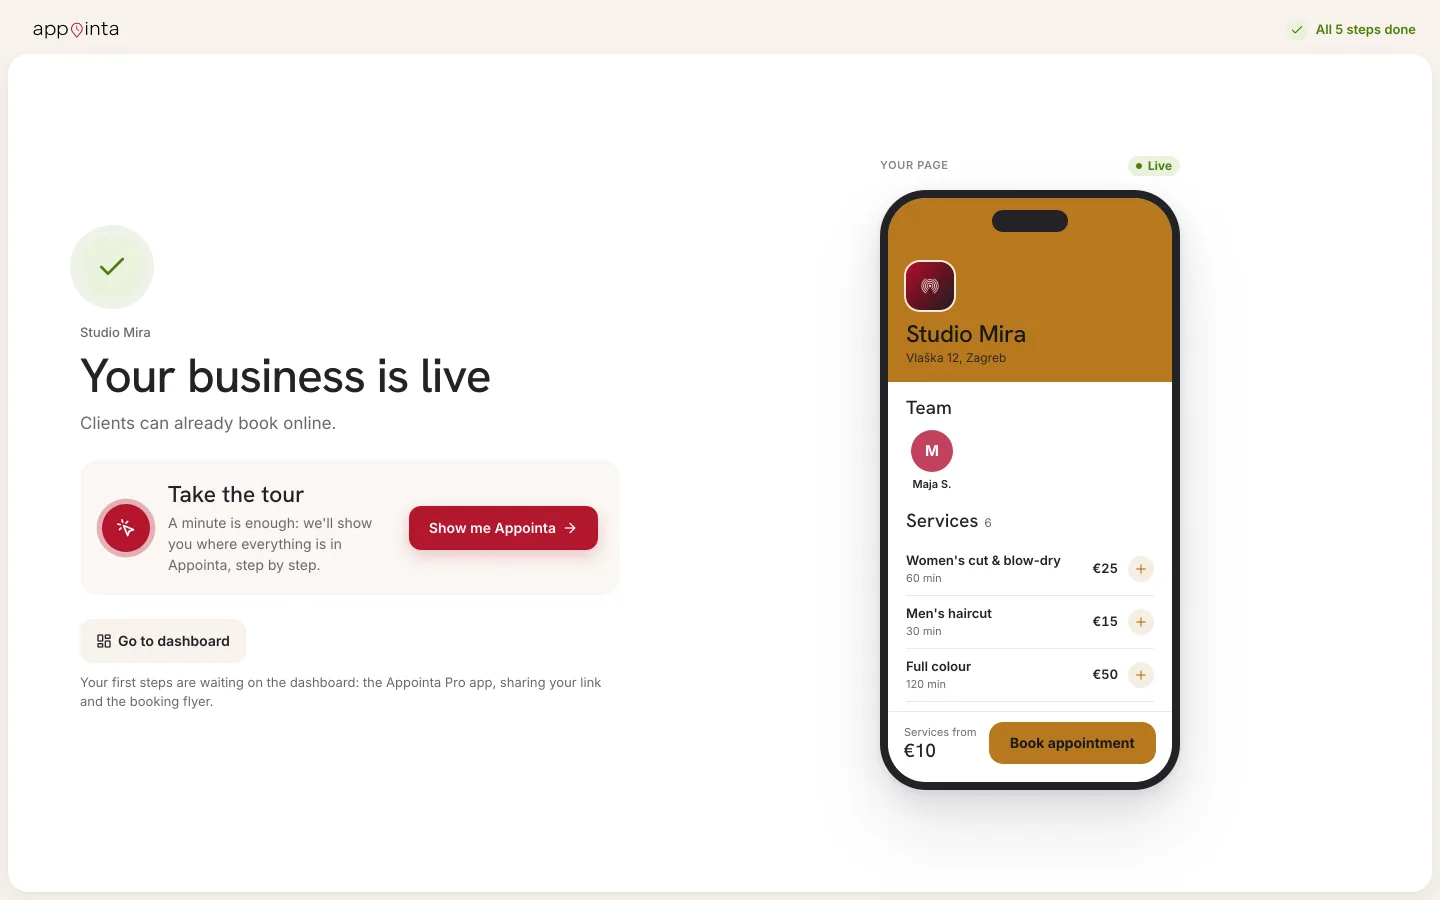
You go through the wizard only once per business. Next time you sign in, you go straight into the admin area.
What you change later, and where
| What | Where |
|---|---|
| Name, contact details, address, color and logo | Settings → Business, see Business settings |
| Public link (slug) | Can't be changed after launch. |
| Opening hours per day | Locations → the location card (by default it's named “Glavna lokacija”) → Working hours, see Locations |
| Closures and holidays | Settings → Availability |
| Services and prices | Services, see Services and price list |
| Staff, shifts and who performs which service | Employees, see Working hours and time off |
| Booking rules | Settings → Bookings |
| Public link, QR codes, embed code, A5 flyer, Appointa Pro activation and the client app | Settings → Sharing & app, see Sharing and the QR code |
| Two-factor sign-in | Settings → Security, see Security and two-factor sign-in |
A video for every step
Each step has a short video in Croatian (the First steps playlist):
- The first screen — demo or a real business
- Step 1 — name, link, color, logo
- Step 2 — contact details
- Step 3 — working hours
- Step 4 — price list
- Step 5 — team and shifts
- Booking rules — decisions you make deliberately
- Going live and the first booking
All the playlists are on the Video guides page.
Frequently asked questions
Do I have to fill in everything straight away?
No. To launch, only the identity, the working hours and at least one service are required. You add the rest later, and the wizard remembers your progress after every step.
Can I change the public link later?
No. After launch the public link stays the same, so that every shared link and QR code keeps working. Choose it carefully in the first step.
Why can I only add one staff member in the wizard?
A new business starts on the Starter plan, which includes one staff member. After launching, you can move to Pro or Premium (and buy extra seats if needed) and add the others in Employees.
Clients can't see a single free slot. Why?
Most often because the business has no staff with shifts, or the shifts are outside the working hours. Check Employees and the location's working hours.
Is anything carried over from the demo business?
No. You set up your real business from scratch, and the demo is deleted automatically when you launch your real business, see Demo business.