Public business page
What clients see on your public page, how they book an appointment step by step, how they sign in and how they cancel an appointment themselves.
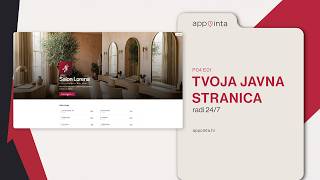
Your public page is where clients get to know your business and book an appointment, 24 hours a day, without calling and without installing an app. This page shows you exactly what the client sees, the four steps they go through when booking, how they sign in, how the members-only mode works and how they cancel an appointment themselves.
Before you start
- Your public page becomes available once you complete the business setup and launch your business. Until then, the page address reports that the page doesn't exist.
- The public page has no separate editor. Everything on it comes from data you already manage in the app: Settings (name, logo, color, contact details, address), Services, Employees, Gallery and Reviews.
- How booking works (how far ahead, whether your confirmation is needed, who is allowed to book) is set by the Booking rules.
Public page address
The address looks like appointa.hr/s/<slug>. The slug is the short identifier you chose for your business during setup. It can't be changed afterwards, so links you've shared and QR codes you've printed always stay valid. You'll find the exact address, with a Copy button, under Settings → Sharing & app (see Sharing and the QR code).
The page is in Croatian. The same page with an English interface opens at appointa.hr/en/s/<slug>. Service names and your other texts stay exactly as you entered them.
What clients see
The page is styled in your brand color: buttons, highlights and the booking bar take the color from your settings.
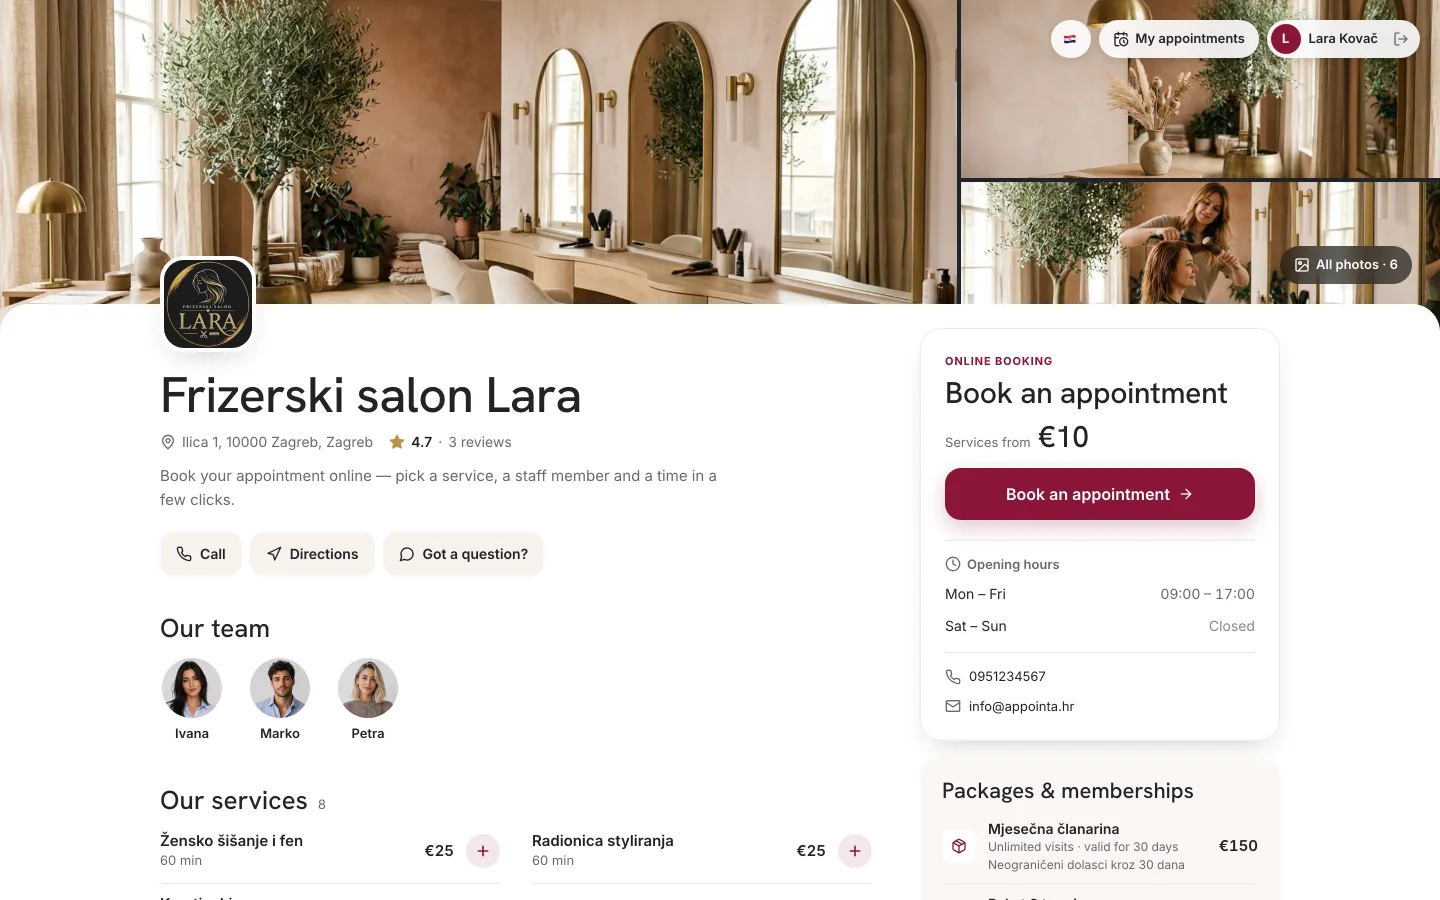
| Part of the page | What it shows | Where it comes from |
|---|---|---|
| Header | A full-width cover photo, logo, name, address, average rating and the Book an appointment button | Gallery, Business settings, Reviews |
| Our services | All active services with their duration and price or a price note. Clicking a service opens booking with that service already selected | Services |
| Packages & memberships | An informational list of packages with the number of visits, validity period and price, plus a note that they are bought at the business | Packages and memberships |
| Our team | Staff cards with a photo or initial. Clicking one opens booking with that staff member | Employees |
| Gallery | Photos in the order you set. Clicking one opens a full-screen viewer | Gallery |
| Opening hours | Opening times by day, or the Closed label | The working hours of your main location |
| Contact | Phone, email and address | Business settings |
| Appointa app | Links to download the client app | — |
| Privacy notice | That your business is the data controller, with a link to the privacy policy | — |
A few display rules:
- Without a cover photo, the header is filled with your brand color. Without a logo, the first letter of your business name is shown.
- The average rating appears only once you publish at least one review.
- The Packages & memberships, Our team, Gallery and Contact sections are hidden when they have no content. The Packages & memberships section is only available to businesses on the Premium plan.
- On a phone, as soon as the client scrolls past the header, a bar with the Book an appointment button appears at the bottom of the screen, so booking is always within thumb's reach.
- In the top right there is a Log in button. A signed-in client sees their name there, a Log out button and a My appointments link.
Booking step by step
The client starts booking with the Book an appointment button, by clicking a service or by clicking a staff member. Booking has four steps, numbered at the top. At the bottom are the Back and Next buttons and a summary bar with the selected service and its duration, the date and the time.
- What service are you looking for? The client picks one service. If your business has two or more active locations, they also choose a Location above the list. If they came from a staff card, services that staff member doesn't do are greyed out with the label Doesn't offer this service.
- Choose a staff member. The client picks Any staff member or a specific person. Staff who don't do the selected service are visible but can't be selected. With Any staff member, the system assigns an available staff member, giving priority to the client's preferred staff member if they're free at that time.
- Choose date and time. The client picks a day in the calendar. Past days and days beyond the allowed period aren't available. For the selected day, times are grouped into Morning (before 12:00), Afternoon (12:00–17:00) and Evening (from 17:00), always in your business's time zone. Taken times stay visible but are struck through. For group services the occupancy is shown next to the time, e.g. 4/20, unless you've turned off occupancy display for that service.
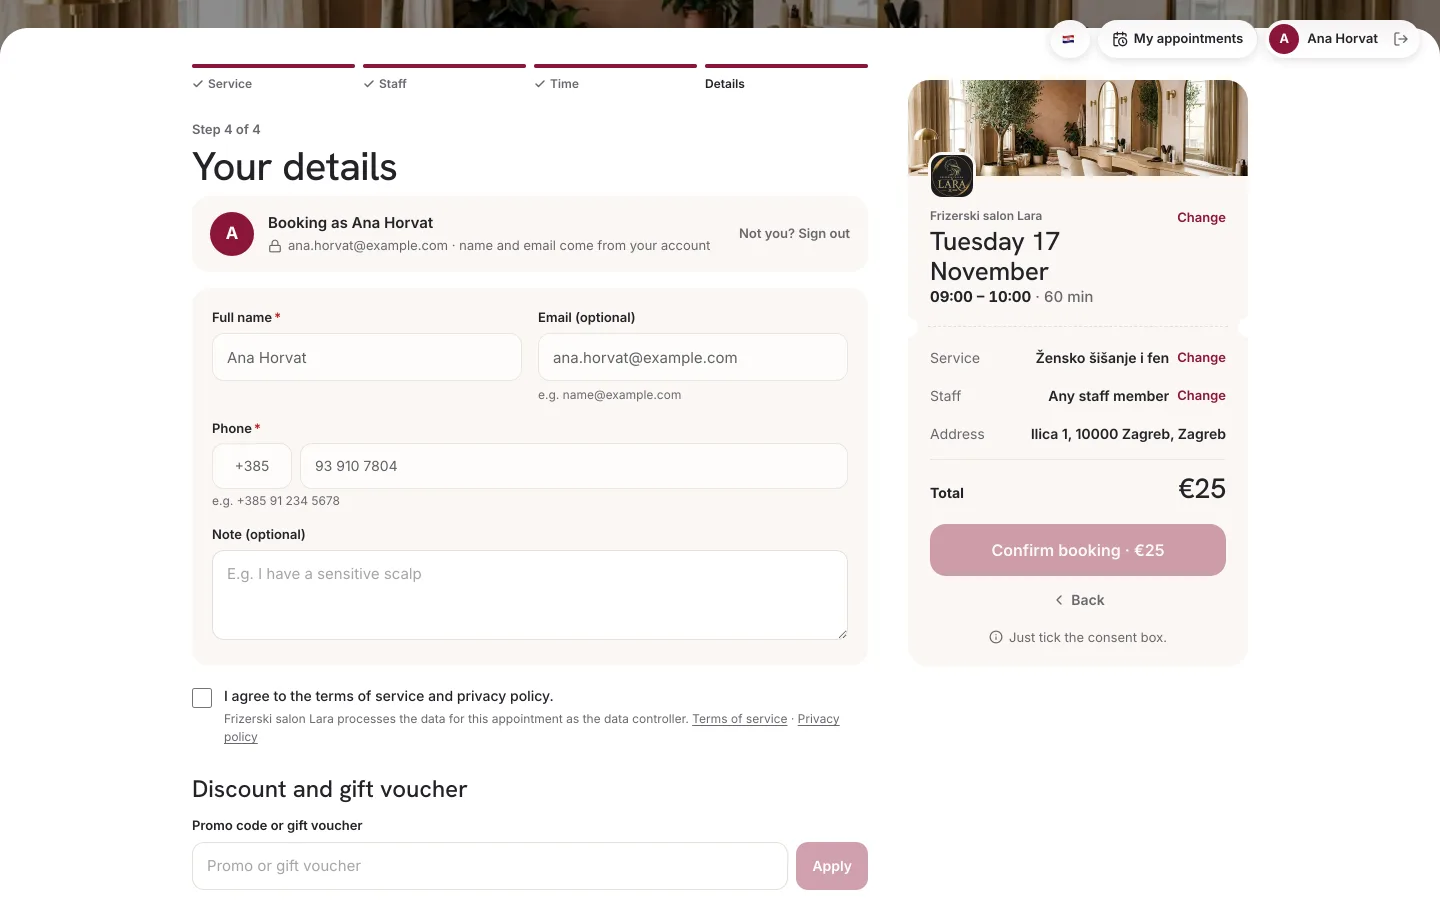
- Your details. The client enters their contact details and, optionally, a code, and clicks Confirm booking.
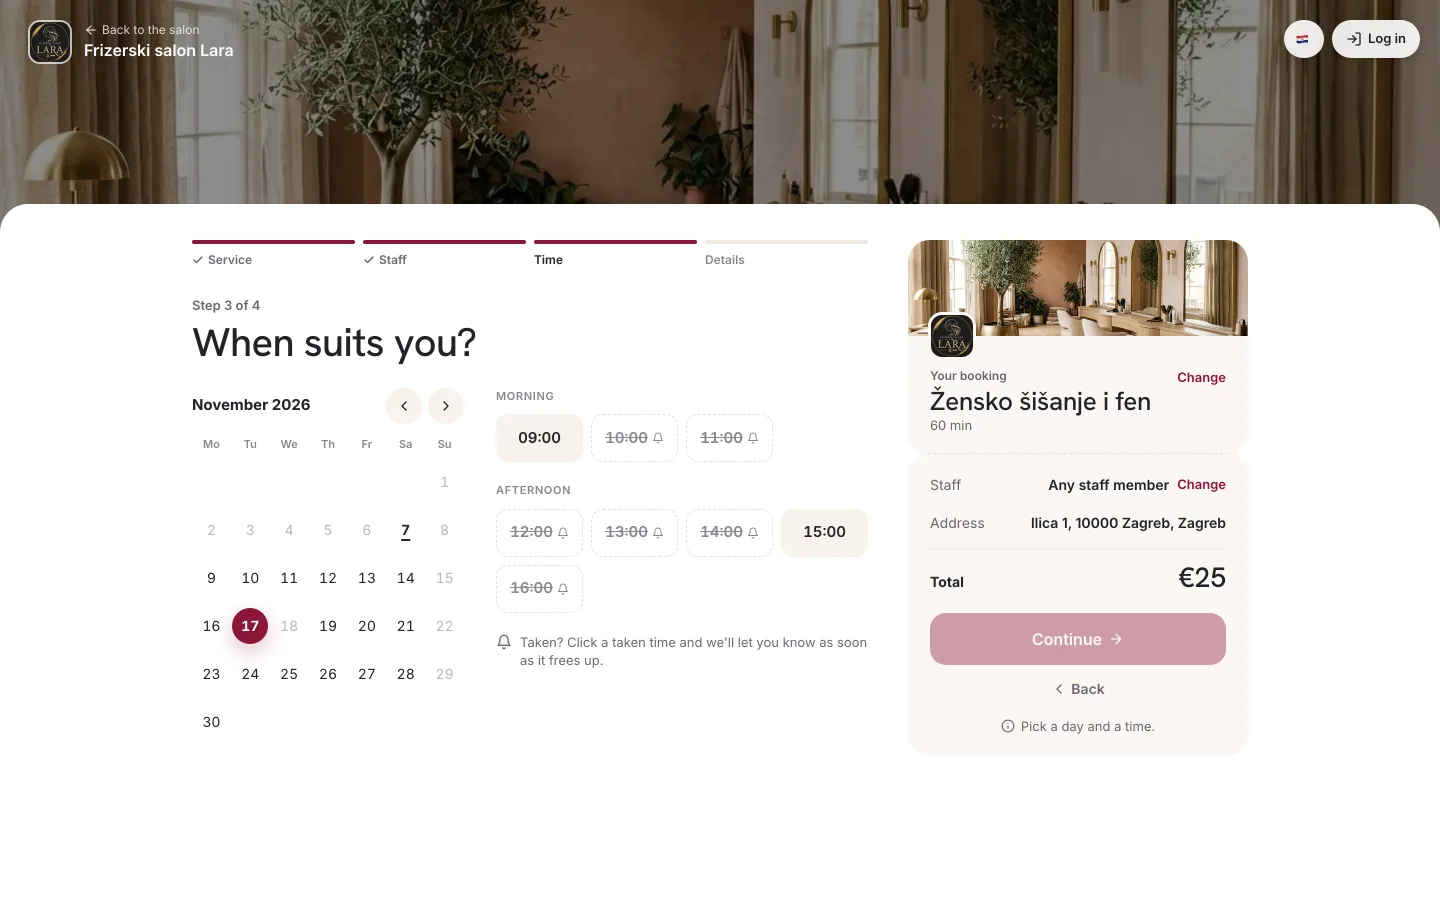
If there are no available times on the selected day, the message No available time slots for the selected date. appears. How the offered times are generated and what limits them is explained in How offered times are generated.
Fields in the fourth step
| Field | Required | Note |
|---|---|---|
| Full name | yes | |
| Phone | yes | Must be a valid number. |
| Email (optional) | no | If entered, it must be valid. Notifications for clients who don't use the app are sent to it. |
| Note (optional) | no | You see it in the appointment details as Client note. |
| Consent | yes | A checkbox next to the text “I agree to the terms of service and privacy policy.” Below it, a line says that your business processes the appointment data as the data controller. |
| Have a code? | no | A promo code or gift voucher code, applied with the Apply button. |
For a signed-in client, the details are filled in from their account. Above the fields it says “Booking as … — details come from your account.”, and fields the account already has a value for are locked.
The Have a code? field takes one code. The system recognises on its own whether it's a promo code or a gift voucher. A valid promo code shows a breakdown of Price, Discount and Total, and an accepted voucher shows the message Gift voucher accepted. The field isn't shown for a service with a hidden price.
A signed-in client with a package for the chosen service on the day of the appointment sees a line “From package … · visits left: …” instead of the Have a code? field — the appointment isn't charged. A package-only service is labelled Package only in the list; for it, the client has to sign in at the fourth step, and without a valid package they can't confirm the booking.
When a booking doesn't go through
| Message to the client | Why it appears |
|---|---|
| The selected time slot is no longer available. Please choose another. | Someone else booked the same time in the meantime. |
| That time is too soon… | The appointment starts before the earliest online booking limit. |
| You've reached the maximum number of active bookings at this salon… | The client has reached the max active bookings. |
| Online booking isn't available right now. Please call the salon. | The client is blocked because of no-shows. |
| This business has reached its monthly booking quota… | A business on the Starter plan has used up its 30 appointments for the month. |
| You can book this service only with a valid package… | The service is package only, and the client has no package valid on the day of the appointment. |
If your business has a waitlist (Premium plan), the client can click a struck-through time, or the Join the waitlist button when the day has no available times. They must be signed in to join the waitlist, and the system notifies them when a slot opens up.
Confirmation screen
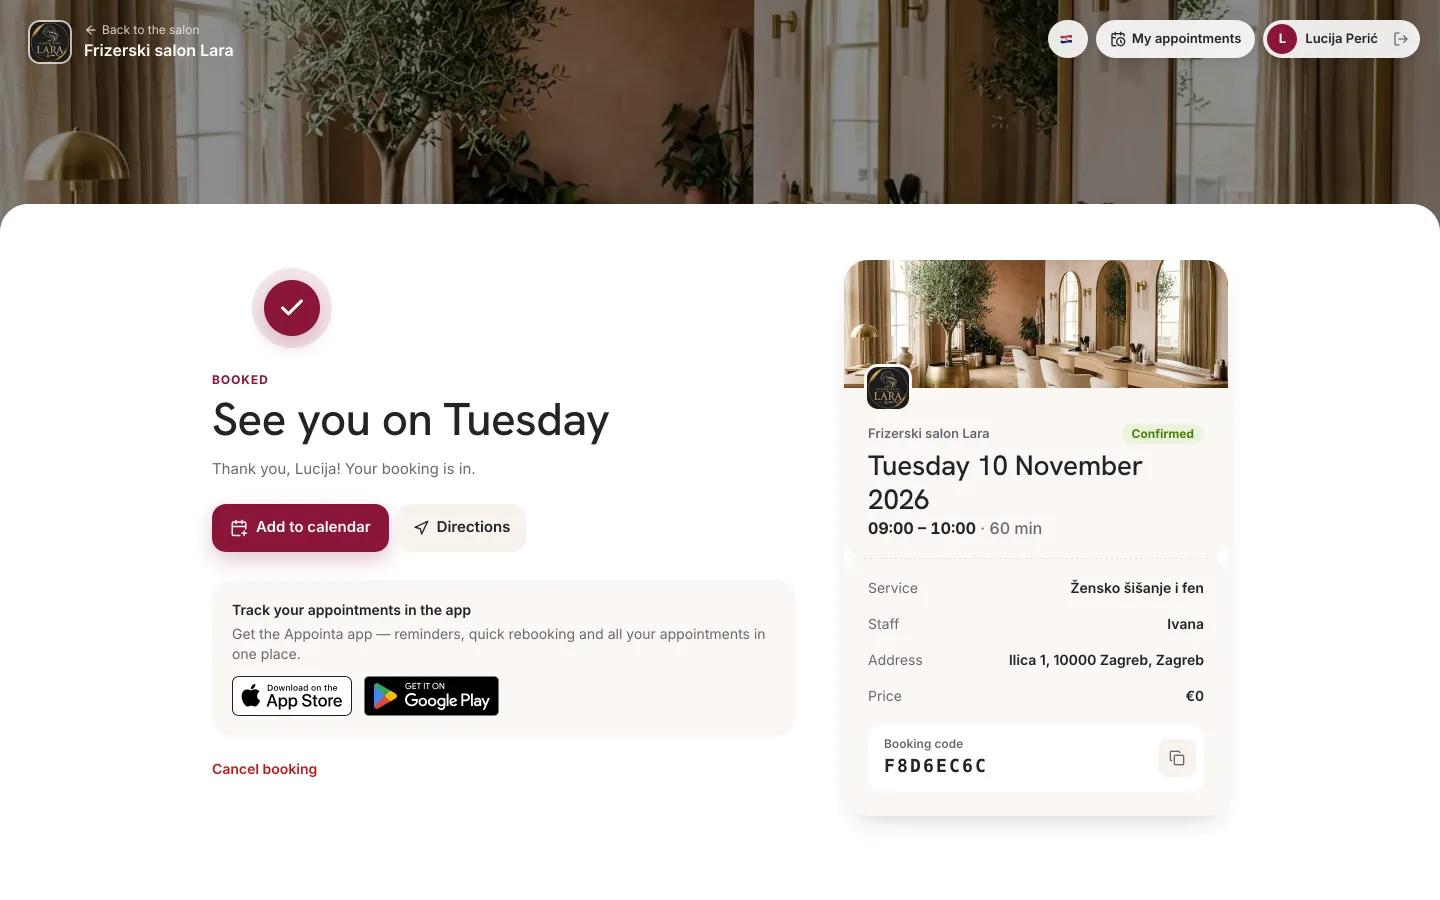
After clicking Confirm booking, the client sees one of two headings:
- Appointment booked! when direct booking is turned on. The appointment is confirmed straight away.
- Request sent! when direct booking is turned off. Below it, the client reads that the business still needs to confirm the appointment and that the request expires if the business doesn't confirm it within 24 hours.
Below the heading is a summary: Service, Staff, the assigned resource if the service requires one (e.g. Room — Room 1), Date, Time, Price and Booking code. Then comes a block for downloading the Appointa app and three actions:
- Add to calendar downloads an appointment file (.ics) that the client opens in Google, Apple or Outlook Calendar.
- A button with your business name takes them back to the public page.
- Cancel booking opens the page for cancelling that appointment.
Client sign-in
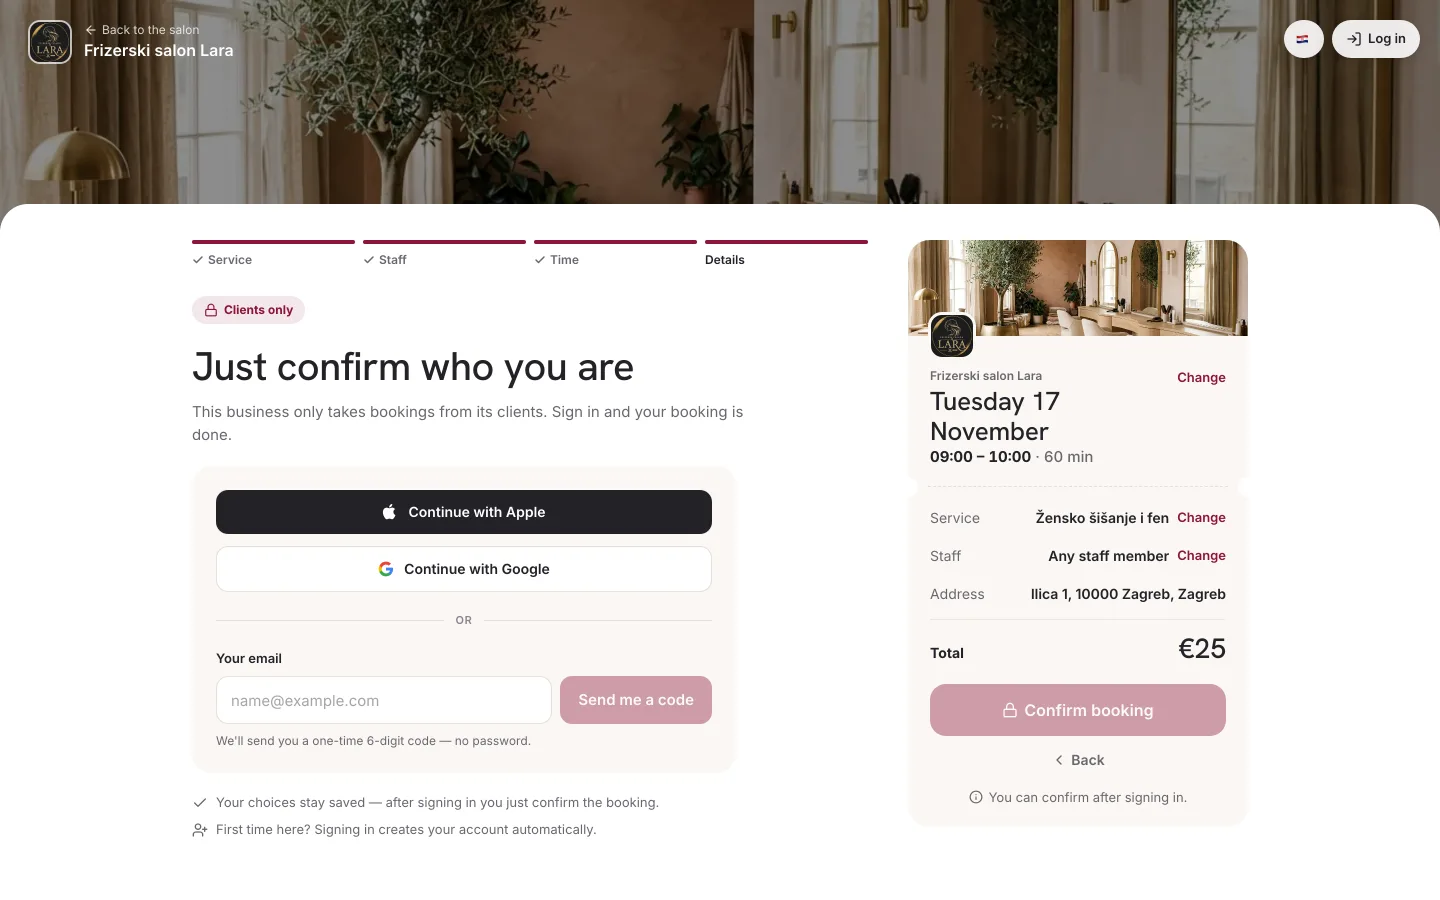
On the public page, clients sign in without a password, in one of three ways:
| Method | How it works |
|---|---|
| Continue with Apple | Sign in with an Apple account, in one tap. |
| Continue with Google | Sign in with a Google account, in one tap. |
| Code by email | The client enters Your email and clicks Send me a code. They enter the 6-digit code from the email, which is valid for 10 minutes, and click Confirm. Send a new code takes them back to the email field, from where they send the code again. |
The account is created automatically the first time they sign in, with no separate registration. The client signs in with the Log in button in the top right, to see and cancel their appointments, or in the fourth booking step when your business only takes bookings from its own clients. They use the same account to sign in to the Appointa app.
Members-only booking
When Anonymous bookings is turned off in the booking rules (the default), only clients you've accepted can book online. The flow looks like this:
- A client who isn't signed in goes through the first three steps.
- In the fourth step they see Just confirm who you are and sign in with Apple, Google or a code by email. The selected service, staff member and time are remembered.
- If they're already your client, the booking completes as usual.
- If not, clicking Confirm booking sends you a request to become a client and they see Request sent!. The appointment is not held for them.
- You get a notification in the Appointa Pro app, and an email to your business's contact address if one is set. You approve or reject the request in Clients, in the Client requests list, with the Approve and Reject buttons.
- Once approved, the client books again. If they use the Appointa app, they get a notification that they've been approved.
When anonymous bookings are turned on, none of this applies: anyone can book without signing in, by entering their name and phone number. The difference between the two modes is explained in Anonymous bookings.
Notifications the client receives
What the client receives depends on whether they use the Appointa app. App notifications only reach a client whose appointment is linked to their account and who is signed in to the Appointa app on their phone. A notification about the booking itself is only sent if the client was signed in when booking.
| Event | Client with the app | Client without the app |
|---|---|---|
| Direct booking | A notification that the appointment is confirmed | Only the confirmation screen; no email is sent |
| Request sent | A notification that the request has been sent | Only the confirmation screen |
| You confirm the request | A notification that the appointment is confirmed | An “Appointment confirmed” email with the details and a cancellation link |
| The request expires after 24 hours | A notification that the request has expired | An email with a Book a new appointment button |
| Reminder before the appointment | A notification | Email or SMS, see Reminders and notifications |
| You cancel the appointment | A notification and a cancellation email | An SMS if SMS notifications are turned on and you have credits, otherwise an email |
Cancellation by the client
A client can cancel an appointment themselves in three ways:
- My appointments on the public page. A signed-in client sees their upcoming appointments at your business, marked Pending or Confirmed. They click Cancel appointment, and in the Cancel this appointment? window they confirm with Cancel appointment or back out with Keep it.
- With the Cancel booking link on the confirmation screen, in the confirmation or reminder email and in the SMS reminder. This opens the Cancel booking page with the appointment details and a Confirm cancellation button.
- In the Appointa app.
A client can cancel no later than the number of hours before the start set in Latest cancellation. The default is 2 hours. After that, online cancellation isn't possible: the client gets a message that the appointment can no longer be cancelled and, under My appointments, also a prompt to call the business. You and your team can always cancel an appointment in the calendar, without this limit.
When a client cancels, the time is freed up for others straight away, you get a notification in the Appointa Pro app, and if you have a waitlist, the system offers the free slot to clients who are waiting.
Frequently asked questions
Do clients need to install the app to book?
No. The public page works in any browser on a phone or computer. The Appointa app is an extra convenience for clients: notifications, reminders and all their appointments in one place.
Can a client choose several services in one booking?
On the public page, one booking contains one service. For several services, the client makes several bookings, one after another.
A client says they can't see any available times. What should I check?
Check that the service is assigned to at least one staff member, that staff work that day, that the day falls within the How far ahead clients can book period and that the business isn't closed that day because of a closure or public holiday on the Availability tab in settings.
A client booked without signing in. How do they cancel?
With the Cancel booking link on the confirmation screen or in the reminder. The same cancellation deadline applies as for signed-in clients.