Employees
How to add an employee, assign their services, set a color and photo, archive them, and buy extra seats when your team outgrows your plan.
 Video guideDjelatnici: tko što radi + pozivnica u Appointa ProWatch on YouTube · The video is in Croatian.
Employees are the people clients book appointments with: hairdressers, therapists, trainers, instructors. Every employee has a name, a color, a photo and a list of the services they perform. From these, Appointa builds the columns in your calendar and offers free time slots in online booking. On this page you'll learn how to add and edit an employee, assign services to them, archive them when they leave and buy an extra seat when your team grows.
Before you start
- Employees are edited by the owner and managers. Team members with the Staff role don't see the Employees menu item.
- Create your services first, because you assign existing services to an employee. See Services and price list.
- The number of active employees is limited by your plan. If all seats are taken, you won't be able to save a new employee (see Employee seats).
The employee list
In the sidebar, select Employees. Below the title you can see how many employees are active (e.g. “3 active”). On the right are the Show archived switch and the Add staff member button. The Search staff... field filters the list by name.
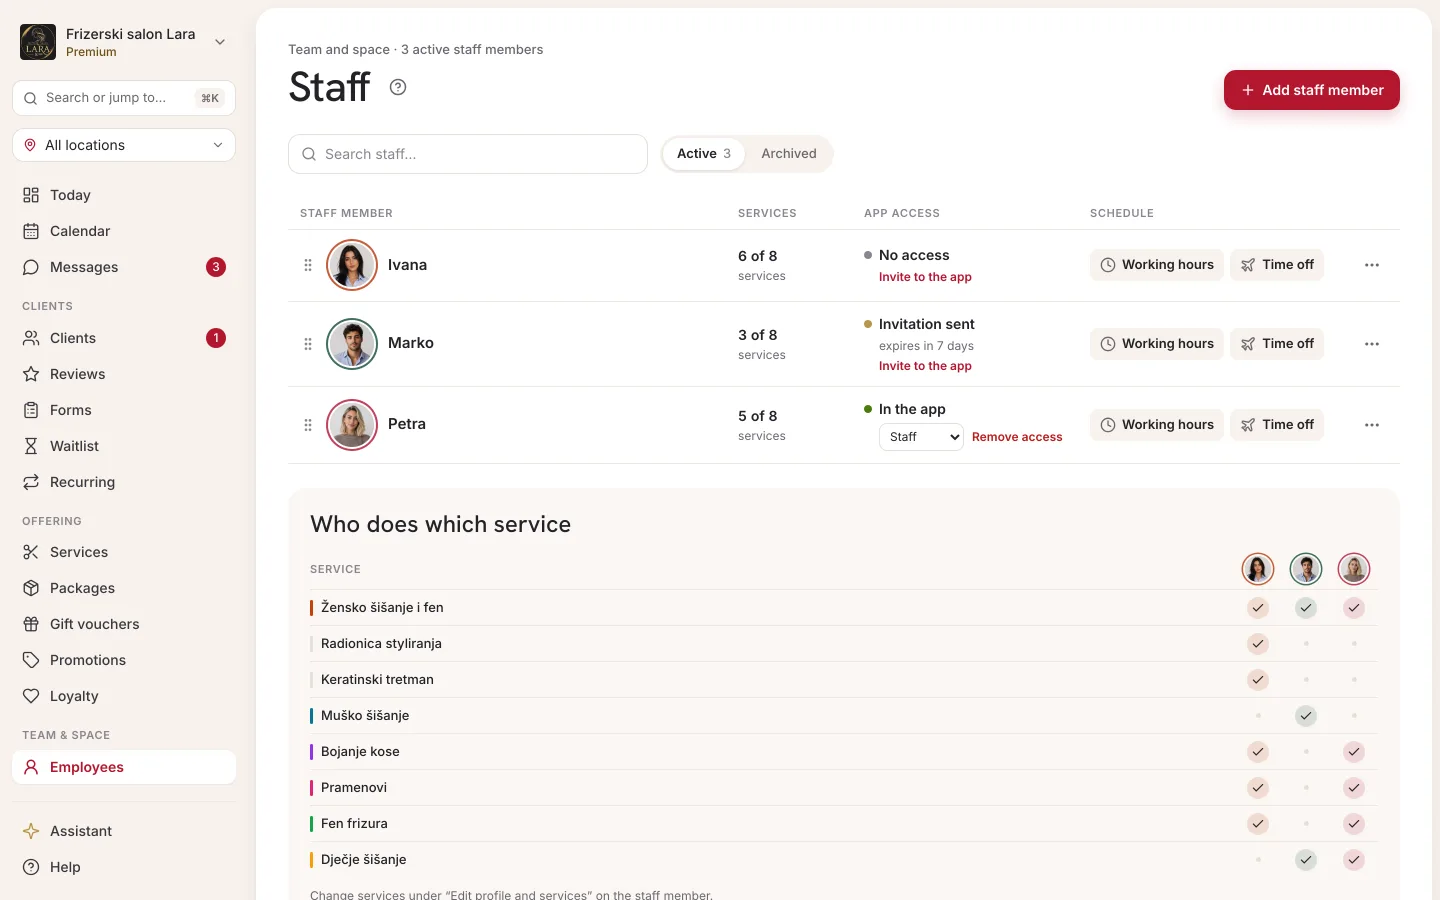
Each employee has their own card:
| Part of the card | What it shows |
|---|---|
| Photo | The profile photo. Without one, a square in the employee's color with the first letter of their name is shown. |
| Name | The name as your team and clients see it. |
| Linked | The employee has accepted an invitation and signs in with their own account (see Invitations and roles). |
| Archived | The employee is archived. The name is struck through and the card is faded. |
| Calendar color | A small square in the color that marks the employee in the calendar. It's only shown if a color has been chosen for the employee. |
| Performs 4 of 6 services | How many of all active services the employee performs, with their names below. If they perform none, it says No assigned services. |
| Links | Working hours, Time off, Edit, Invite to app and Archive. An archived employee only has Restore. |
Working hours and Time off are described on the Working hours and time off page, and Invite to app on the Invitations and roles page.
Adding an employee
- In the menu, open Employees.
- Click Add staff member. The New staff member panel opens on the right.
- In the Name field, enter the name the way clients should see it (e.g. “Maja S.”).
- If you like, choose a color under Color (optional): click one of the suggested colors, click + for a custom color, or enter a HEX code in the field below (e.g.
#1D4ED8). - Under Services performed, tick every service the employee performs.
- Click Save. The message Saved appears and the employee is on the list.
- To add a photo, click Edit on their card (see Editing and photo).
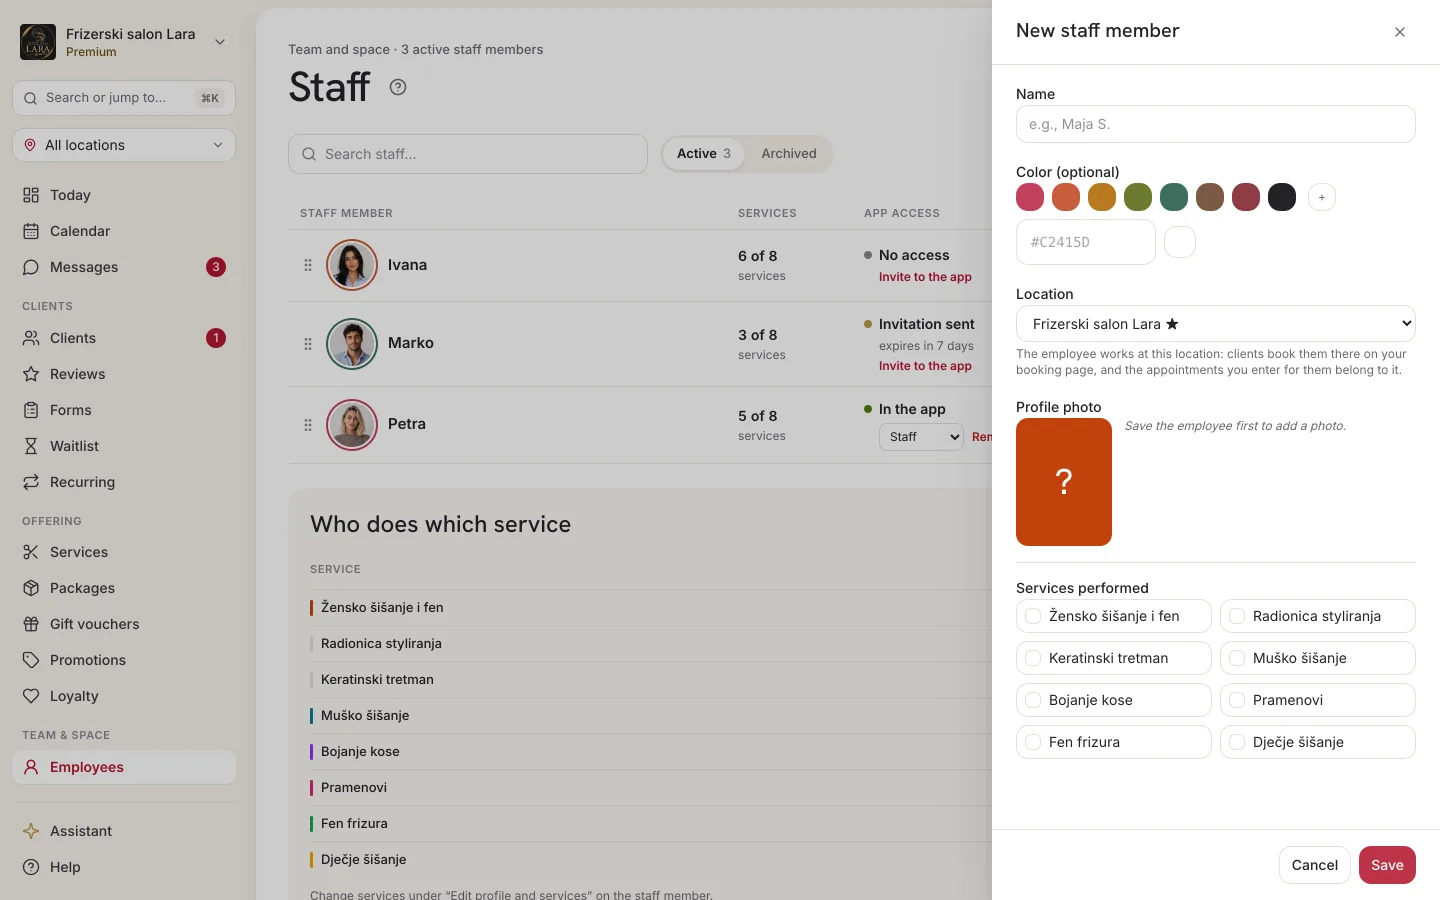
| Field | Required | What it means |
|---|---|---|
| Name | yes | Shown in the calendar, on your public page and at the “Choose a staff member” booking step. Up to 255 characters. |
| Color (optional) | no | Marks the employee in the calendar (the edge of their appointments and the circle with their initial). When the employee has no photo, the circle with the initial that the client sees when booking is also in this color. |
| Location | no | Only shows when you have two or more active locations. The location where the employee works; for a new one, the primary location is preselected. See Locations. |
| Profile photo | no | Can only be added once the employee has been saved. JPG, PNG or WebP, up to 5 MB. |
| Services performed | no | The services that can be booked with this employee. The list only offers active services. |
| OIB (for invoices) | no | Only visible when editing, on the Pro and Premium plans. Only needed if the employee issues fiscalised invoices. |
Editing and photo
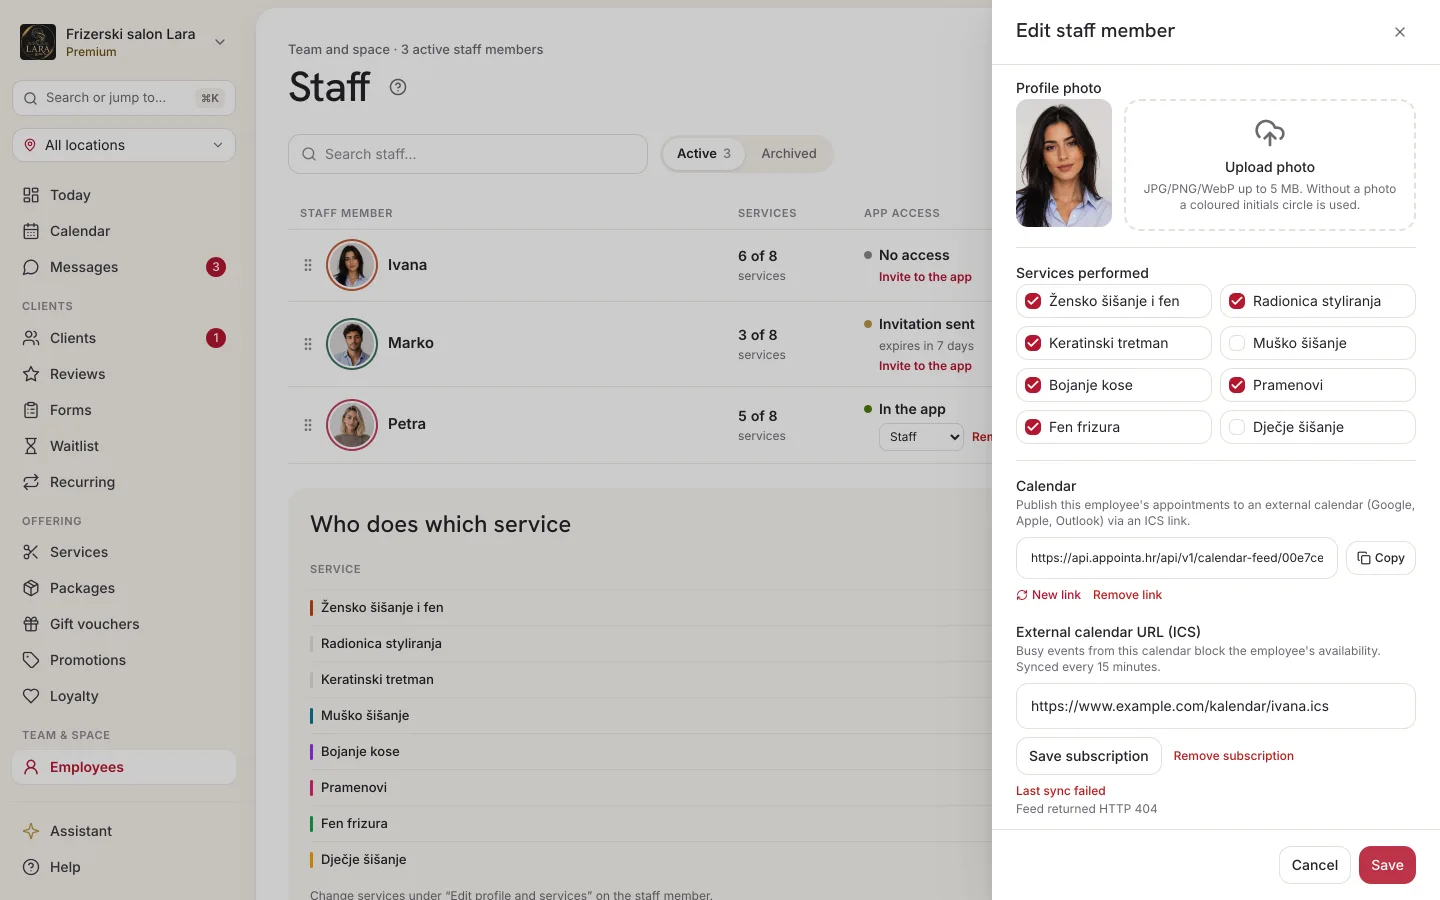
- On the employee's card, click Edit. The Edit staff member panel opens.
- Change the name, color or services.
- For a photo, click Upload photo in the Profile photo section and choose a file. The photo is saved straight away, as soon as it's uploaded, so you don't need to wait for the Save button.
- Click Save.
If you change the name, color or OIB and then close the panel without saving, Appointa asks Unsaved changes. Choose Discard changes or Stay. Changing the service checkboxes doesn't trigger this question, so always click Save after ticking services.
Photo messages:
| Message | Cause |
|---|---|
| Photo must be JPG, PNG or WebP. | You chose a file in a different format (e.g. HEIC from an iPhone). Save it as a JPG and try again. |
| Photo is larger than 5 MB. | Shrink the image or export it at a lower resolution. |
| Photo upload failed. | A connection problem. Try again. |
OIB for fiscalised invoices
On the Pro and Premium plans, the Edit staff member panel has an OIB (for invoices) field. Enter the employee's personal OIB (Croatian personal identification number) only if fiscalised invoices will be issued in their name. When fiscalisation is turned on, the operator code is shown below the field, e.g. “Fiskal operator: OP1”. The details are on the Turning on fiscalisation page.
Employee calendar
At the bottom of the Edit staff member panel there's a Calendar section. There you connect the employee's appointments to a Google, Apple or Outlook calendar, and the other way round: private commitments from those calendars block their free time slots. The section is available from the Pro plan up. The whole procedure is described on the Calendar sync page.
Assigning services
An employee is only offered in online booking for the services assigned to them. This is the most common reason a client “can't see” an employee.
- You assign services with the checkboxes under Services performed, when adding an employee or through Edit.
- When you add a new service, assign it to the employees who perform it. It won't be assigned to anyone on its own.
- A service's price and duration are the same for all employees. For now, the only way to have a different price per employee is a separate service (e.g. “Haircut — senior stylist”).
- In web booking, at the Choose a staff member step, the client sees the whole team and the Any staff member option. Employees who don't perform the selected service are greyed out, marked Doesn't offer this service, and can't be selected. The client app only shows the employees who perform the selected service.
Archiving and restoring
Employees aren't deleted, they're archived. That way, past appointments still show who did them.
- On the employee's card, click Archive.
- Confirm in the Archive staff member? window with the Archive button.
- The message Employee archived appears at the bottom, with an Undo button in case you change your mind.
What happens after archiving:
- The employee is no longer offered in online booking and disappears from the calendar columns.
- Existing appointments remain and aren't cancelled automatically, so clients don't get a notification either. In the Day view, an archived employee has no column, so you can't open or move their appointments there. In the Week and Month views they're still visible, but clicking them opens the day view. If you've already archived an employee who still has appointments, restore them, deal with the appointments, then archive them again.
- The employee no longer takes up a seat on your plan.
To restore an employee, turn on Show archived and click Restore on their card. Restoring uses a seat just like a new employee. If all seats are taken, the message “Employee seat limit reached” appears.
Employee seats
Each plan includes a set number of active employees. Archived employees don't count.
| Plan | Seats included | Extra seats |
|---|---|---|
| Starter | 1 | no — for more employees, move to Pro or Premium |
| Pro | 3 | can be bought |
| Premium | 5 | can be bought |
When all seats are taken, the New staff member panel stays open after you click Save and shows the message “Employee seat limit reached (3/3).” with a button:
- Add a seat (Pro and Premium) — takes you to Billing, where you buy a seat;
- Upgrade plan (Starter) — takes you to the plan selection.
Both buttons lead to pages that only the owner can see. If you're a manager, ask the owner to buy a seat or change the plan.
How to buy a seat
Seats are bought by the owner, because only the owner sees Billing.
- Click the business card at the top of the sidebar and choose Billing.
- The Employee seats card shows how many seats are used (e.g. “3/3 seats used”) and how many are included in your plan.
- Next to Extra seats, increase the number with the + button. The price per seat is shown next to it.
- Check the Due today amount, then click Confirm change.
- Go back to Employees and save the new employee.
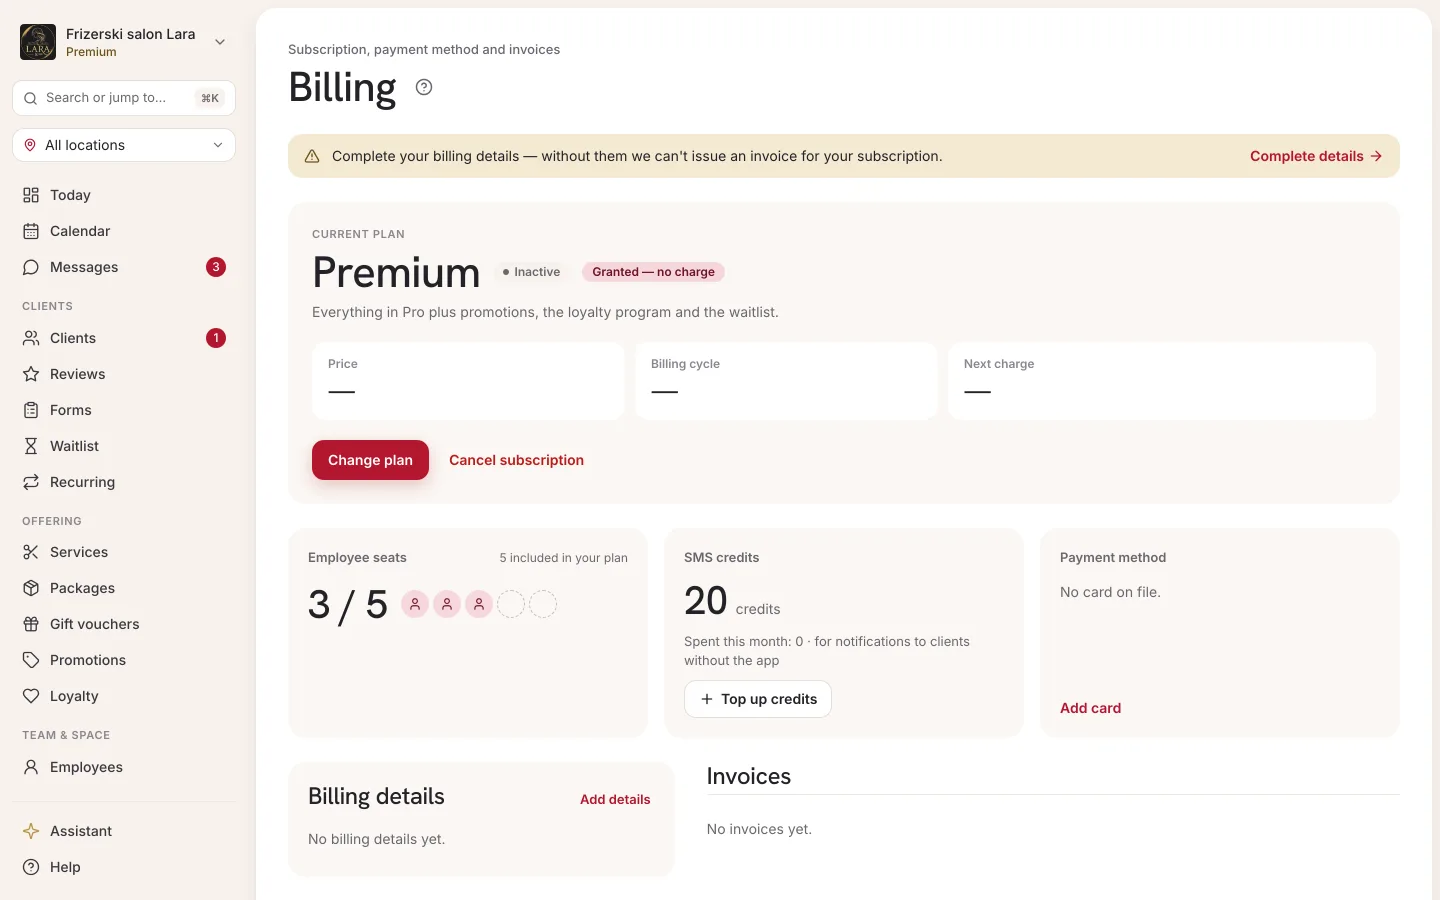
You can also reduce the number of extra seats, but not below the number of active employees. In that case, archive employees first. If you use a plan marked Granted — no charge and aren't paying for a subscription, the counter for buying seats isn't shown (see Granted plan). Seat prices and billing are described on the Starter, Pro and Premium plans and Subscription and payment pages.
Frequently asked questions
A client can't see an employee when booking. Why?
Most often, the selected service isn't assigned to that employee. In web booking they're then greyed out, marked Doesn't offer this service, and in the client app they aren't shown at all. If the service is assigned but there are no time slots, check their shifts and time off (Working hours and time off) and whether they've been archived. If you have several locations, an employee only has time slots at their own location (see Locations).
Do I have to enter an employee's email?
No. The employee profile has no email field. An employee can have appointments without ever signing in to the app. You only enter an email when you send them an invitation to sign in themselves.
Can I add someone who doesn't perform services, such as a receptionist?
Yes, as an employee with no assigned services. Clients won't be able to book them, but such a profile takes up a seat on your plan and appears in the calendar. You need the profile if you want to send them an invitation to sign in.
Can I delete an employee permanently?
No, employees can only be archived. That way, past appointments still show who did them, and you can restore an archived employee if you have a free seat.
How many employees can I have?
As many as your plan has seats, plus any extra seats you buy on the Pro and Premium plans. See Employee seats.