Appointa Pro (the team app)
Downloading and activating Appointa Pro, the Home screen, the day calendar, new appointments and walk-ins, clients, messages, management and notifications.
 Video guideAppointa Pro — tvoj salon u džepu (aktivacija u minuti)Watch on YouTube · The video is in Croatian.
Appointa Pro is the mobile app for running your business from your phone. With it you run your working day without a computer: you see today's revenue and appointments, add appointments and walk-ins, change statuses, reply to clients and manage services, employees, shifts, reports and bulk cancellations. On this page you'll learn how to activate the app and what each of its screens does.
Before you start
- Your business must be set up on the web, through the setup wizard.
- To activate the app you need a computer (or another device) with Appointa open on the web, and a phone with a camera and an internet connection.
- Every team member generates the activation QR code themselves, for themselves: the app signs in with the account of the person who generated the QR, with their role. An employee therefore first needs to accept the invitation and have their profile linked to their account (see Invitations and roles).
- Some tools depend on your plan: recurring appointments need the Pro or Premium plan, while the waitlist, promotions, loyalty and visit packages need the Premium plan. Invoices are available on the Pro and Premium plans once the owner has set up fiscalisation on the web.
Download
Search for Appointa Pro in your phone's app store:
- iPhone: Appointa Pro on the App Store
- Android: Appointa Pro on Google Play
Appointa Pro and the client app (Appointa) are two different apps with different icons. If you also book appointments elsewhere yourself, you can have both on the same phone.
Activating with a QR code
Appointa Pro has no separate password screen. You connect your phone to your business with a one-time QR code that you generate on the web.
- On your computer, sign in to Appointa with your own account.
- Owner or Manager: click the business card at the top of the sidebar (the account menu) and choose Settings, then the Sharing & app tab.
- Staff: click Dashboard in the menu and scroll down your overview to the Mobile app activation section at the bottom.
- In the Mobile app activation section, click Generate QR. A QR code appears, together with a Valid for countdown and a code for manual entry.
- On your phone, open Appointa Pro. On the Activate salon mode screen, tap Scan QR.
- Point the camera at the QR code on your computer screen.
- The app shows Device activated and the name of your business. Tap Open salon mode.
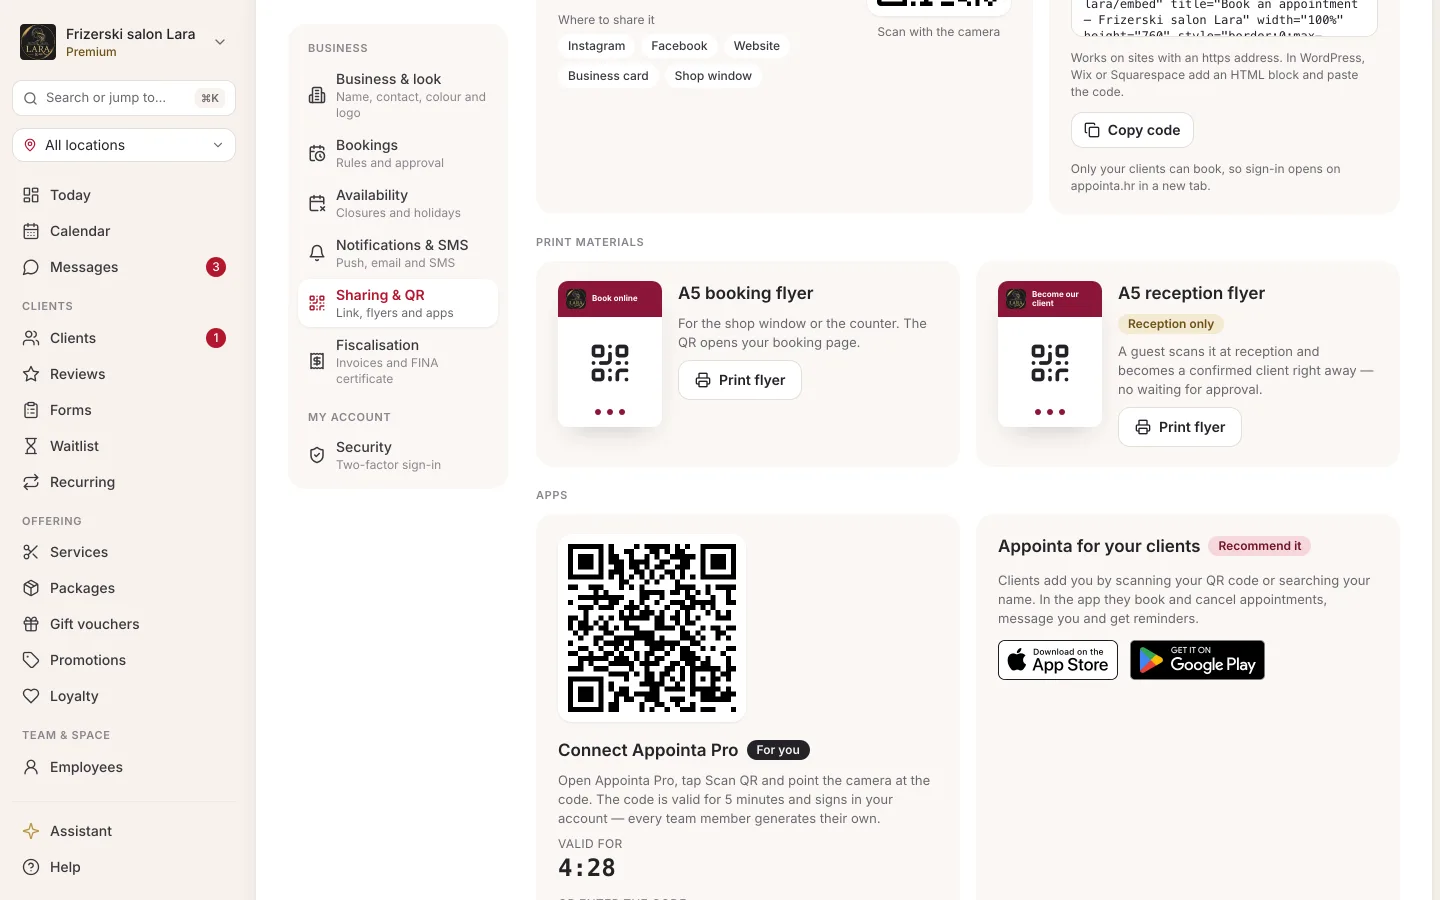
The QR code is valid for 5 minutes and can be used only once. If it expires, click Generate new QR. After you launch your business, the Connect Appointa Pro guide in the First steps card on the dashboard also leads you here. Below the QR code there are also links to download Appointa Pro from the App Store and Google Play.
Entering the code manually
If your camera doesn't work, click Copy next to the Or enter the code field below the QR code on the web. In the app, tap I have a code to type, paste or type the code and tap Activate. The code is long (about 40 characters), so pasting it is easiest — for example, if you open Appointa on the web in the browser on the same phone. A manually entered code is also valid for only 5 minutes.
Activation errors
| Message in the app | What it means | What to do |
|---|---|---|
| Invalid QR code | The code wasn't recognised, usually because it was typed with a mistake or not pasted in full. | Copy the code again with the Copy button or generate a new QR. |
| QR already used | The code is single-use and has already been used. | Generate a new QR. |
| QR expired | More than 5 minutes have passed. | Generate a new QR and scan it right away. |
| Network error | Your phone has no internet connection. | Check your connection and tap Try again. |
How long you stay signed in
While you use the app, your sign-in extends itself. If you don't open the app for 30 days, you'll be signed out and will need a new QR. One activation covers one business: the app shows the business whose QR you scanned. For another business, sign out and scan that business's QR.
Bottom bar
| Tab | What's in it | Number badge |
|---|---|---|
| Home | Revenue and appointments for the selected day | — |
| Calendar | A time grid of the day with appointments | — |
| Clients | Address book, join requests, client profile | Number of clients waiting for approval |
| Messages | Conversations with clients | Number of conversations waiting for your reply |
| More | Profile, settings and business management | — |
The number on Messages doesn't disappear when you merely read a message — only when you reply or mark the conversation as done. The total of both badges is also shown on the app icon on your phone's home screen.
Home: your day at a glance
The date is at the top, and below it are three cards with figures for that day:
| Card | What it shows |
|---|---|
| Revenue | The total price of the day's confirmed and completed appointments |
| Remaining | Pending or confirmed appointments that haven't started yet |
| Completed | Appointments marked as completed |
Swipe the figure cards left or right for the next or previous day. When you're not on today, a Today button appears at the top to take you back. Below the figures is the list of the day's appointments: tap a row to open the appointment details. An appointment with no client entered is shown as Walk-in. Cancelled appointments are not shown, either here or in the calendar.
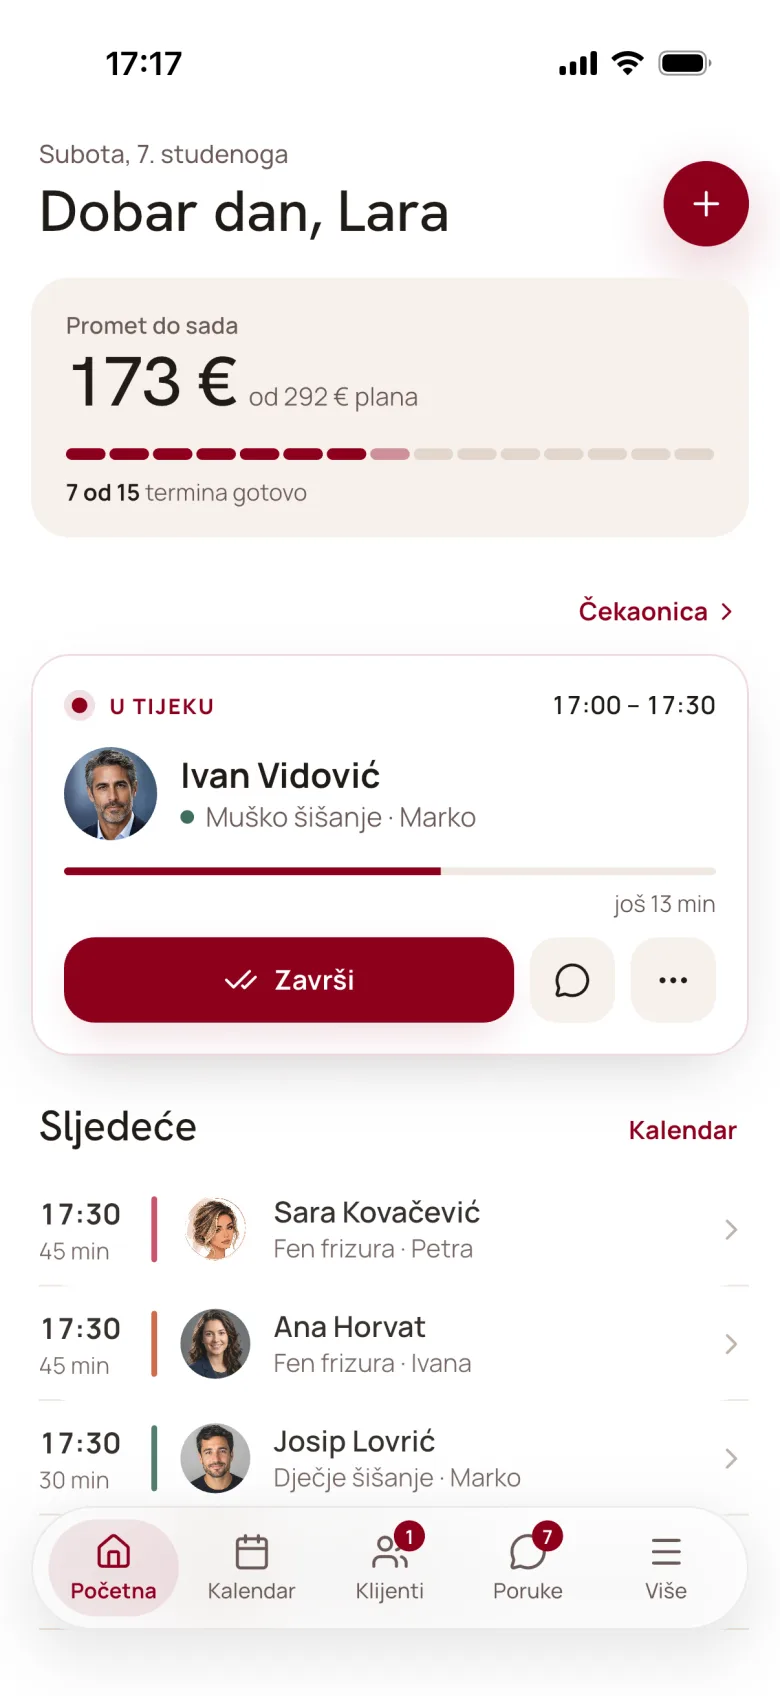
You can also swipe an appointment row for quick actions:
| Swipe | Actions |
|---|---|
| Right | Confirm (pending appointment) or Complete (confirmed appointment), and Message |
| Left | Cancel (pending and confirmed) and No-show (confirmed) |
For cancellations and no-shows, even a full swipe only opens a confirmation, so you can't do anything by accident. The + button in the top right opens a new appointment. If you issue invoices, it offers a choice between New appointment and New invoice.
Day calendar
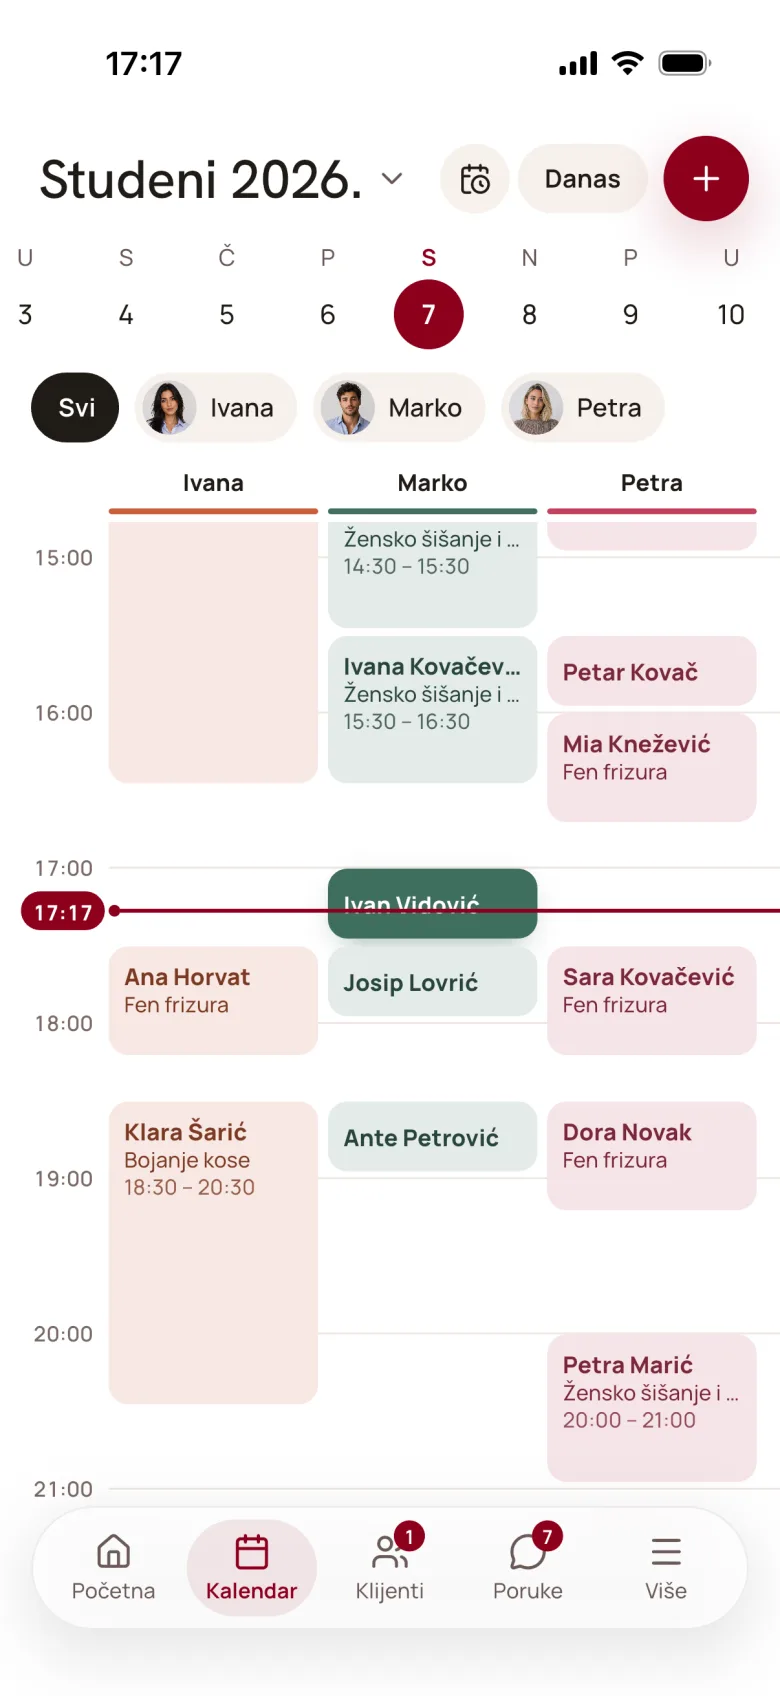
The calendar shows one day as a time grid from 08:00 to 22:00.
- Changing the day: tap a day circle in the strip below the title, or swipe the grid left or right. Tapping the month and year opens a date picker, so you can quickly jump to days further away too.
- Employee: the All drop-down in the top right narrows the view to a single employee.
- Overlaps: appointments at the same time are stacked one behind the other. Tapping an appointment at the back brings it to the front, and the +N badge opens a list of all appointments at that time.
- The current time on today's date is marked with a horizontal line.
- New bookings and changes made on the web appear on their own, briefly highlighted.
Schedule override
Owners and managers have a calendar-with-clock icon in the top right. It opens a Schedule override for the selected date: choose the Employee, then enter different working hours for them or turn on Day off. The change applies to that date only, and Restore weekly schedule undoes it. If the employee already has appointments in that time, the app lists them and asks whether you want to save anyway. More about shifts: Working hours and time off.
New appointment
The + button on Home or in Calendar opens Quick appointment in five steps:
- Who is the appointment for? Type a name or phone number and choose the client, or tap Anonymous appointment.
- Choose a service.
- Who performs the service? The employees who perform the selected service are shown.
- When suits the client? Choose a date, then a free time slot (morning or afternoon). Pick the time manually lets you set any time, even outside the free-slot schedule or beyond the online booking window.
- Just confirm: check the summary, add a Note (optional) if you like and tap Create appointment.
On the Premium plan, when the chosen client has a package that covers the service on that day, the summary shows a line “From package: … · … left” and a price of €0; the appointment is taken from the package. For a package-only service without the client's package (or for an anonymous appointment), the summary warns “The client has no valid package — the visit is at full price.”, and you can still create the appointment.
To go back to an earlier step, tap the step number in the header. An appointment you enter in the app is Confirmed right away, and once it's saved its details open. If a client isn't in your address book yet, add them first in the Clients tab.
Walk-ins
For a client who walked in without an appointment and whose details you don't want to enter:
- Tap + and choose Anonymous appointment (“no contact · billing only”).
- Choose the service and the employee.
- Choose the first free slot or, if you're starting right away, Pick the time manually.
- Tap Create appointment.
On Home, the appointment is shown as Walk-in and counts towards revenue. You can't send this client a message. When the service is finished, open the appointment and tap Complete.
Appointment details and statuses
Tapping an appointment opens the Appointment screen: the status, the client with their contact details (tap to open the client profile), the service, employee, time, duration and price (“€0 · from package” for an appointment taken from a package). Where relevant, the details also show a Gift voucher row (amount and code), a resource (Room, Equipment or Vehicle — tap to open its photos), Client notes, the client's Booking note and the Cancellation reason.
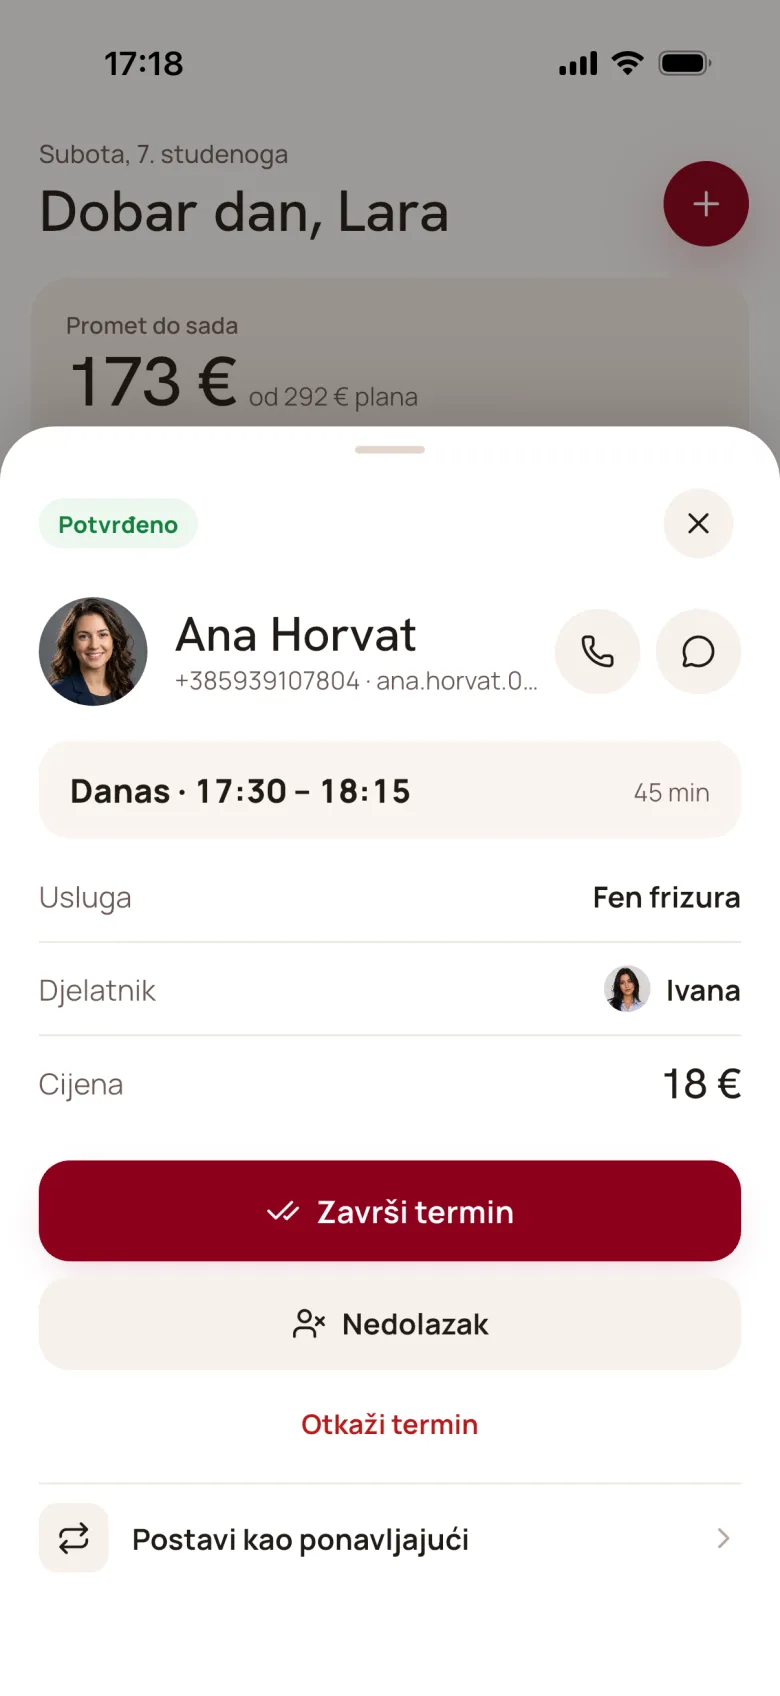
| Status | Available actions |
|---|---|
| Pending | Confirm, Cancel, Message |
| Confirmed | Complete, No-show, Cancel, Message |
| Completed, No-show, Cancelled | Only Message (plus invoice actions, if any) |
- Cancel asks for a reason that the client will see; the reason is optional. If your business has a late-cancellation fee, a Charge cancellation fee checkbox is offered. It's ticked in advance when the appointment is within the cancellation window.
- No-show opens the Why no-show? choice: Didn't show up, Too late, Notified too late, Salon forgot or Other, with an optional note.
- Complete shows a confirmation (with confetti for the first completed appointment of the day). If you issue invoices, the app then asks The appointment is completed. Issue the invoice?
Statuses and what they mean are described in Appointment details.
Group sessions
For services with several seats, tapping the appointment opens the list of enrolled clients with the count X / Y seats filled. While seats are still free, Add client enrols a new participant in the same group: you only choose the client and confirm. If someone takes the last seat in the meantime, the app reports The session is full — no seats left.
Recurring appointment
On the Pro and Premium plans, the details of a pending or confirmed appointment with a client entered include a Set as recurring card. Choose the Frequency (every week, every 2 weeks or every 4 weeks), optionally extra Weekdays and an End date, then tap Activate recurrence. The appointments are booked ahead straight away. For dates that are already taken, the app offers New appointment. You can review and end series under More → Recurring appointments; more about this in Recurring appointments.
Clients
The Clients tab shows your address book, with a search by name or phone (the magnifier icon in the top right).
- Swiping a row: right for Message and Call (if the client has a phone number), left for Archive. An archived client disappears from the list, but their history stays. Online booking no longer recognizes them, so their next booking treats them as a new client (see Archived clients).
- Join requests: clients who have asked to join your business appear at the top of the list, up to three at a time, with See all (N). Approve or Reject each request, by tapping or swiping (right to approve, left to reject).
- Add client (the icon in the top right) offers Manual entry (name, phone, email and a note; besides the name you need at least an email or a phone number) or QR code: the client taps Scan QR code in their Appointa app and scans the code on your screen. If Auto-approve on scan is turned on in your settings, the client is connected immediately. Otherwise you receive their request for approval.
Tapping a client opens their profile. At the top are icons for messaging, editing and anonymizing. Below them are:
- Client chart: allergies, preferences, styling notes and the preferred staff member. These are private notes the client can't see. Save them with Save chart.
- Packages (Premium): visit progress for each package. Owners and managers have a Sell package button and can void an active package, giving a reason.
- The client's Invoices, if you issue invoices.
- Appointment history with statuses. Tap an appointment to open its details.
Messages
The conversation list has the filters All, Unread and Unanswered. Labels on a conversation card:
| Label | Meaning |
|---|---|
| new | A client message you haven't opened yet |
| needs reply | The last message was sent by the client |
| answered | The last message was sent by your team |
| done | The conversation has been marked as done |
| muted | You don't get notifications for this conversation |
Swipe a conversation right for Mark done and Mute, or left for Hide. A hidden conversation returns to the list as soon as a new message arrives. In an open conversation, the Mark done button in the header marks that the message needs no reply. More about messages: Messages.
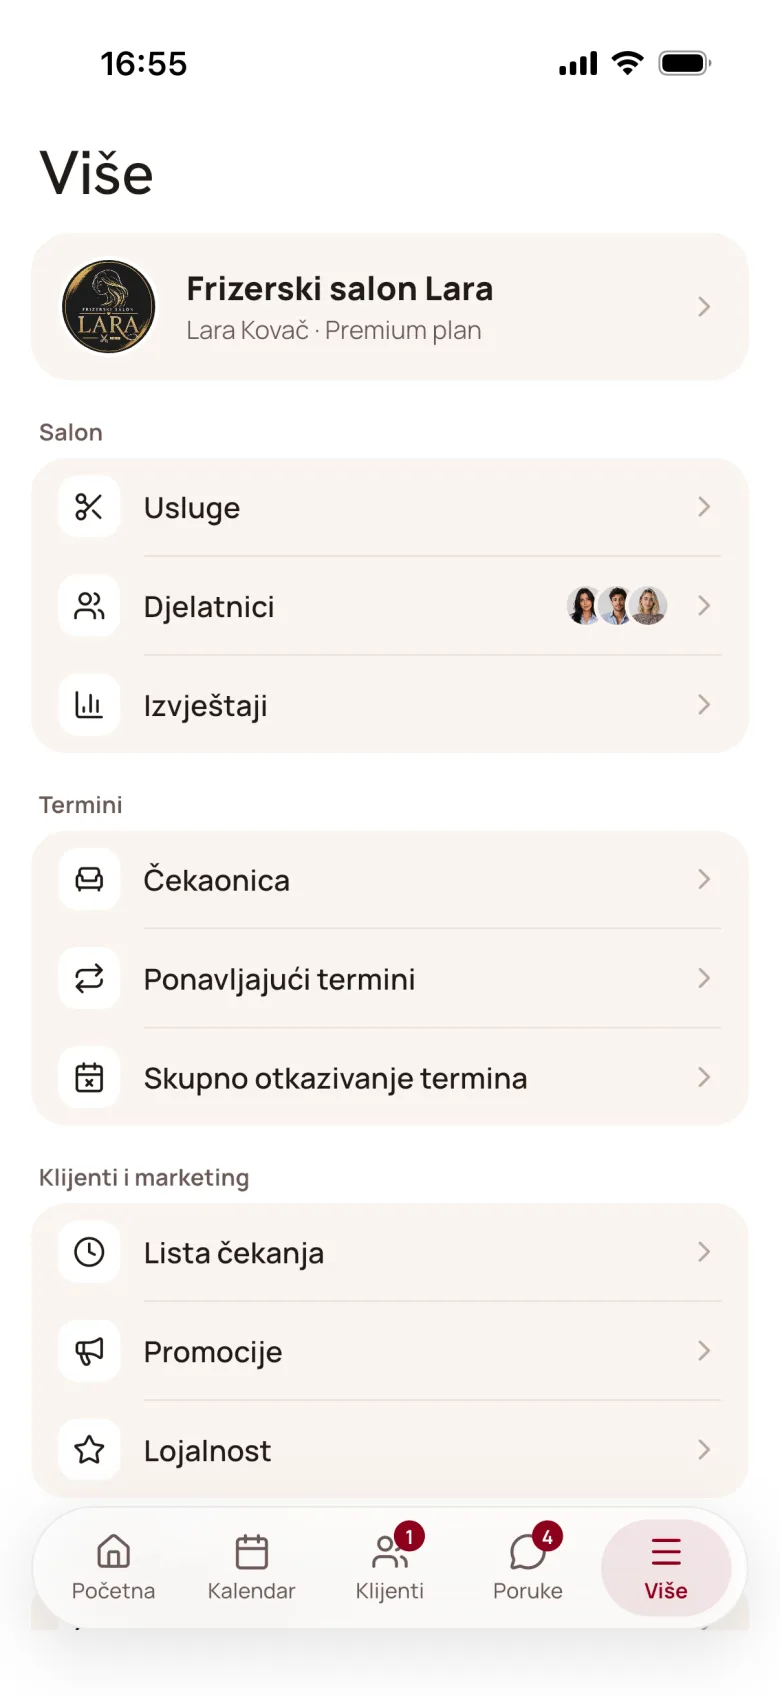
The More tab
The More tab shows your email and phone number, plus the app settings: Language (Croatian or English), Appearance (Light, Dark or System) and Notifications. Owners and managers also manage the business here:
| Item | What you do | Plan |
|---|---|---|
| SMS notifications | The Send SMS notifications switch for clients without the app. You buy credits on the web, on the Billing page. | all |
| Services | Add, edit and archive services | all |
| Staff | Team, invitations, working hours and time off | all |
| Waitlist | Clients waiting for a free slot | Premium |
| Promotions | Promotions with a code, and sending them to clients | Premium |
| Loyalty | Stamp-card program | Premium |
| Recurring appointments | Review and end series | Pro and Premium |
| Analytics | Figures for the week, month or quarter | all |
| Bulk cancel appointments | Cancel a day, a period or one employee's appointments | all |
Items your plan doesn't include are greyed out, labelled Available in Premium plan or Available in Pro plan. At the bottom are Delete account and Sign out.
Services
The + button adds a service: Name, Duration (min) (5–600), Price (€) and Seats (1 for a one-on-one appointment, more for groups). On the Premium plan there's also a Package only switch (see Package-only services). The schedule of group services is edited on the web. Archive hides a service from booking, and Unarchive brings it back. See Services and prices.
Employees, working hours and time off
The + button adds an employee with a name, a colour and the services they perform. When editing an employee you'll find:
- Working hours: a weekly schedule with one or more shifts per day (Add shift) and a choice of Every week, Even weeks or Odd weeks. An empty day means the employee doesn't work that day.
- Time off & absences: From–To periods with an optional reason, during which the employee isn't available for bookings.
- Invite to app (for an employee without a linked account): enter the Staff member's email and tap Send. The employee receives an email invitation with the Staff role and, after accepting it, signs in on the web. You can Resend or Revoke invitations you've sent.
If your plan's employee seat limit has been reached, the app tells you when you try to add someone. See Employees and Invitations and roles.
Analytics
Choose Week, Month or Quarter (it opens on Month). The current period is always shown, including appointments still to come. The cards show:
| Card | What it shows |
|---|---|
| Revenue | The same figure as Revenue in Analytics on the web: confirmed and completed appointments plus packages and gift vouchers sold in the period. When packages or vouchers were sold, a breakdown “Appointments · Packages · Vouchers” is shown below it. |
| Appointments | The number of confirmed and completed appointments |
| No-show | The share of cancelled appointments and no-shows among all appointments in the period |
| Avg. price | The average appointment price, leaving out appointments taken from a package |
Below them are Busiest day and the Appointments · last 7 days chart. Staff performance → opens the Staff screen: for each employee, the number of appointments, revenue and their share of the total number of appointments, with the busiest one marked Top. More detailed reports are on the web: Analytics.
Bulk cancellation
- In More, tap Bulk cancel appointments.
- Choose the method: Day, Range (from–to) or Employee (one employee within a range).
- Choose the Reason: Sickness, Emergency, Technical issue or Other. If you like, add an Internal note, which the client doesn't see.
- Leave Notify clients switched on if you want to let them know straight away.
- Tap Cancel appointments, then Yes, cancel.
If notifying is on, clients with the Appointa app get a push notification and an email. Clients without the app get an SMS if SMS notifications are turned on, and an email otherwise. Walk-in appointments have no client, so no one is notified about them. The reason and the internal note are saved with the appointment but aren't sent to the client. More in Cancelling a day.
Waitlist, promotions and loyalty
- Waitlist: the + button adds a client with a preferred date and time range. Swipe an entry for Notify (while the client hasn't been notified yet), Mark resolved or Remove. Mark resolved only takes the entry off the list; you book the appointment separately. See Waitlist.
- Promotions: New promotion asks for a Title, Code, Body, Discount type (percent or amount) and Discount value; Start and End are optional. Send sends the promotion to clients as a push notification, and Remove marks it as expired. See Promotions.
- Loyalty: you set the Stamps required for a reward (2–50), the Reward (Next appointment free, 50% off, 30% off or Fixed discount amount (€)) and the Program active switch. Only the stamp-card program can be edited in the app. The Euro stamps program (credit for euros spent) is set up on the web. See Loyalty program.
Invoices
Once the owner has set up fiscalisation on the web (Settings → Fiscalisation), you can also issue invoices from the app:
- In the details of a confirmed or completed appointment, tap Issue invoice.
- Choose the Payment method: Cash or Card. Owners and managers also choose who issues the invoice, in the Issued by (operator) field. An employee issues invoices in their own name.
- Check the items and the Total, then tap Issue invoice.
Issuing an invoice turns a confirmed appointment into a completed one. The invoice status changes on its own from awaiting JIR to fiscalised (the JIR is the unique invoice identifier assigned by the Croatian Tax Administration). Open invoice shows the invoice, and next to it you can see whether it was Sent to the app or Sent by e-mail to the client. Owners and managers can cancel an invoice with a storno (the Cancel invoice button, with a reason) and, for a rejected invoice or one without a JIR, start Retry fiscalisation. To issue an invoice without an appointment, use + on Home → New invoice. For an appointment paid with a package or a gift voucher, the app doesn't issue an invoice and tells you why. Everything about invoices: Issuing invoices.
Notifications on your phone
Appointa Pro sends push notifications when:
- a client books an appointment (New booking, with the client's name, the service, the time and the start of their note),
- a client cancels an appointment (Client cancelled an appointment),
- a client asks to join your business (New client request) or connects by scanning a QR code (New client),
- a new client message arrives,
- a recurring appointment couldn't be booked because the slot is taken,
- with fiscalisation: the Tax Administration rejects an invoice (Invoice not fiscalised) or an invoice still hasn't received a JIR after 24 hours (Invoice still has no JIR).
Tapping a notification opens the related appointment, request, conversation or the list of recurring appointments.
More → Notifications has two switches:
| Switch | What it turns on and off |
|---|---|
| Bookings and clients | Notifications about new bookings, client cancellations, join requests, new clients and recurring appointments that couldn't be booked |
| Client messages | Notifications about new messages |
The Bookings and clients switch applies only to the notifications in the first row of the table. Appointa Pro doesn't send you a reminder the day before an appointment; reminders go to clients. Invoice fiscalisation notifications can't be turned off.
FAQ
Do I need to generate a new QR for every phone?
Yes. Each QR works once and for 5 minutes. For another phone, generate a new one.
Why can't I see Services, Staff or Analytics in the More tab?
Only the Owner and Manager roles see business management. If the role of the person who generated the QR has since been changed to Staff, the app shows only the working tabs. Roles are set in Invitations and roles.
Can an employee use Appointa Pro on their own phone?
Yes. After accepting the invitation, the employee signs in on the web, generates their own QR on their dashboard (Dashboard in the menu) and scans it with their phone. The app then works with their account and the Staff role: they see the working tabs, but not business management.
Can I move an appointment in the app?
No. The app lets you change the status and cancel. You move an appointment on the web, in the appointment details or by dragging it in the calendar (see Rescheduling an appointment).
What happens when I sign out?
The app asks you to confirm (“Are you sure? You'll need a fresh QR code to sign back in.”). To sign in again, you'll need a new QR from the web.
Is Delete account the same as signing out?
No. Delete account permanently deletes your user account: it sends you an email with a confirmation link, and once you confirm, it removes your personal data and signs you out of all devices, including the web. To stop using the app on your phone, use Sign out.
The full video series on Appointa Pro (activation, Home, calendar, new appointment, statuses, clients, messages, management) is on the Video guides page.