Client profile
What a client profile shows (next appointment, stats, appointments, chart with allergies and notes, packages, invoices) and how to edit it.

A client profile brings everything about one person together on a single screen: contact details, the next appointment, all appointments, the internal chart with allergies, preferences and notes, the reviews they've left and, depending on your plan, loyalty, packages, invoices and recurring appointments. On this page you'll find out what each part of the profile means, how to edit the details and how to book a new appointment or send a message straight from the profile.
Opening a profile
- In the side menu, choose Clients.
- Find the client with the search box (see Client list).
- Click anywhere on their row.
The profile opens on its own page. The ← All clients link at the top left takes you back to the client list. Profiles of anonymized clients can't be opened from the list.
Header and buttons
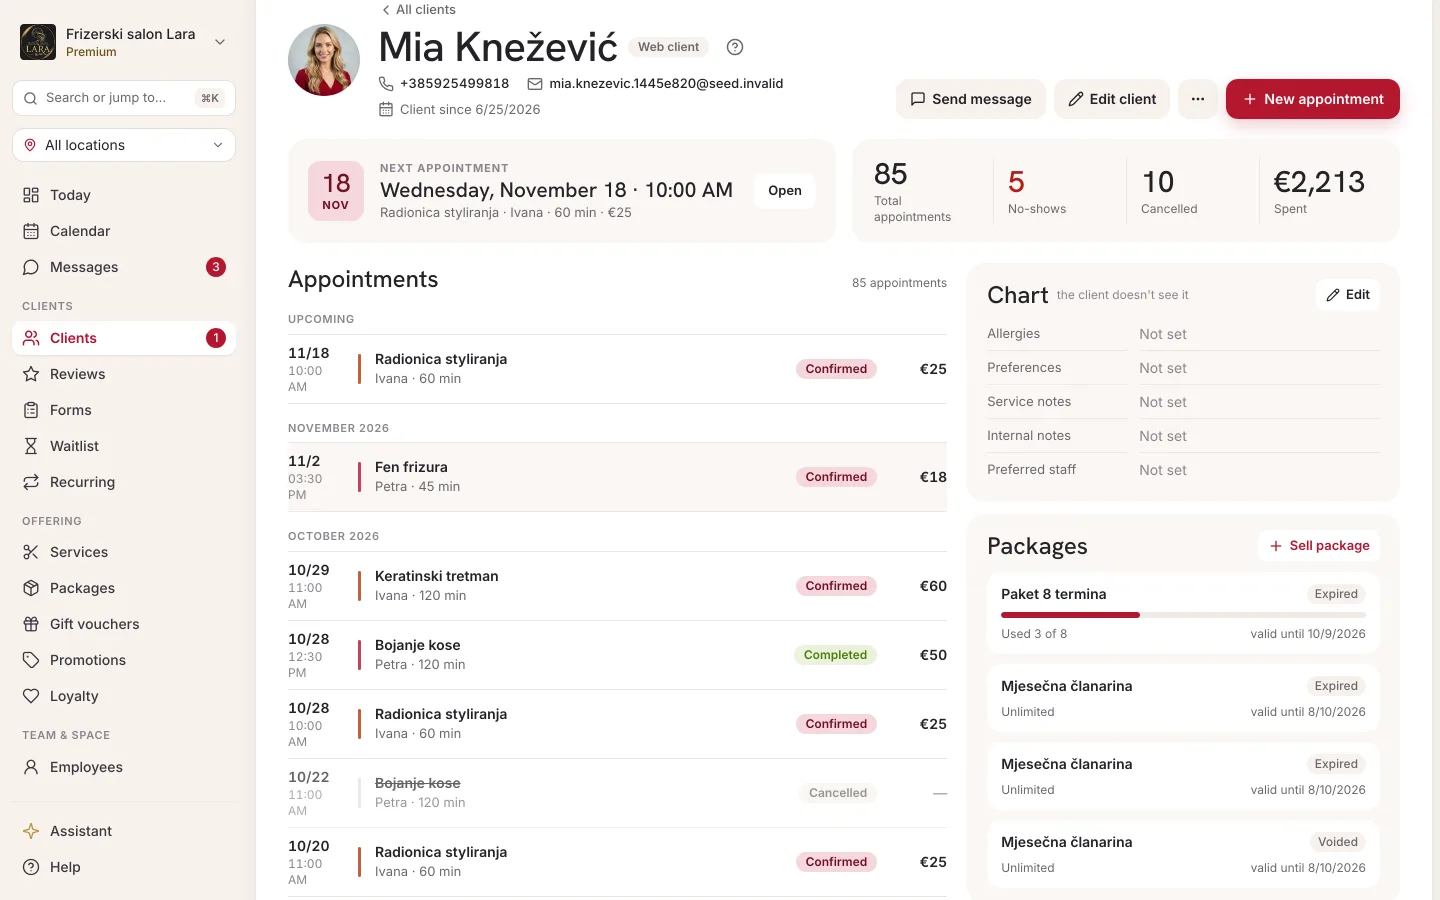
The header shows the profile photo or initial, the name, the app user or web badge (the badges are explained in the list columns), and below them the phone, email and the Client since date. Clicking the number starts a call, and clicking the email opens your mail program. If there's no email, it says “No email”. On the right are the buttons:
| Button | What it does |
|---|---|
| Send message | Opens the conversation with the client in Messages. If there's no conversation yet, it's created. |
| Edit client | Opens the Edit client panel with the contact details and the chart (see Editing details and the chart). |
| ⋯ (three dots) | A menu with Anonymize client (see Privacy and deletion). The owner and managers see it. |
| New appointment | Opens the new appointment form with this client already selected (see New appointment for the client). |
If the client has allergies on file, there's a red box under the header, e.g. “Allergies: PPD. Check before every service — the warning also shows on the appointment.” Everyone on the team who opens this client's profile sees it.
Next appointment and stats
Under the header there are two cards.
Next appointment shows the client's nearest upcoming appointment (pending or confirmed): the day, date and time, service, staff member, duration and price. Open opens that appointment's details. If the client has nothing booked, it says “No upcoming appointments.”
On the right are four figures:
| Figure | What it counts |
|---|---|
| Total appointments | All of the client's appointments, including upcoming and cancelled ones. |
| No-shows | Appointments marked as a no-show. |
| Cancelled | Cancelled appointments. |
| Spent | The sum of final prices of completed appointments only, in euros. |
Appointments
The Appointments section in the left column lists all of the client's appointments in groups:
- Upcoming — pending and confirmed appointments still to come, nearest first;
- then by month (e.g. October 2026) — all other appointments, newest first.
Each row shows the date and time (always in your business's time zone), the service, staff member and duration, a status badge (Pending, Confirmed, Completed, Cancelled or No-show) and the price. Cancelled appointments and no-shows show “—” instead of a price, and a cancelled service is struck through. If the client has no appointments yet, it says “No appointments yet.”
Clicking a row opens the appointment details, where you can change the status (e.g. Confirm, Complete, Mark no-show), move the appointment (Reschedule) or cancel it (Cancel). Appointment details are described on the Appointment details page.
Chart
The Chart card in the right column says “the client doesn't see it”. It holds what your team needs to know before every appointment. On the profile the chart is read-only; empty fields say “Not set”, and Edit opens the Edit client panel (see Editing details and the chart).
| Field | What it's for | Where else it shows |
|---|---|---|
| Allergies | E.g. “PPD, sulphates”. | The red box at the top of the profile and a red warning on the appointment. |
| Preferences | The client's habits and wishes, e.g. “likes a quiet slot, coffee without sugar”. | On the appointment. |
| Service notes | What the staff member needs for the service: colour formula, preferred length, treatment progress. | On the appointment. |
| Internal notes | General notes, e.g. “pays in cash” or “comes with a child”. | Only on the profile. |
| Preferred staff member | The staff member the client likes to see. | Used in online booking. |
The Preferred staff member is used in online booking: when the client chooses any staff member, Appointa assigns the preferred one if they're free at that time.
Additional cards
Below the chart, depending on your plan and data, extra cards appear. Most of them show only when there's something to show. The exceptions are Packages (on the Premium plan) and Invoices (when fiscalisation is on), which show even when empty (“This client has no packages yet.”, “This client has no invoices yet.”).
| Card | When it shows | What it shows |
|---|---|---|
| Packages | On the Premium plan | Sold packages and memberships and the Sell package button (see below). |
| Invoices | When fiscalisation is on (Pro and Premium plans) or when the client already has an invoice | Up to 20 of the client's latest invoices with the number, time, amount and status. Clicking opens the invoice. Staff members only see invoices they issued and invoices for their own appointments. |
| Stamp card | When you have an active stamp-based loyalty program (punch card) | E.g. “Punch card · 7 / 10”, “3 more to reward” and the stamp grid. See Loyalty program. |
| Reviews the client gave | When the client has rated at least one appointment | Stars, the service and staff member, the date, the comment and a public or private badge. See Reviews. |
| Promotions | When targeted or automatic promotions (e.g. a birthday one) were sent to a client with the app | The promotion name, the date sent and a used or unused badge. Clients without the app don't have this card. |
| Recurring appointments | On the Pro and Premium plans, when the client has a series | The service, staff member, frequency (e.g. “Every 2 weeks · TUE 17:00”) and the Active, Paused or Ended status. |
Selling a package
The Sell package button shows only when you have at least one active package on offer.
- On the Packages card, click Sell package. The Sell package panel opens.
- Under Package, choose a package. Each one shows its number of visits (or Unlimited), how many days it's valid and its price.
- Check the number in Number of visits. It's prefilled from the package; change it if you're selling a different number of visits. A membership has no such field.
- Check the expiry date in Valid until. It's preset to today + the package's validity period; change it in the calendar or with End of this month or End of next month (the date is shown on the button).
- Check the Summary (visits, expiry date and price) and click Sell package.
- The panel says “Package sold”, and the package shows on the profile right away. With fiscalisation on, you can issue the invoice in the panel straight away or click Not now; a package without an invoice has an Issue invoice button. Without fiscalisation you issue it on your own register.
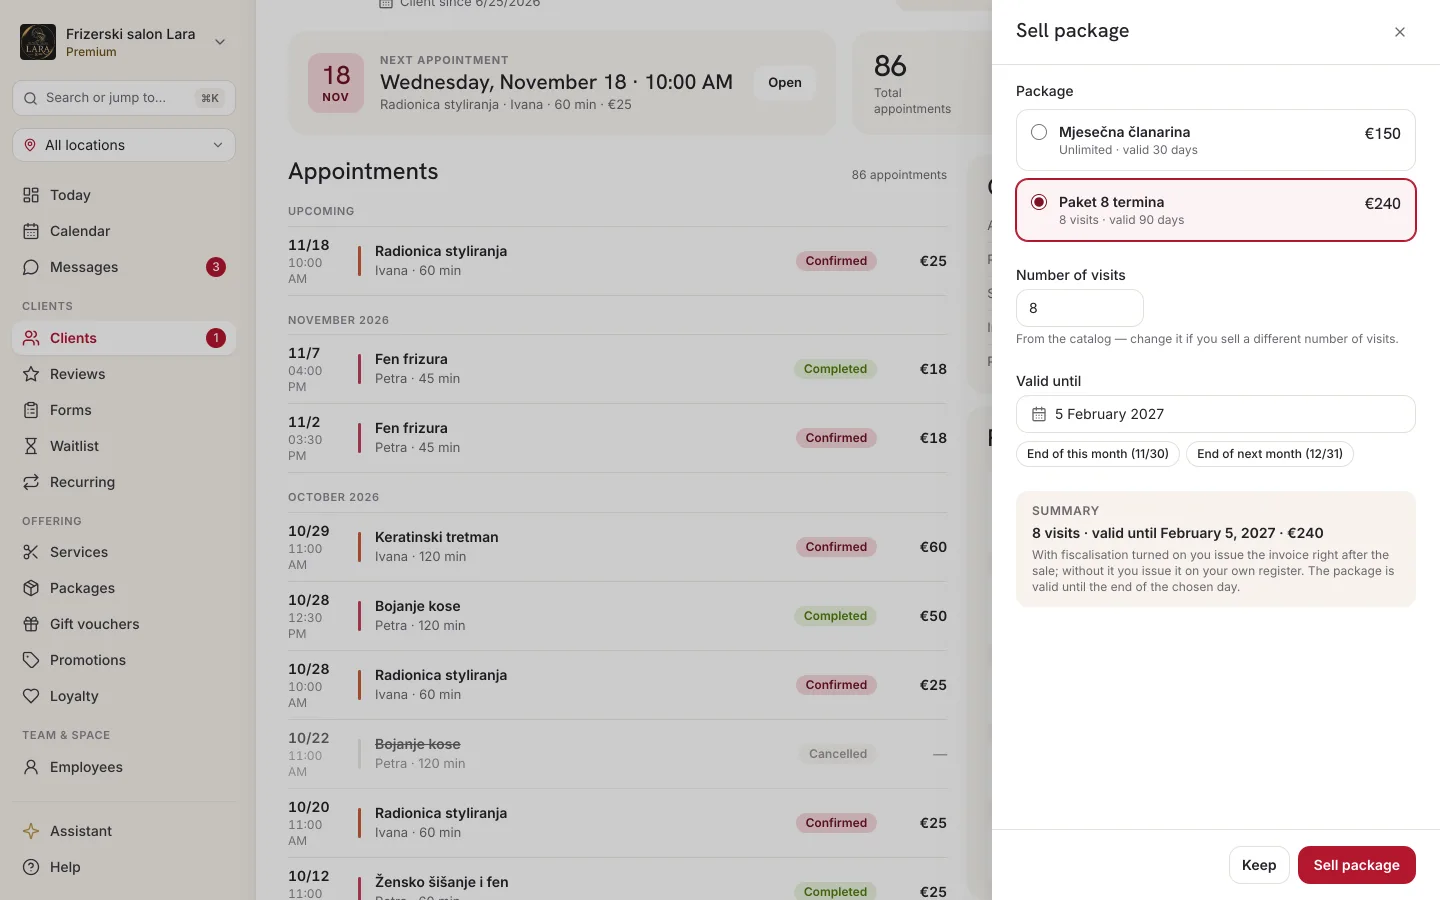
A package is valid until the end of the chosen day, and the date can't be in the past. The price is the package's price even if you change the number of visits. Each sold package shows a usage bar, “Used 3 of 8” (or Unlimited), the “valid until” date and the Active, Used up, Expired or Voided status.
You void an active package through the ⋯ menu next to it: choose Void, enter the Void reason (required) and confirm with Void package. After that, the package “can no longer be used for bookings”. Packages are sold and voided by the owner and managers. Defining packages is described on the Packages and memberships page.
Ending a recurring appointment
Next to a series that hasn't ended yet, the Recurring appointments card has a bin icon (End). In the “End the recurring rule?” dialog, confirm with Yes, end. No new appointments are created any more, and “Existing scheduled appointments stay as they are.” If you don't want those either, cancel them in the calendar. Series are ended by the owner and managers. Series are described on the Recurring appointments page.
Editing details and the chart
You edit the contact details and the chart in one panel, with one save button.
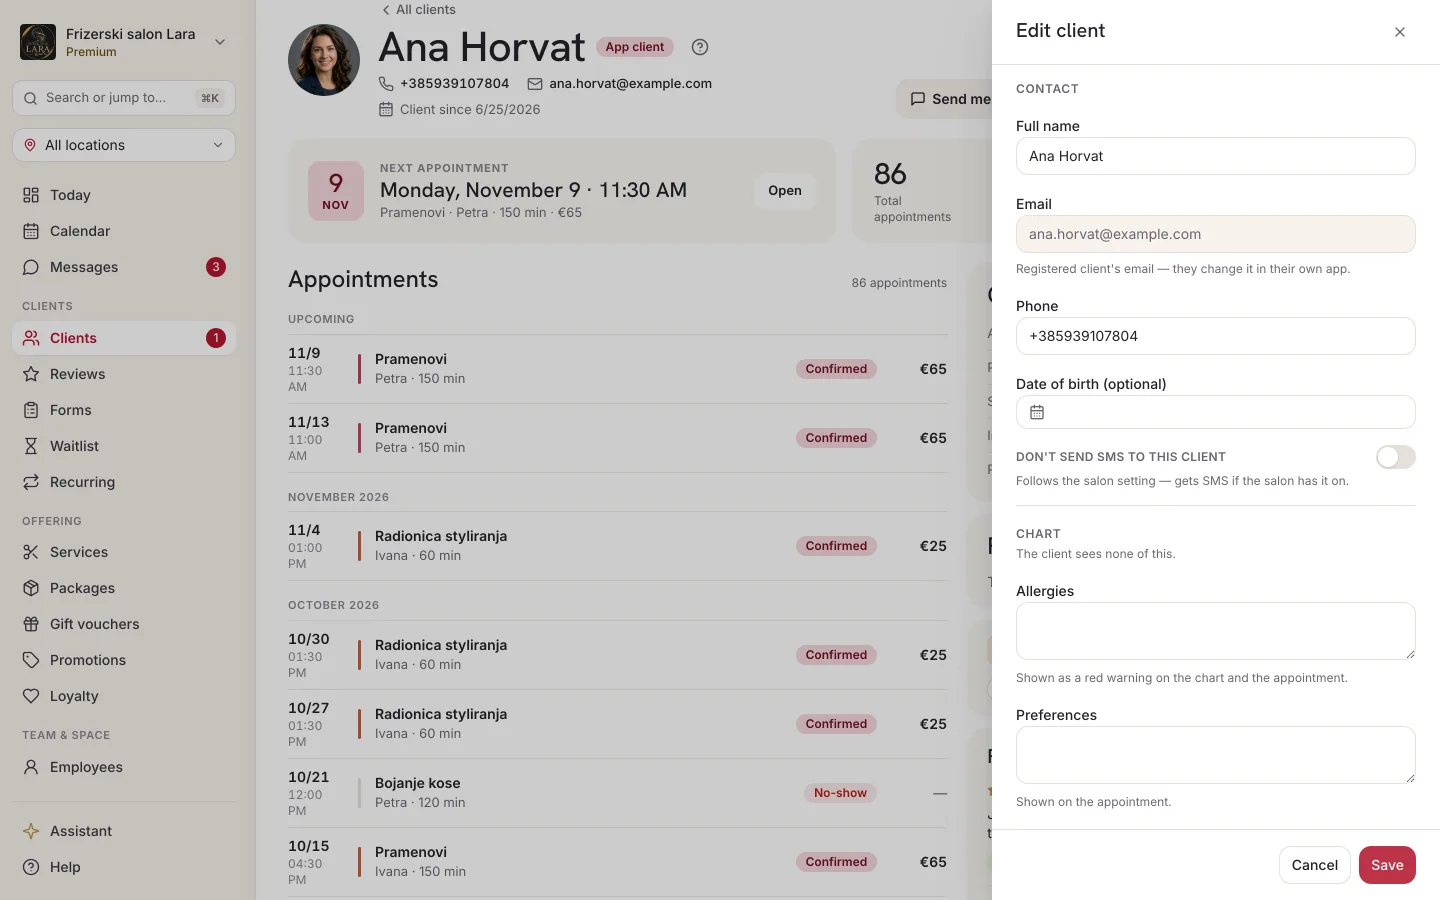
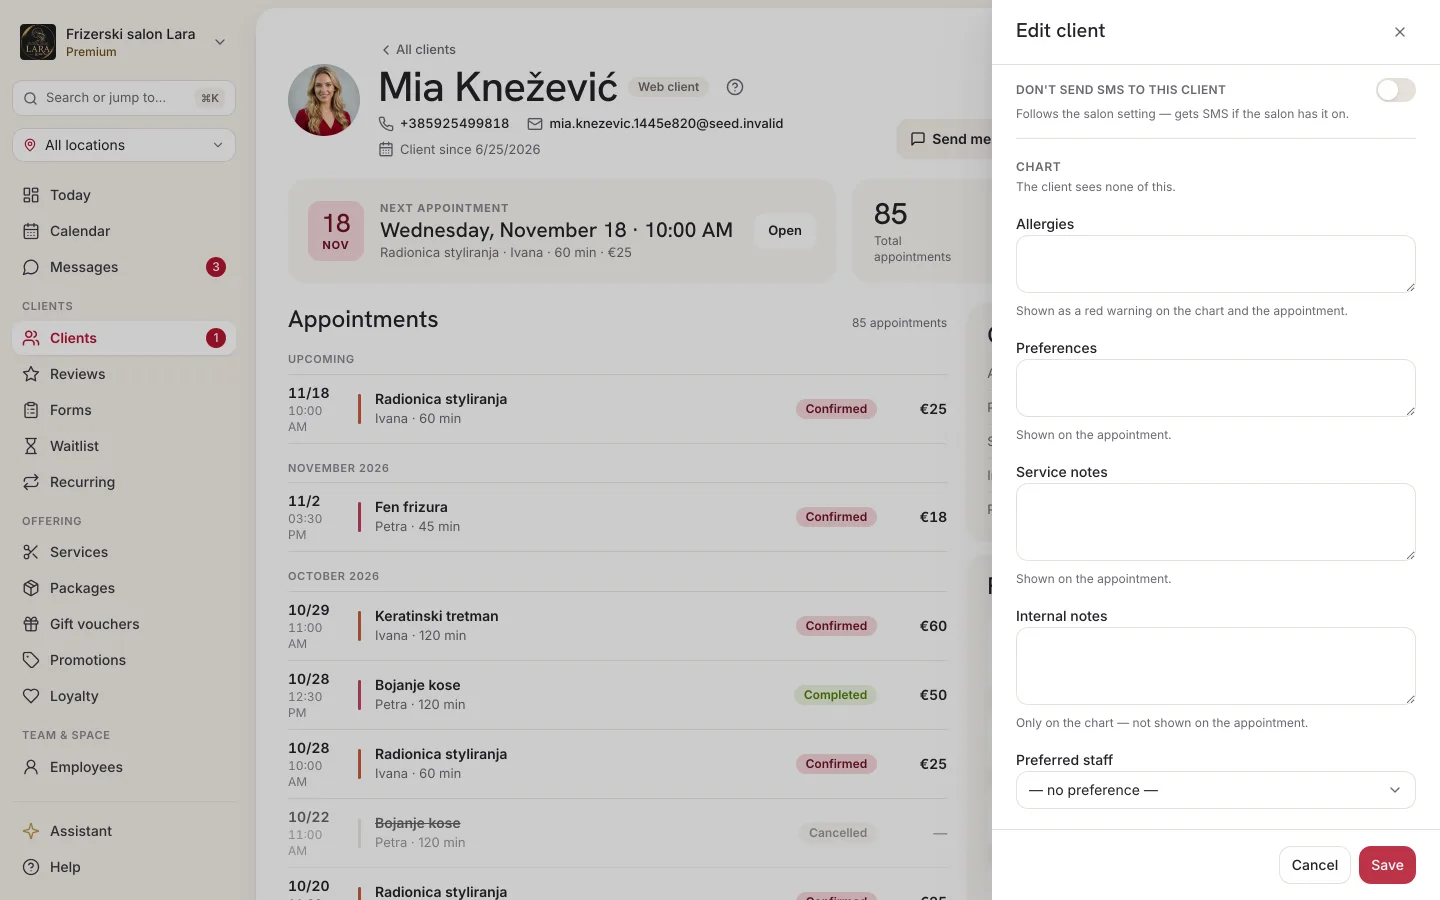
- Click Edit client in the header or Edit on the Chart card. The Edit client panel opens.
- Under Contact, change the Full name, Email, Phone or Date of birth (optional), and turn on Don't send SMS to this client if needed.
- Under Chart (“The client sees none of this.”), fill in Allergies, Preferences, Service notes, Internal notes and Preferred staff member. Under each field it says where it shows.
- Click Save.
| Field | Note |
|---|---|
| For a client with an Appointa account, the field is locked: “Registered client's email — they change it in their own app.” For everyone else, the unique email rule applies (see Duplicates). | |
| Phone | A client without an account must keep at least an email or a phone. |
| Don't send SMS to this client | Off: the client “Follows the salon setting — gets SMS if the salon has it on.” On: “No SMS — the reminder goes by email (or push if they have the app).” See SMS notifications. |
If you close the panel with unsaved changes, Appointa asks whether to discard them.
New appointment for the client
The New appointment button opens the New appointment panel. The client field isn't shown, because the appointment is automatically linked to the client whose profile you're viewing.
- Choose the Service. Price (EUR) is filled in with the service's price, and End is calculated from the service's duration.
- Choose the Employee. The list shows only staff members who perform that service.
- If the service uses a resource (e.g. a room or a device), leave Any available in the Resource field or choose a specific one.
- Choose the Date and Start, and adjust End if needed.
- If needed, adjust Price (EUR) and add Notes.
- Click Save. The message “Appointment created” appears.
If the staff member already has an appointment at that time, you'll see the message “Employee already has an appointment in that range.”
An appointment you enter this way is confirmed straight away and appears in the calendar and in the Appointments section of the profile. All the form fields are described on the New appointment and walk-ins page.
Messaging the client
Send message takes you to Messages, straight into the conversation with that client. Messages reach the client as a push notification in the Appointa app, so only clients who use the app can receive them. Sending is disabled for everyone else. See Messages.
FAQ
Can the client see my chart and notes?
No. Only your team sees the chart, including the internal notes. The client doesn't see them in the Appointa app or on your public page.
Why isn't the loyalty program shown on the profile?
The stamp card appears only when your business has an active stamp-based loyalty program (punch card). The loyalty program is part of the Premium plan.
Where can I see the client's answers to an intake form?
Answers are linked to the appointment, not to the profile. Open the appointment in the calendar's day view and look at the Questionnaires section. Appointment details opened from the Appointments section of the client profile don't show intake forms. See Intake forms and consents.
The client changed their mobile number. Where do I update it?
On the profile, click Edit client and enter the new number in the Phone field. For a client with the app, you can change the number, but not the email.
Can I add a gift voucher to a client's profile?
No. You sell and track gift vouchers under Gifts in the menu. See Gift vouchers.