Intake forms and consents
Create an anamnesis, consent or questionnaire that the client fills in online before the appointment, and review the answers on the appointment in the calendar.

Intake forms collect what you need to know before an appointment: an anamnesis before physiotherapy, an allergy check before a cosmetic treatment or a consent before a tattoo. The client fills them in on their phone, in advance and without signing in, and the answers are waiting for you on the appointment in the calendar. On this page you'll learn how to put a form together, how to link it to services, when the client receives it and where you read the answers.
Before you start
- Intake forms are available on the Pro and Premium plans. On Starter, the Forms item isn't in the menu, and the page offers an upgrade.
- Forms are created and edited by the Owner and Manager. All team members can see the form status and the answers in the calendar.
- The client gets the link to the form by email, so their profile needs an email address (or an Appointa account).
- If you want to link a form to specific services, they must exist in Services.
Forms overview
In the side menu, choose Forms. The Intake forms & consents page shows all your forms, and the Create from template and New form buttons are at the top right.
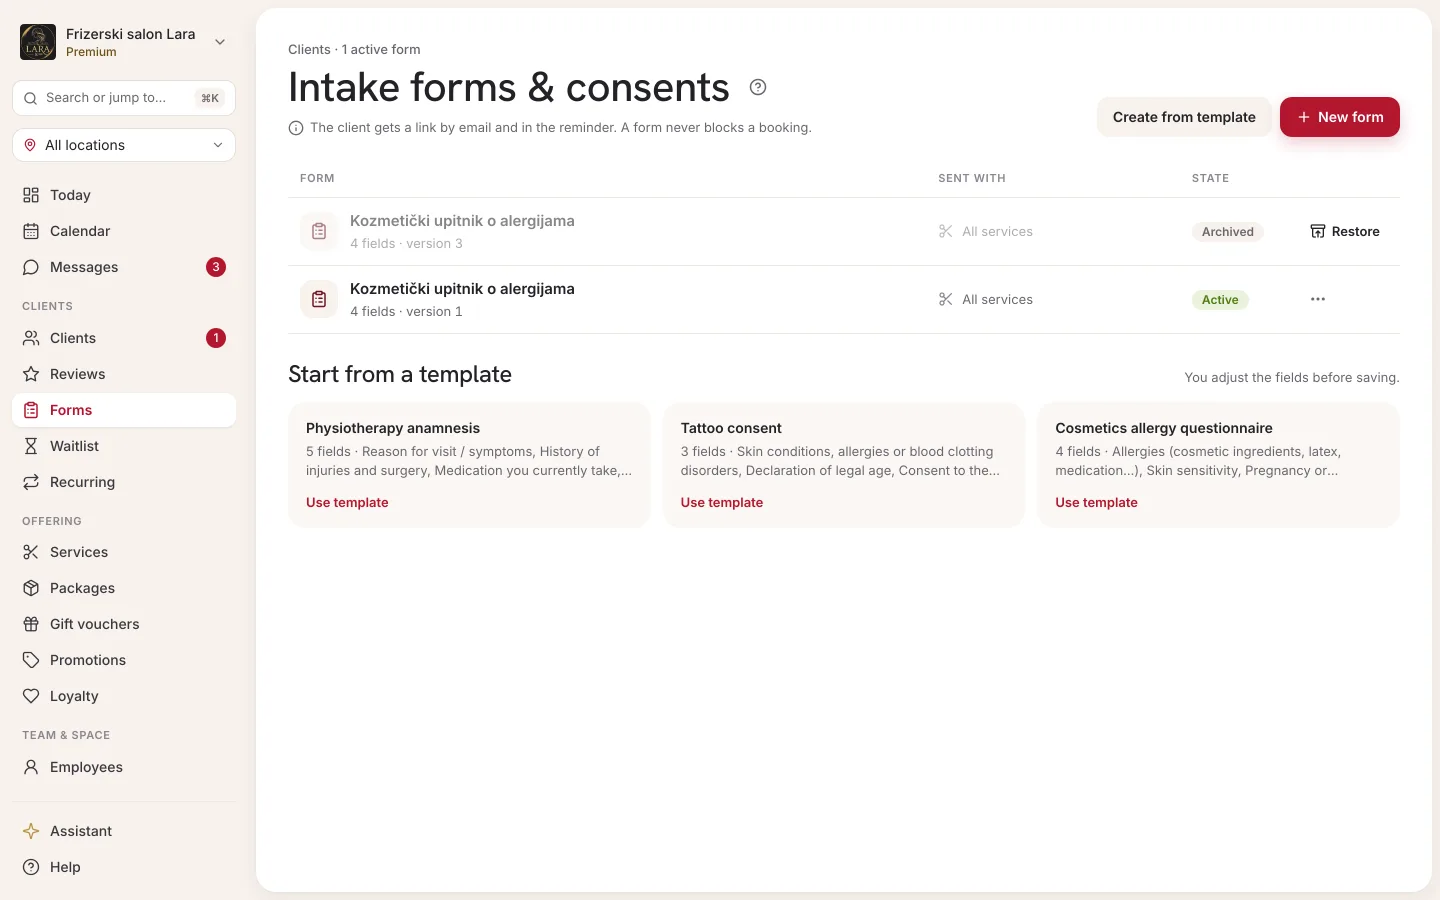
| Column | What it shows |
|---|---|
| Name | The form's name, which the client sees in the email and at the top of the form. |
| Services | All services or the number of services the form is linked to (e.g. “3 services”). |
| Version | v1, v2… It goes up every time you change the questions (see Versions). |
| Status | Active or Archived. |
| Actions | Edit and Archive, or Restore for an archived form. |
New form
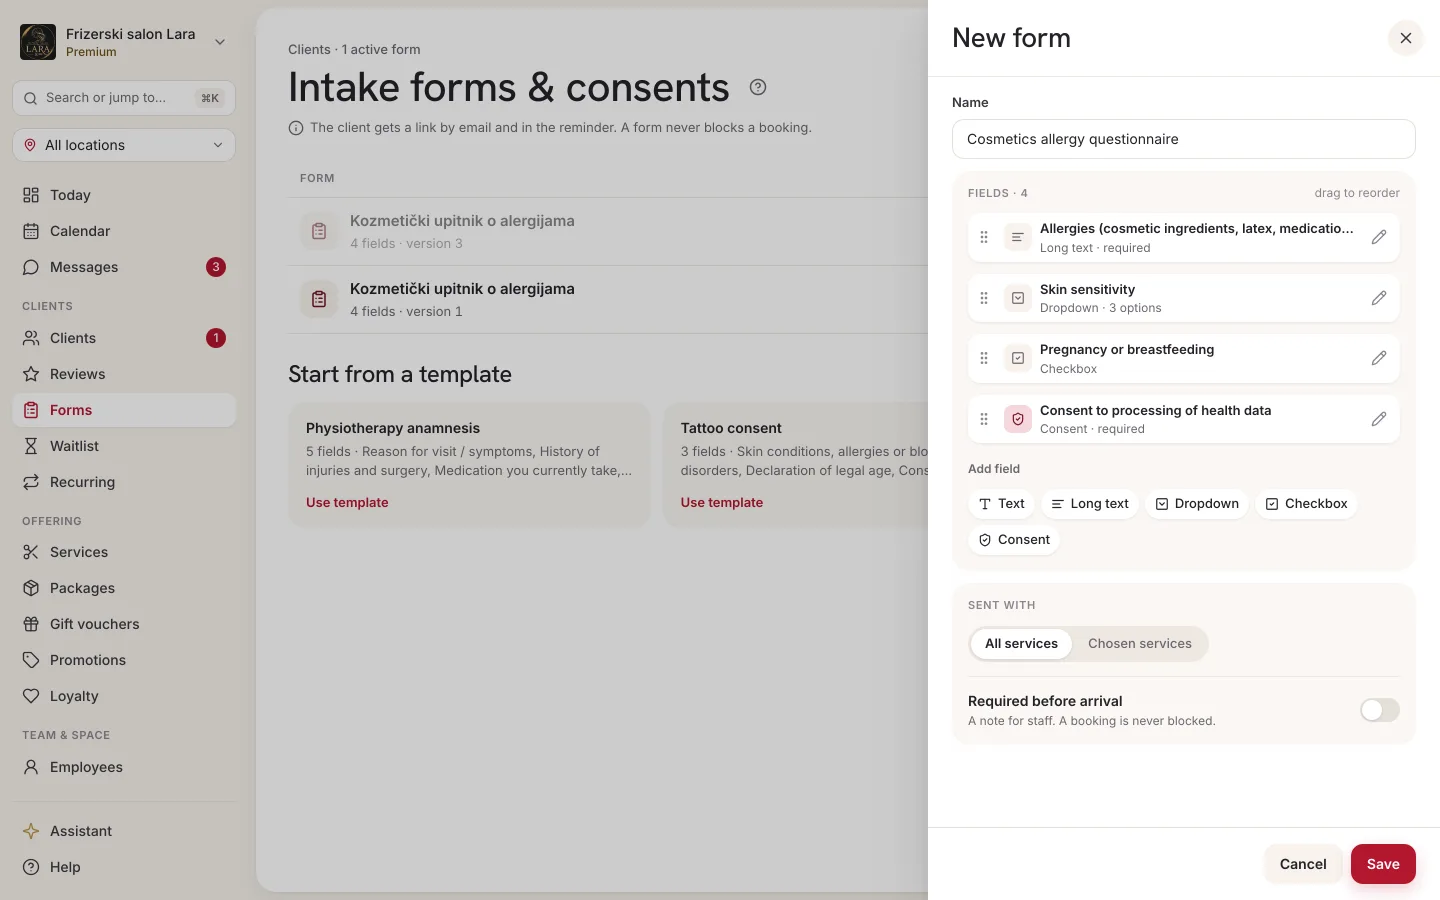
- Click New form. A panel opens on the right.
- Enter a Name, e.g. “Anamnesis before a massage”.
- Click Add field, and for each field enter the Field label (the question the client sees), choose the Field type and tick Required if needed.
- Repeat step 3 for all the questions. Remove a field you don't need with the bin icon (Remove field).
- Decide which services the form goes with (see Which services the form goes with).
- Click Save. The message “Form saved” appears.
Field types
| Field type | How the client fills it in | What else you enter |
|---|---|---|
| Text | A short, single-line answer | — |
| Long text | A multi-line answer, e.g. injury history | — |
| Dropdown | Choosing one of the answers offered | Options (one per line) |
| Checkbox | Yes or no, e.g. “Pregnancy or breastfeeding” | — |
| Consent | A checkbox next to the full consent text, which the client reads and confirms | Consent text |
When you save, Appointa tells you if something is missing: “Enter a form name.”, “Add at least one field.”, “Every field needs a label.”, “A dropdown needs at least one option.”, “A consent needs its full text.” or “Pick at least one service.”
Required before arrival
The Mark as required before arrival checkbox is a record for your team. As the panel says, “booking is never blocked in this version”.
Starting from a template
For common industries there are ready-made templates you can pick up and adjust:
- Click Create from template.
- In the Pick a template panel, click one of the templates. Each one shows its number of fields.
- The editor opens with the questions and consent texts already filled in. Adjust what you want and click Save.
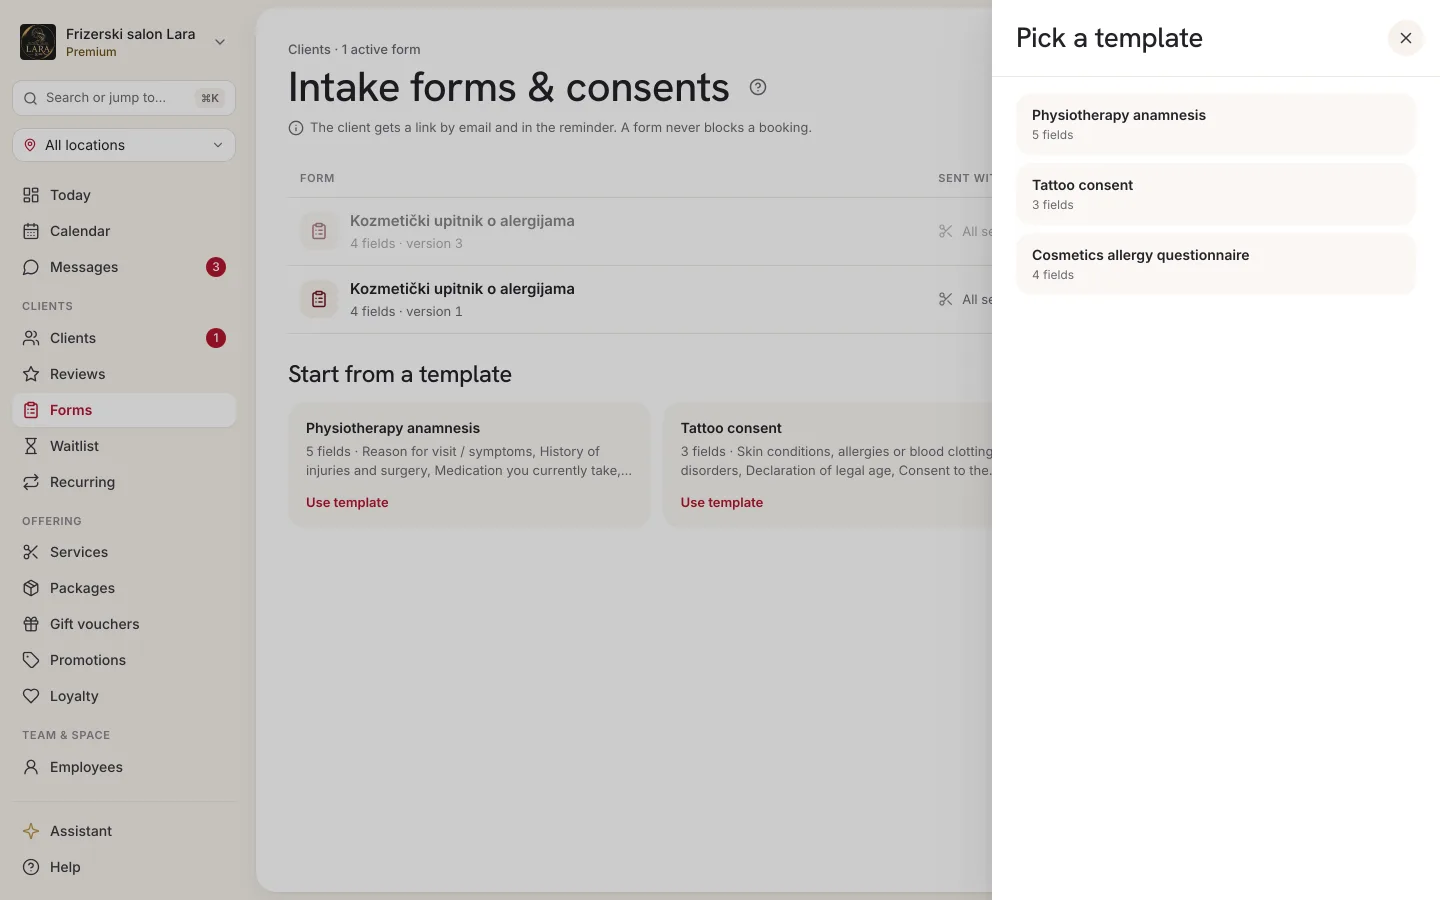
| Template | Questions |
|---|---|
| Physiotherapy anamnesis | Reason for visit / symptoms, History of injuries and surgery, Medication you currently take, Pain level, Consent to processing of health data |
| Tattoo consent | Skin conditions, allergies or blood clotting disorders, Declaration of legal age, Consent to the procedure |
| Cosmetics allergy questionnaire | Allergies (cosmetic ingredients, latex, medication…), Skin sensitivity, Pregnancy or breastfeeding, Consent to processing of health data |
Which services the form goes with
The Applies to all services checkbox is ticked by default, so the form goes with every appointment. If you untick it, a Services list appears where you tick the ones the form goes with, e.g. an anamnesis only with the first examination, or a consent only with tattoos. The form is then sent only with appointments for those services, so you don't burden other clients.
One appointment can get several forms if more than one active form matches it. The client then gets a link to each of them in the email.
Editing, versions and archiving
- Edit opens the same panel as when creating a form. When you change the questions, the form gets a new version (v2, v3…). Changing only the name or the services doesn't change the version.
- Forms that have already been sent stay in the version that applied when the appointment was booked. The client fills in those questions, and you see the answers next to the same questions they answered.
- Archive asks for confirmation: “The form will no longer be sent with new appointments. Existing responses are kept.” Reminders also stop for unfilled forms of that kind.
- Restore makes an archived form active again for new appointments.
When the client receives the form
A form is attached to every new appointment whose service matches the form: when the client books online, when you enter the appointment for the client, and when an appointment is created from a recurring series. Each appointment gets its own form, so a regular client fills it in separately for each appointment.
A recurring series' appointments are created in advance, but the email with a link goes out right away only for the series' nearest appointment. If the nearest one is the appointment you set the series up from, the client already got that email when it was booked. For later appointments in the series, the link to a form with required fields arrives in the reminder about 24 hours before the appointment.
| When | What the client receives |
|---|---|
| Right after booking | The email “Questionnaire before your visit — your business name” with a link for each form. |
| When you confirm an appointment that was waiting for your confirmation | A client without the app also gets links to forms not yet filled in, in the appointment confirmation email. A client with the app reads “please fill in the questionnaire before your visit” in the confirmation notification. |
| About 24 hours before the appointment | If a form with at least one required field hasn't been filled in yet, the link arrives in the reminder by email. |
What the client sees
The link from the email opens a simple, mobile-friendly page. No sign-in, account or app is needed. At the top are your business name, the form name, and the service and time of the appointment in your business's time zone. Required fields are marked with an asterisk, and each consent shows its full text.
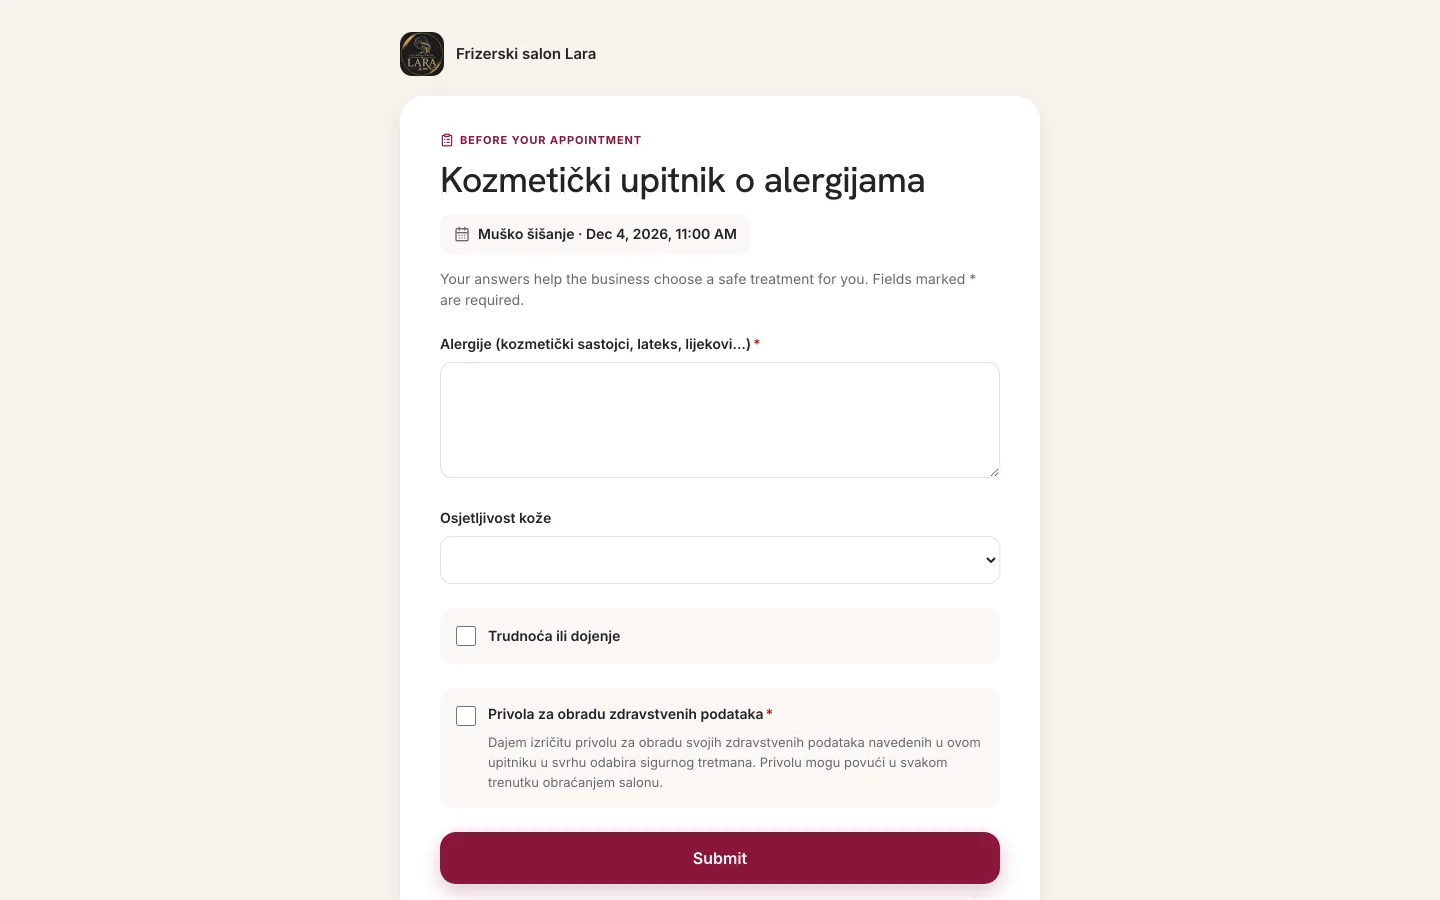
| Situation | What the client sees |
|---|---|
| A required field isn't filled in | “The field “…” is required.” |
| A required consent isn't ticked | “Please accept the consent “…” to continue.” |
| Sent successfully | “Thank you! Your answers were sent to the salon.” |
| Opens the link again | “This questionnaire has already been submitted.” |
| The appointment was cancelled | “Appointment cancelled — This questionnaire is no longer needed because the appointment was cancelled.” |
| The link is wrong | “Questionnaire not found — This link is invalid or no longer valid.” |
A form can be sent only once. After sending, the client can no longer change their answers.
Statuses in the calendar
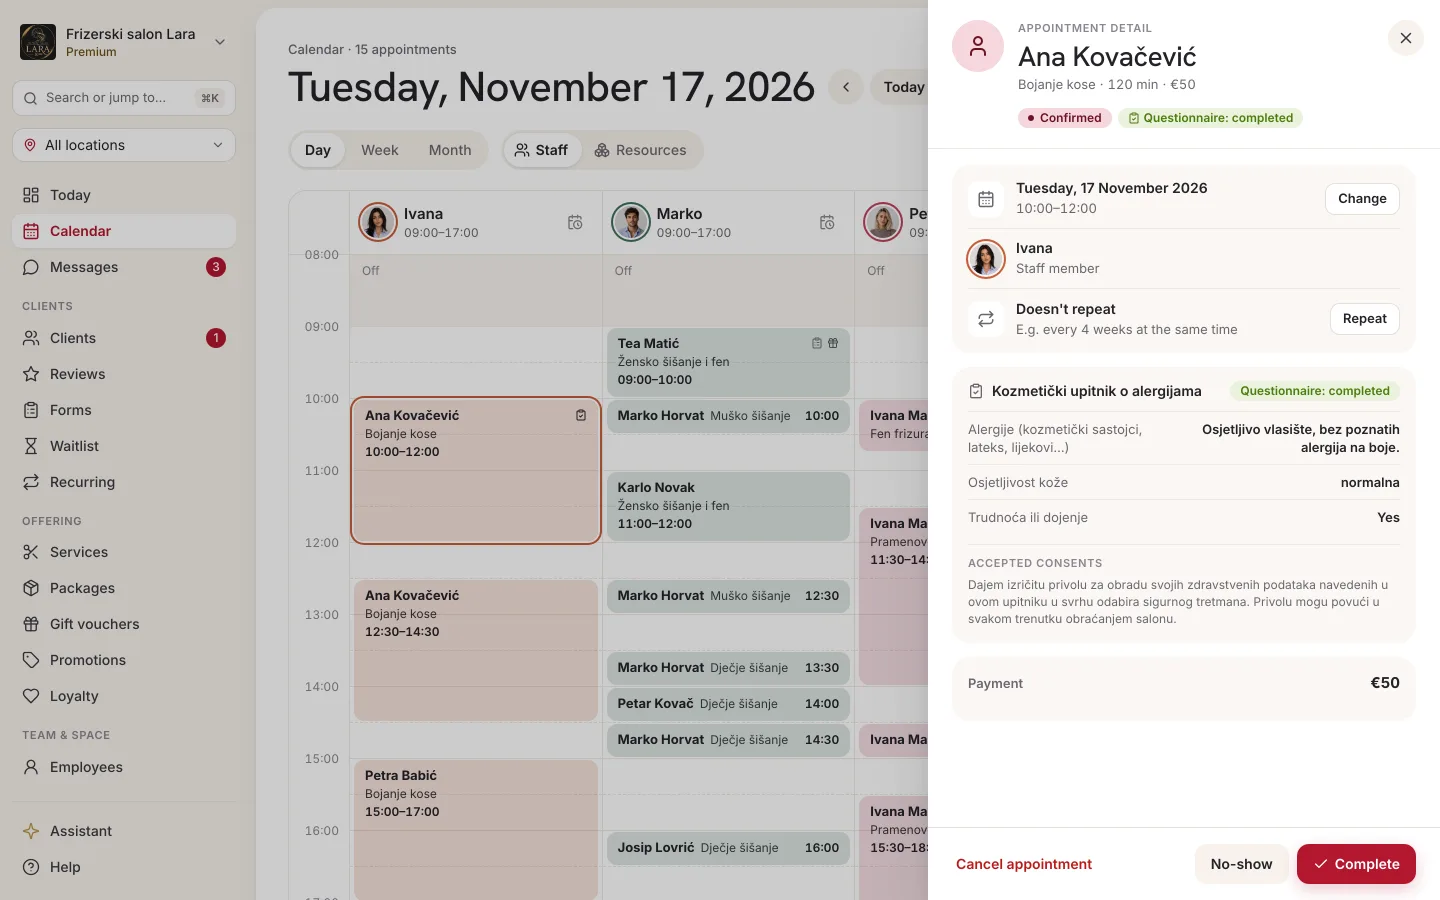
In the calendar's day view, an appointment with a form has a small clipboard icon: faded while the form is waiting to be filled in, and with a tick once it's filled in. In the appointment details, the status is highlighted with a badge:
| Badge | Meaning |
|---|---|
| Questionnaire: pending | At least one form for this appointment hasn't been filled in yet. |
| Questionnaire: completed | All forms for this appointment have been filled in. |
This way, a glance at the day tells you whom to remind or ask to fill in the form at the front desk.
The icon and badge are visible only in the day view and in the appointment details opened from it, not in the week view or in the appointment history on the client profile.
Reviewing the answers
- In the calendar, open the day view and click the appointment. The appointment details open on the right.
- Scroll to the Questionnaires section.
- For each form, you'll see its name and status. For a filled-in form, the questions and answers are below: checkboxes as Yes or No, and unanswered fields as “—”.
- Below the answers, in the Accepted consents part, is the full text of each consent the client confirmed.
Privacy and keeping the answers
- Answers often contain health information. Appointa records every time the answers are opened, that is, who viewed them and when.
- With each accepted consent, its full text is saved, exactly as the client saw it, along with the moment it was accepted. Changing the text in the form later doesn't change consents already given.
- Answers are automatically deleted 24 months after the appointment.
- When you anonymize a client or the client deletes their Appointa account, their answers are permanently deleted right away (see Client privacy).
FAQ
Does the client need the app or an account?
No. The form opens in the browser, from the link in the email, without signing in.
What if the client doesn't fill in the form before the appointment?
Nothing is blocked and the appointment stands. In the calendar you'll see the Questionnaire: pending badge, so you can ask the client to fill it in at the front desk, on their own phone, from the email they received.
The client made a mistake in an answer. Can I correct it?
No. Submitted answers can't be changed, either by the client or by you. Note an important correction in the client chart, e.g. in the Allergies field.
Can I ask for a consent with its full text?
Yes. A Consent field shows the client the entire Consent text next to the checkbox. If the consent is required, the form can't be submitted until the client ticks it.
Can I resend the link to the client?
There's no manual resend button. If the form has required fields, the link arrives automatically in the reminder about 24 hours before the appointment.
What happens to forms if I switch to Starter?
Links clients have already received keep working, so they can still fill them in. The Forms page and the answers in the calendar are available only on the Pro and Premium plans. Archive any forms you no longer want to send to clients before switching to Starter, because on Starter you can no longer open the Forms page.