Appointment details and statuses
What the appointment details show and what each status means: confirming requests, rescheduling, cancelling, no-shows, completing and client notifications.

Every appointment in the calendar has its own details: a panel with the client, service, time and the buttons you use to change the appointment's state. On this page you'll learn what each status means and in what order they change, how to confirm an online request, reschedule or cancel an appointment, record a no-show and complete an appointment, and which notification the client gets after each action.
Opening the details
- In the menu, open Calendar and the day view of the day you want.
- Click the appointment block. The Appointment detail panel opens on the right.
- You close the panel with the close button, the Esc key or by clicking outside the panel.
You can also open an appointment from a client's profile: click the appointment in the Appointments section or Open on the Next appointment card. Details opened this way have the same status buttons, but the Reschedule panel has no Employee field, you can't issue an invoice from there, and intake forms aren't shown — for those, open the appointment from the calendar. In the week and month views, clicking an appointment first opens the day view for that day.
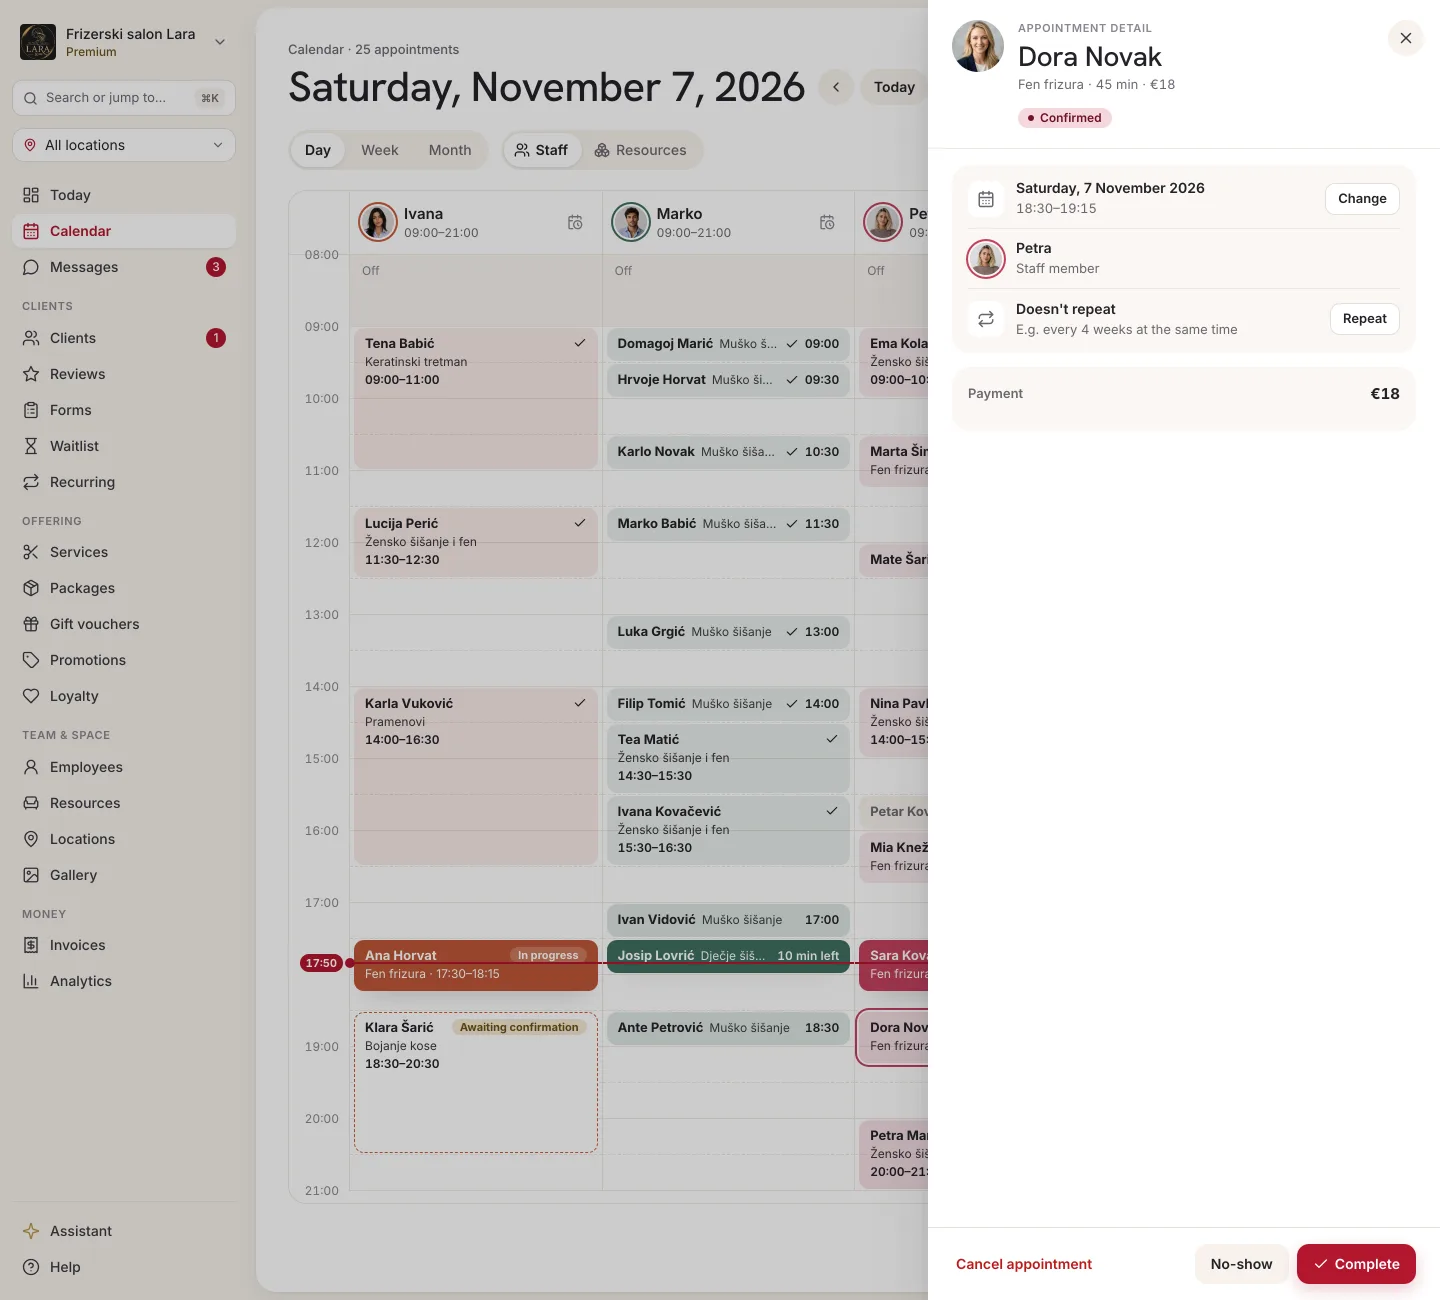
What the details show
| Part of the panel | What it shows |
|---|---|
| Client | The client's photo (or an icon) and name. If the appointment is linked to a client, the name is a link to their profile. An appointment without a client is labeled Walk-in. The service name is shown below the name. |
| Labels | The appointment's status. Next to it you may see Recurring (the appointment is part of a recurring series) and Questionnaire: pending or Questionnaire: completed if your plan includes intake forms. |
| Gift voucher | “Paid by gift voucher” with the amount and the voucher code, if the appointment was paid with a voucher. |
| Time | The date and the start and end time, always in the salon's time zone. |
| Staff member | Who carries out the appointment. |
| Resource | For services with a resource: Room, Equipment, Vehicle or Resource, with the resource's name and photos. |
| Client note | The notes entered with the appointment — yours, or the client's note from their online booking. |
| Cancellation reason | For a cancelled appointment: the reason entered. |
| No-show reason | For an appointment marked as no-show: the selected reason and note. |
| Questionnaires | The answers to the intake form, if there are any (see Intake forms and consents). |
| Invoice | The invoice status for the appointment and the buttons for issuing it, if fiscalisation is turned on (see Completing an appointment and invoicing). |
Appointment statuses
| Status | How it comes about | Takes up time? |
|---|---|---|
| Pending | The client booked online and your business has Direct booking turned off. The request is waiting for your confirmation. | Yes |
| Confirmed | You entered the appointment yourself, the client booked with Direct booking turned on, you confirmed the request, or it was created by a recurring series. | Yes |
| Completed | You clicked Complete or issued an invoice for the appointment. | Yes |
| Cancelled | It was cancelled by your business or the client, or a pending request expired automatically. | No |
| No-show | The client didn't turn up and you recorded it with the Mark no-show button. | No |
Completed, Cancelled and No-show are final statuses: the status of such an appointment can't be changed any more. If you made a mistake, enter a new appointment.
Buttons by status
| Status | Buttons in the details |
|---|---|
| Pending | Confirm, Reschedule, Cancel |
| Confirmed | Complete, Mark no-show, Reschedule, Cancel |
| Completed | No status buttons. If fiscalisation is turned on, Issue invoice. |
| Cancelled, No-show | No buttons. |
On Pending and Confirmed appointments that are linked to a client and aren't part of a series, there's also Make recurring (Pro and Premium plans, see Recurring appointments).
Pending requests
When Direct booking is turned off in Settings → Bookings, every online booking arrives as a request with the Pending status. In the calendar you recognize it by its gold color, and on the dashboard by the gold edge in the list of upcoming appointments. A request takes up time, so another client can't book it.
Accepting a request:
- Click the pending appointment.
- Click Confirm. The status changes to Confirmed.
A client with the Appointa app gets a push notification with the confirmation. A client without the app gets an email with the appointment details and a cancellation link.
Declining a request: there's no separate “Reject” button. Click Cancel, optionally enter a reason (e.g. “We're closed that day, please get in touch for another time.”) and confirm. The client is notified of the cancellation.
Automatic expiry of requests
A request you don't respond to doesn't hang around forever. Appointa cancels it automatically 24 hours after it was sent or when the appointment starts — whichever comes first. The check runs about every 15 minutes.
- The appointment gets the Cancelled status with the reason “Expired automatically — the request wasn't confirmed in time”.
- The client is notified that the request wasn't confirmed (a push notification or an email with a link to book again), unless they've turned reminders off in the app.
- The freed-up time is offered to clients on the waitlist.
Rescheduling an appointment
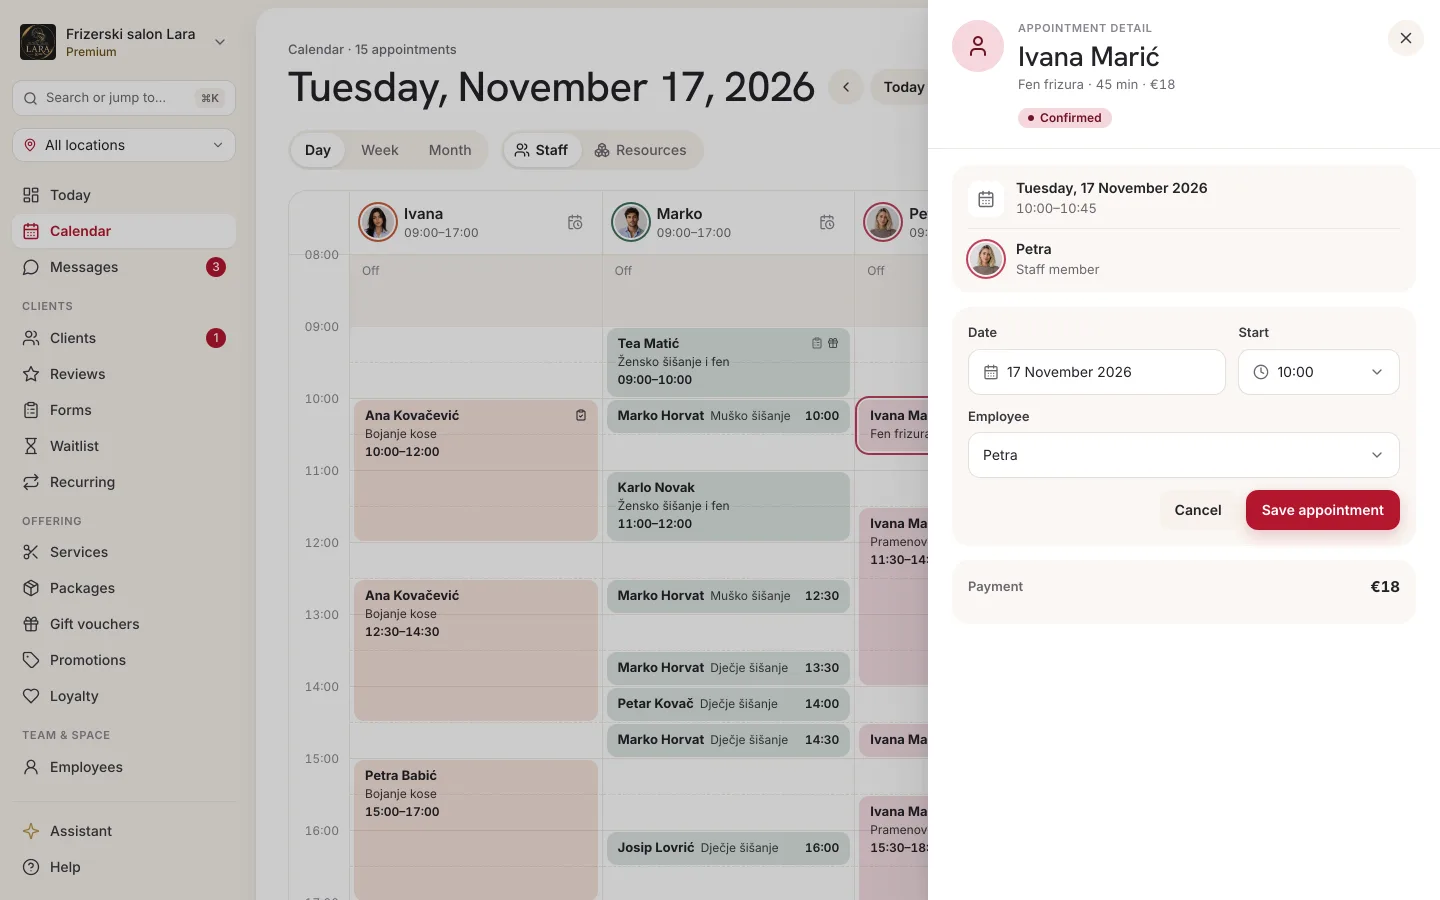
On a computer, the quickest way to move an appointment is to drag it in the calendar (see Moving an appointment by dragging). On a phone or tablet, or when you're changing the date, use the button:
- In the details, click Reschedule.
- Choose the new Date and Start (in 15-minute steps).
- If needed, choose a different employee in the Employee field. Only employees who perform that service are offered.
- Click Save. The message “Appointment moved.” appears.
The appointment's duration stays the same. If the new time overlaps another appointment of the employee, you'll see “That overlaps another appointment — not moved.” and the appointment stays where it was.
When the time changes, the client is notified of the new appointment time. If you only change the employee and the time stays the same, nothing is sent to the client. The old time that has been freed up is offered to clients on the waitlist.
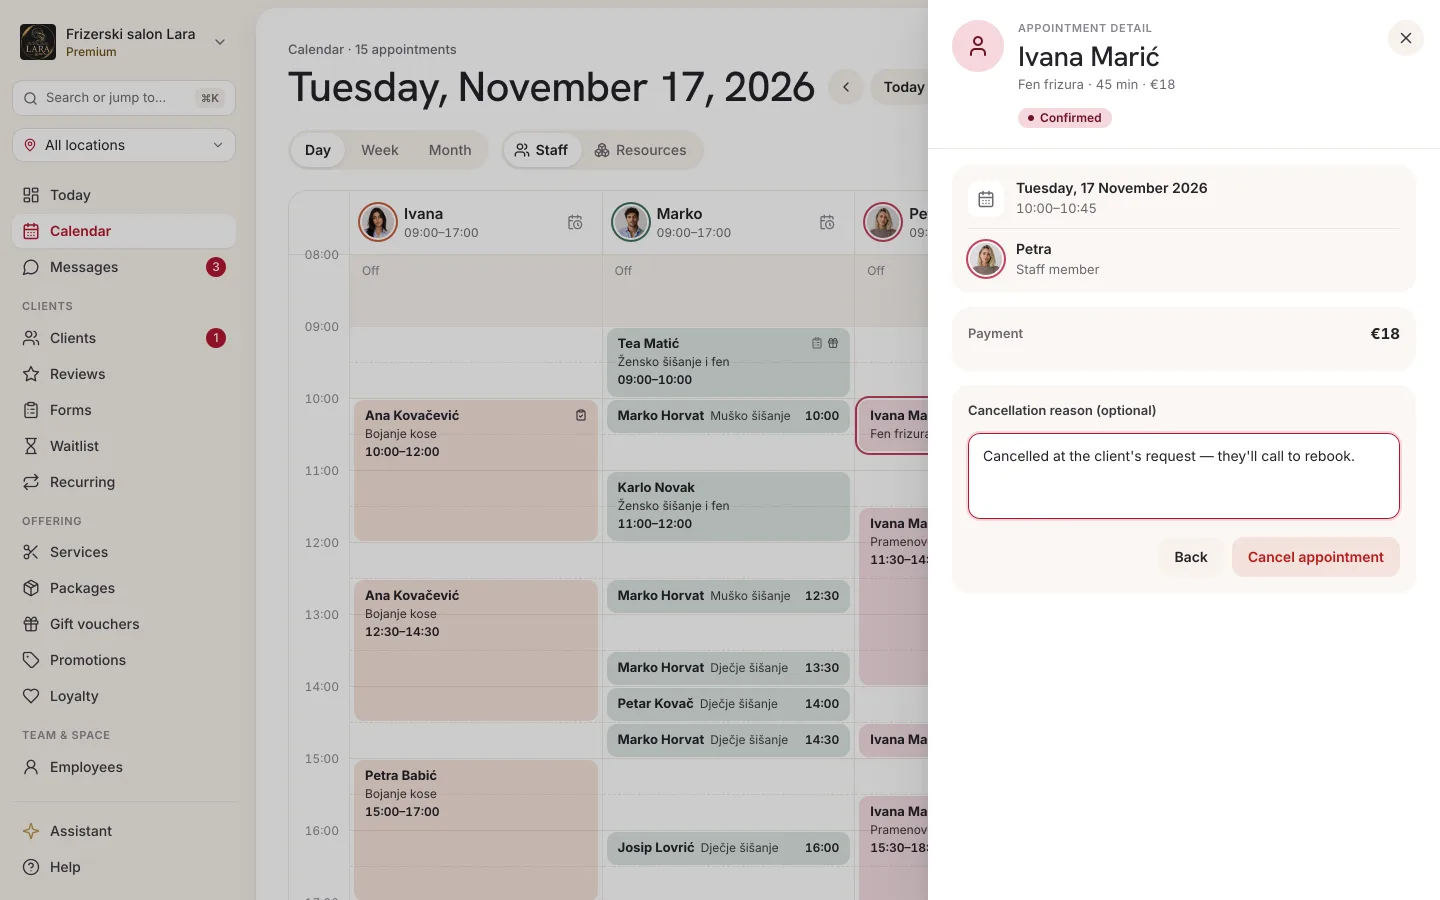
Cancelling an appointment
- In the details, click Cancel.
- In the Cancellation reason (optional) field, enter a message for the client, e.g. “Our staff member is ill, we'll get in touch about a new appointment.”
- If the Charge the cancellation fee checkbox appears, decide whether to tick it (see below).
- Click Cancel appointment. To go back without cancelling, click Back.
What happens after you cancel:
- The appointment gets the Cancelled status, stays in the day view struck through, and no longer takes up time.
- The client is notified of the cancellation. They can see the reason you entered next to the cancelled appointment in the Appointa app.
- If the appointment was paid with a package, the visit is returned to the client's package.
- If a loyalty reward was redeemed on the appointment, the stamps go back on the client's card. An amount paid with a gift voucher goes back on the voucher, and a redeemed promo code no longer counts toward the promotion's limits.
- The freed-up time is offered to clients on the waitlist.
Late-cancellation fee. The checkbox only appears if you've entered a Late-cancellation fee in Settings → Bookings. It's ticked in advance when there are fewer hours left until the appointment than the Latest cancellation setting allows — that is, when the cancellation really is too late. You can untick it. Appointa doesn't charge anything to the client's card: the checkbox only records the fee, and you arrange payment with the client.
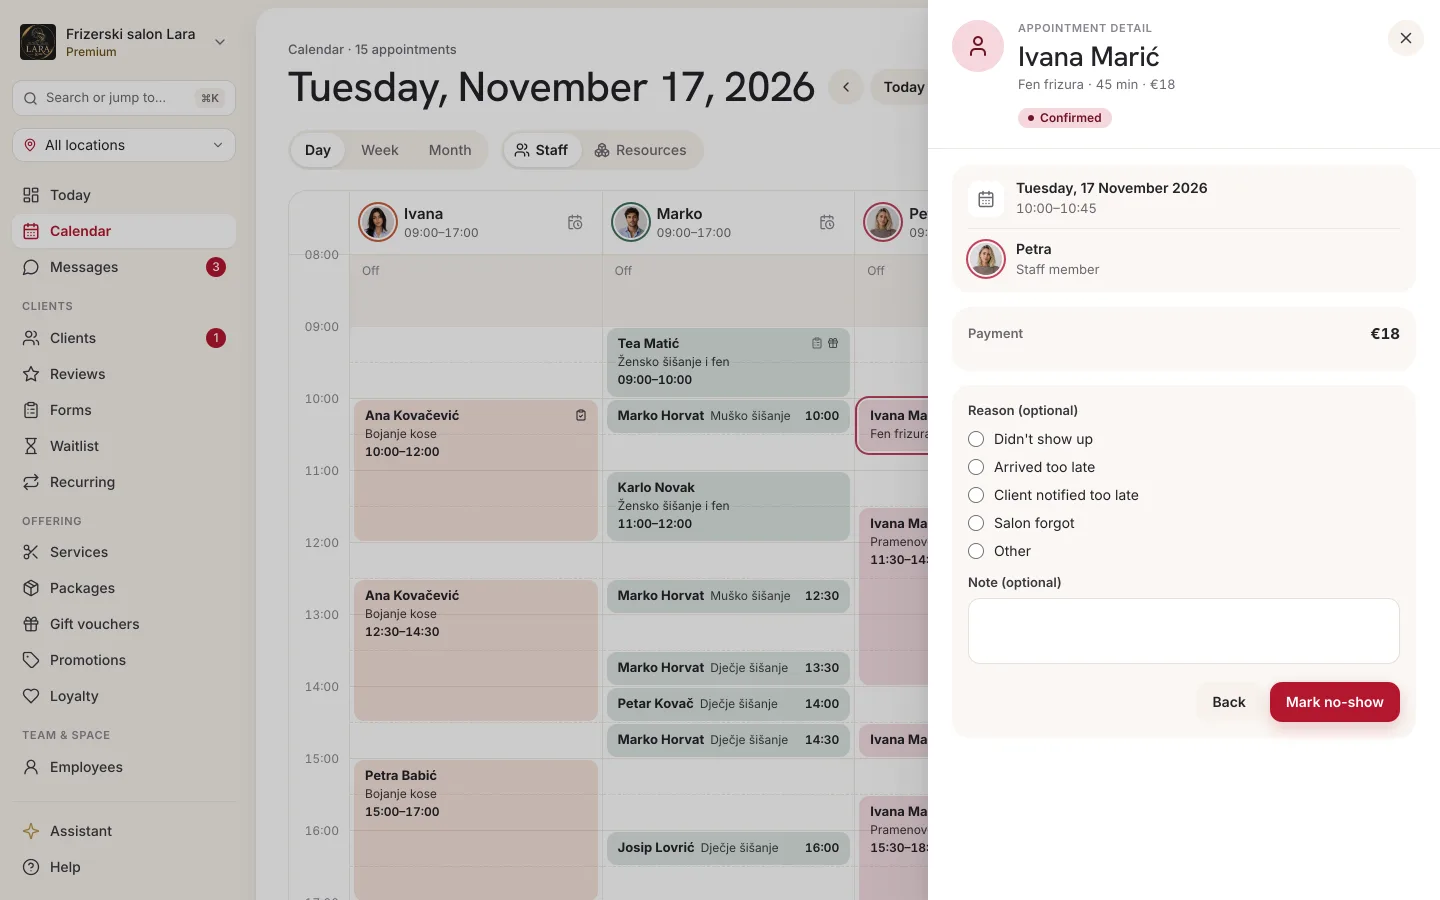
No-shows
When a client doesn't turn up, record it — no-shows are visible on the client's profile and can automatically block online bookings.
- Open an appointment with the Confirmed status.
- Click Mark no-show.
- Optionally choose a reason: Didn't show up, Arrived too late, Client notified too late, Salon forgot or Other, and fill in Note (optional).
- Click Mark no-show.
What happens:
- The appointment gets the No-show status and turns grey; the reason and note are visible in the details.
- A client with the Appointa app gets a push notification that the appointment was missed. Others receive nothing.
- The number of no-shows is visible on the client's profile in the No-shows statistic.
- A visit from a package is not returned.
- If you marked the appointment in advance (e.g. the client let you know they're not coming), the freed-up time is offered to clients on the waitlist.
Completing an appointment and invoicing
When the service has been provided, open the appointment and click Complete. The status changes to Completed.
- If you have an active loyalty program, the completed appointment counts toward the program for the client, and a client with the app gets a push notification when they earn a stamp (see Loyalty program).
- Otherwise, nothing is sent to the client.
If fiscalisation is turned on for your business and you're allowed to issue invoices, the panel stays open after Complete and asks “The appointment is completed. Issue the invoice?”. Click Issue invoice to issue it or Not now to close the panel. The Issue invoice button is also available on confirmed appointments — issuing an invoice completes the appointment at the same time. The whole procedure is described on the Issuing invoices page.
Client notifications
| Action | Client with the Appointa app | Client without the app |
|---|---|---|
| Confirm (a pending request) | Push notification with the confirmation | Email with the details and a cancellation link |
| Time change (Reschedule or dragging) | Push notification with the new time | SMS if SMS notifications are turned on, otherwise email |
| Changing only the employee | Nothing | Nothing |
| Cancel | Push notification and email | SMS if SMS notifications are turned on, otherwise email |
| Mark no-show | Push notification | Nothing |
| Complete | Nothing (except the loyalty stamp push notification) | Nothing |
| Automatic expiry of a request | Push notification |
A Walk-in appointment isn't linked to a client, so nothing is sent to anyone. A client without an email address or mobile number can't receive notifications either. More about the channels on the Reminders and notifications and SMS notifications pages.
Protection against no-shows
Settings → Bookings has settings that reduce the number of empty slots. They're described in detail on the Booking rules page.
| Setting | What it does |
|---|---|
| Latest cancellation | Up to how many hours before the appointment the client can cancel on their own. |
| Late-cancellation fee | An amount that makes the Charge the cancellation fee checkbox appear when cancelling. |
| Block after no-shows | A client with this many no-shows in the last 6 months can't book online. You can still enter an appointment for them manually. |
| Earliest online booking | How many hours before the appointment, at the latest, a client can book online. |
| Max active bookings | How many upcoming appointments one client can have at a time. |
Frequently asked questions
I clicked Complete on the wrong appointment. Can I undo it?
No. Completed is a final status. If the client was actually meant to come later, enter a new appointment for them.
Why can't I see the Mark no-show button?
The button only exists on confirmed appointments. Confirm or cancel a pending request first.
Where can I see a client's allergies?
The appointment details show the client's chart, where filled in: allergies as a red Allergies warning, plus Preferences and Service notes. You enter and change them on the client's profile, with Edit on the Chart card: click the client's name in the appointment details and their profile opens (see Client profile).
Can I change the service on an existing appointment?
In the details, you can only change the date, time and employee. For a different service, cancel the appointment and enter a new one.