Resources
Rooms, equipment and vehicles booked alongside an employee: adding them, photos, linking to a service, the calendar view, blocks and what clients see.

A resource is what an appointment takes up alongside an employee: a massage room, a hall, a laser, a court or a vehicle. When a service requires a resource, Appointa reserves one with every appointment automatically and makes sure that neither the employee nor the resource is booked twice at the same time. On this page you'll learn how to add a resource and its photos, link it to a service, follow it in the calendar and block it for cleaning or servicing.
Before you start
- Resources are available on all plans, including Starter.
- Resources are edited by the owner and managers. Staff don't see the Resources menu item.
- If your services don't take up any space or equipment, you don't need resources, and everything works without them.
When to use resources
Resources make sense when an appointment depends not only on a free employee but also on a free room, device or vehicle. Examples: two massage rooms and three therapists, one laser for the whole salon, a driving school's vehicles, courts.
Every resource has a kind. A service doesn't ask for a specific resource, but for a kind: “any free room”.
| Kind | Examples |
|---|---|
| Room / space | treatment room, hall, booth |
| Equipment | laser, sunbed, measuring device |
| Vehicle | driving car, van |
| Other | court, table, anything else |
The resource list
In the sidebar, select Resources. Below the title you can see the number of active and archived resources (archived ones are only counted once you turn on Show archived). On the right are the Show archived switch and the Add resource button, and the Search resources… field filters the list by name.
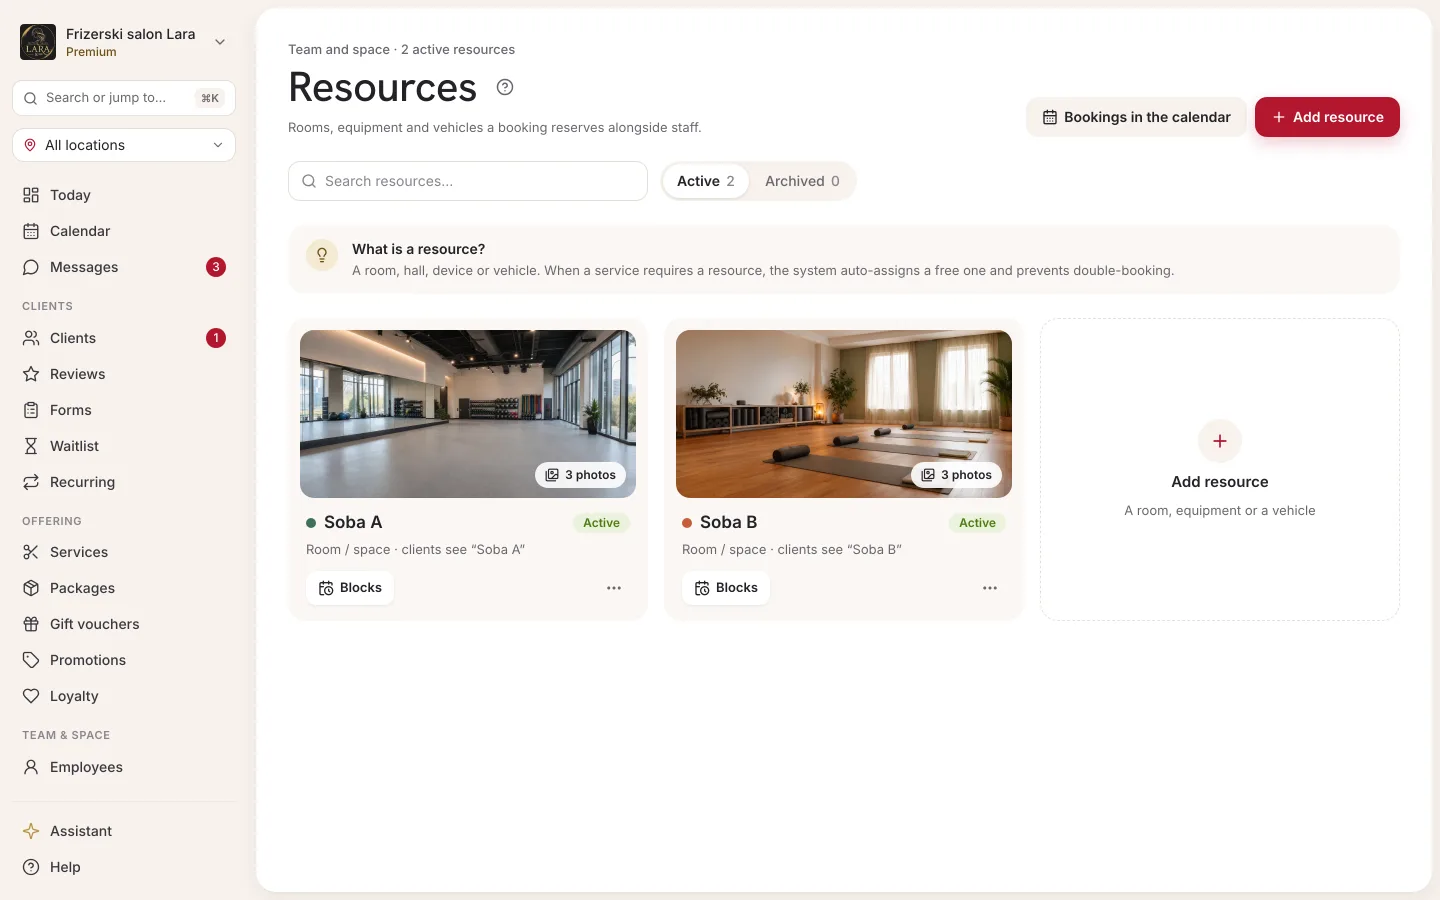
| Column | What it shows |
|---|---|
| Name | The internal name, with a dot in the resource's color. |
| Kind | Room / space, Equipment, Vehicle or Other. |
| Status | Active or Archived. |
| Actions | A calendar-with-clock icon — Blocks (maintenance), and a box icon — Archive. An archived resource has a Restore icon. |
Clicking the row of an active resource opens the Edit resource panel.
Adding a resource
- In the menu, open Resources.
- Click Add resource. The New resource panel opens on the right.
- Enter a Name (e.g. “Hall A”, “Laser”, “Golf 1”).
- If you like, enter a Name shown to clients (e.g. “Room 1”).
- Choose a Kind. The default is Room / space.
- If you like, choose a Color (calendar).
- Click Save.
- To add photos, open the resource again by clicking its row (see Photos).
| Field | Required | What it means |
|---|---|---|
| Name | yes | The internal name your team sees. It can include notes (“Room 2 — by the window”). Up to 255 characters. |
| Name shown to clients | no | The name the client sees on the booking confirmation and in the reminder. If it's empty, the client sees the internal name. |
| Kind | yes | Determines which services can use the resource. |
| Color (calendar) | no | The color of the resource's column in the calendar. |
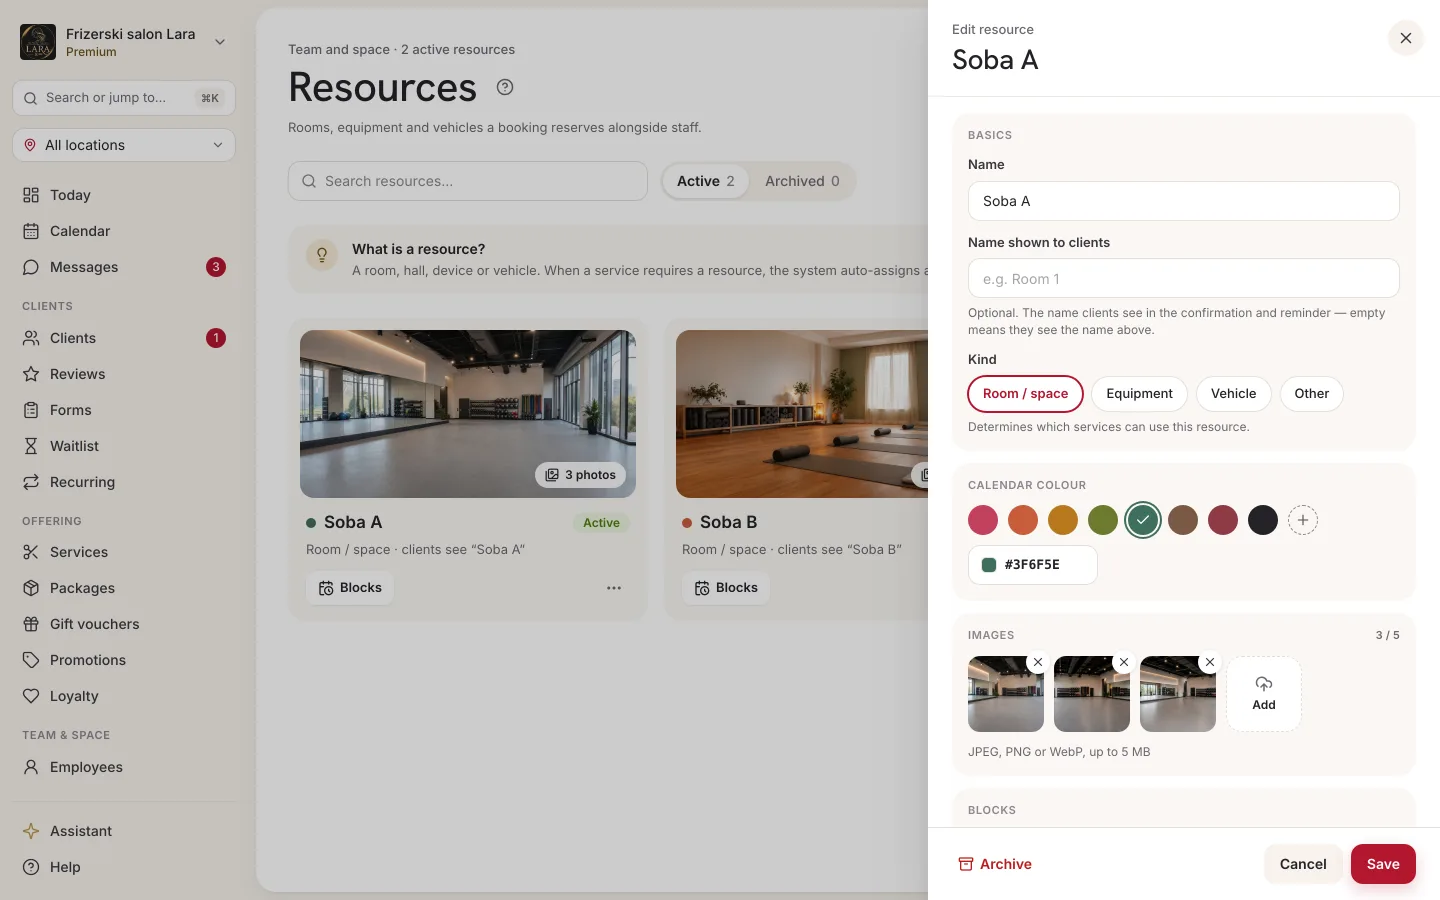
| Images | no | Up to 5 photos, after the first save. |
Photos
Photos help the client find their way: which room it is, what the vehicle looks like. They can only be added once the resource has been saved.
- Click the resource's row. Edit resource opens.
- In the Images section, click Add image and choose a file (JPEG, PNG or WebP, up to 5 MB).
- The image is saved as soon as it's uploaded. The counter next to the heading shows how many there are (e.g. “3/5”).
- You delete an image with the red × on it and confirm in the Delete this image? window with the Yes, delete button.
| Message | Cause |
|---|---|
| The image exceeds 5 MB. | Shrink the image. |
| Unsupported format. Use JPG, PNG or WebP. | E.g. HEIC from an iPhone. Save it as a JPG. |
| Maximum 5 images per resource. | Delete one, then add the new one. |
The client sees the photos in the client app, in the details of their appointment.
Linking to a service
A resource is only reserved with services that require it.
- Open Services and click a service.
- In the Requires a resource field, choose a kind, e.g. Room / space. The default is No resource.
- Click Save.
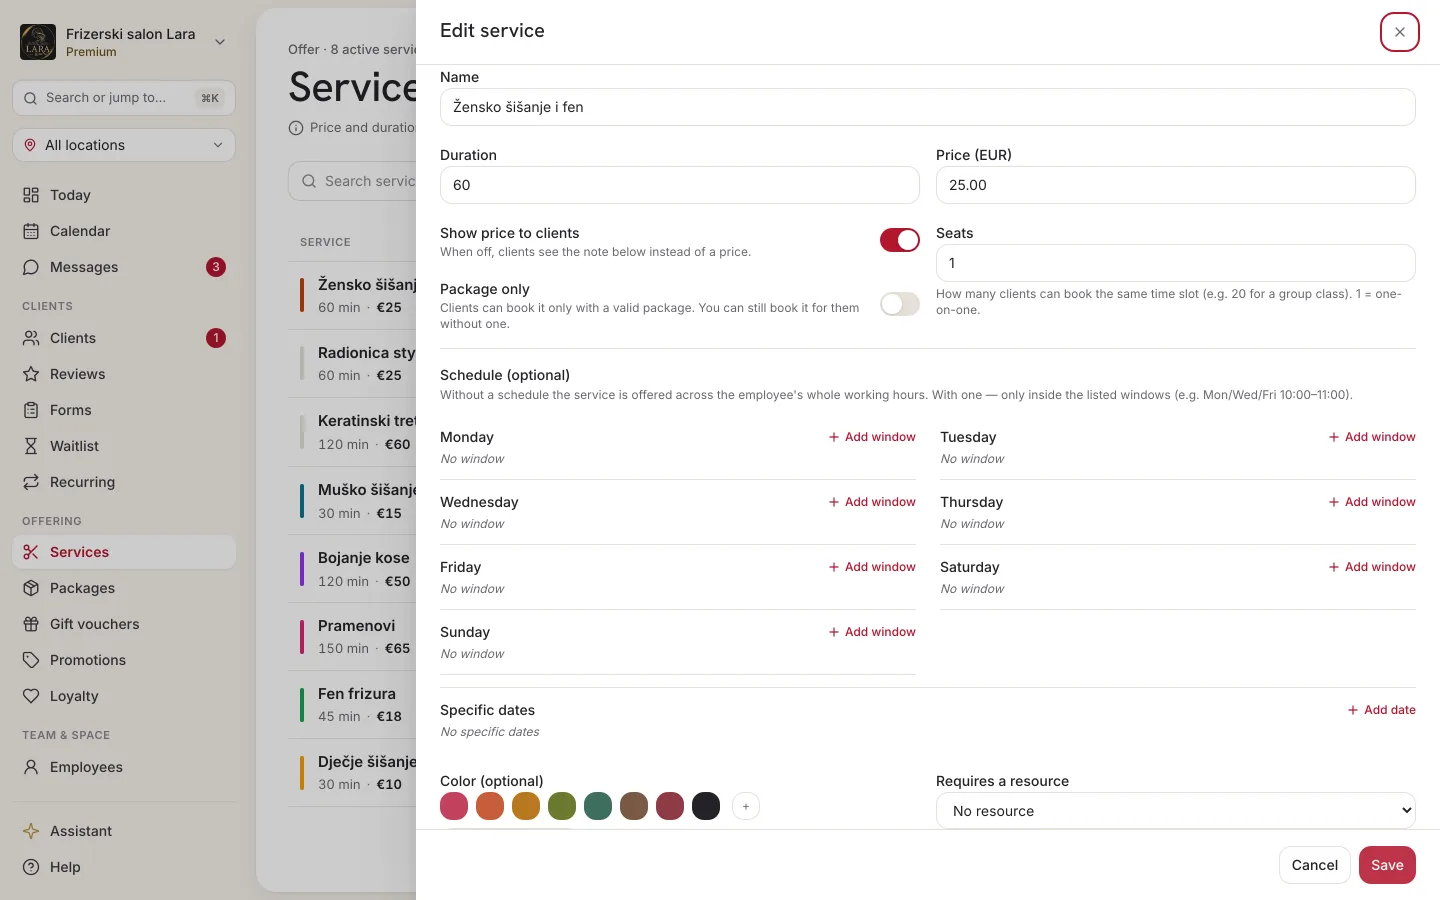
From then on, every appointment for that service takes up one free resource of the chosen kind alongside the employee. More about the service form is on the Services and price list page.
How a resource is assigned
- Online booking: the client doesn't choose the resource. A time slot is only offered if both the employee and at least one resource of the required kind are free at that time, and Appointa assigns a free resource automatically.
- Appointment in the calendar: when the service requires a resource, a Resource field appears in the appointment form, with Any available as the default option. You can also choose a specific resource. Taken ones are marked “(busy)”. If they're all taken, it says “All resources of this kind are busy at the selected time.”
- Moving an appointment: when the time changes, Appointa checks the resource again. If it's taken, it uses another free one of the same kind.
- Group services (several seats): all participants in the same appointment share one resource, e.g. the same hall.
An appointment holds at most one resource, and a resource holds at most one appointment at any moment (except for participants in the same group appointment, who share it). Appointments that only touch (one ends at 10:00, the next starts at 10:00) aren't a conflict. If the resource is taken, saving is refused with the message “The required resource (e.g. a room or device) is already taken at that time.”
A resource is available at all of the business's locations (see Locations).
The Resources view in the calendar
- Open Calendar and switch to the Day view.
- Above the calendar, flip the Staff | Resources switch to Resources.
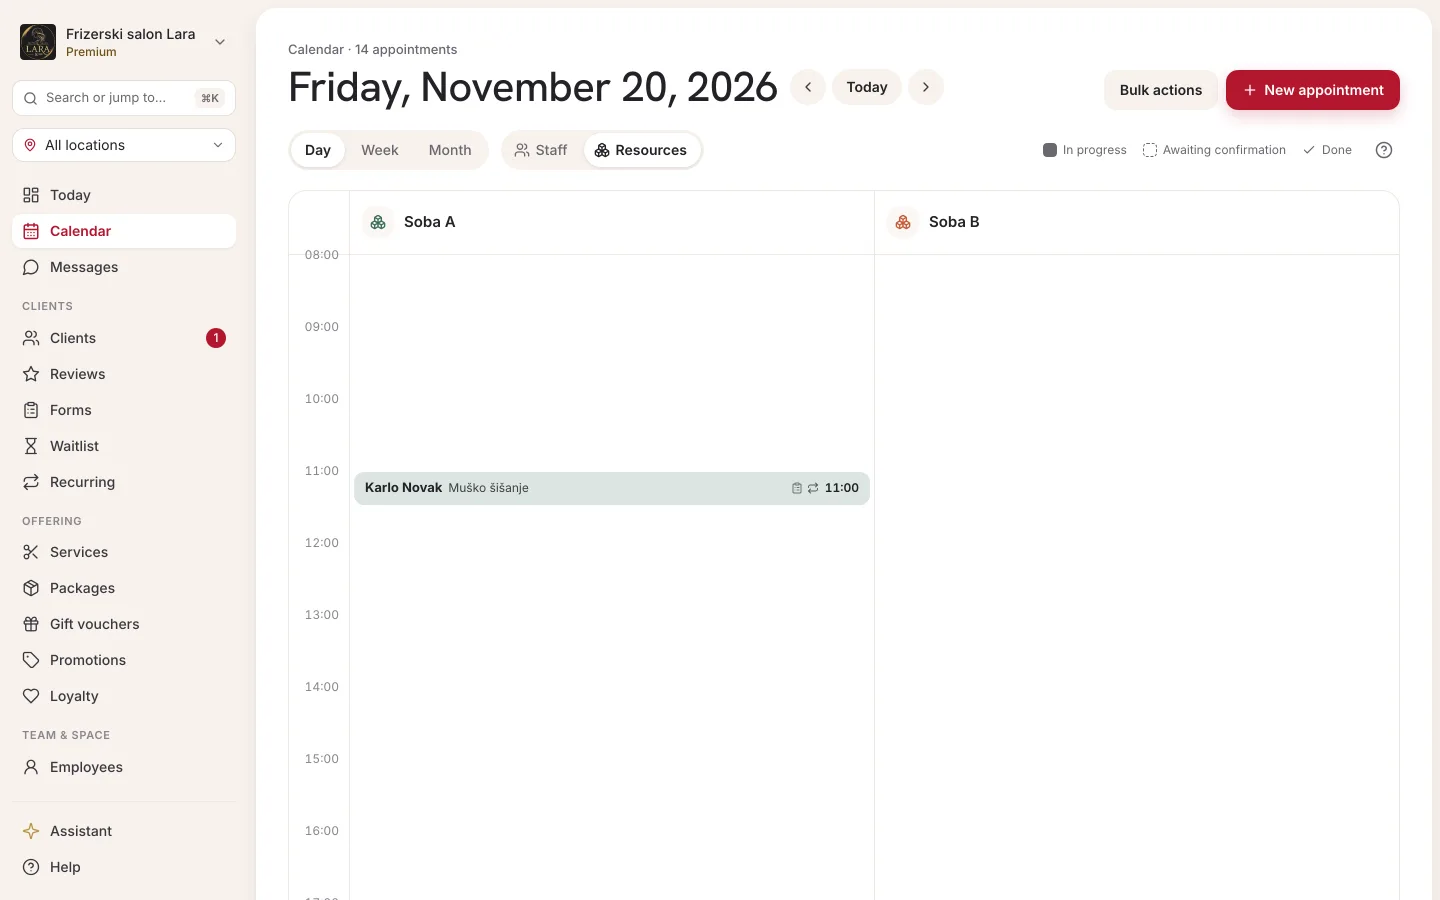
Every active resource gets a column in its color, with the appointments that hold it. Blocks appear as a grey bar with the reason or with the Blocked label.
You can drag an appointment into another resource's column to change its resource. If the target resource is taken at that time, the message “The resource is taken then — not moved.” appears. If the resource isn't of the kind the service requires, it says “That resource isn't offered for this service — not moved.”
If you don't have any resources yet, the view says “No resources yet. Add them under Resources.” Read more about the calendar on the Calendar overview page.
Blocks (cleaning, maintenance, servicing)
When a resource isn't available for part of a day, enter a block.
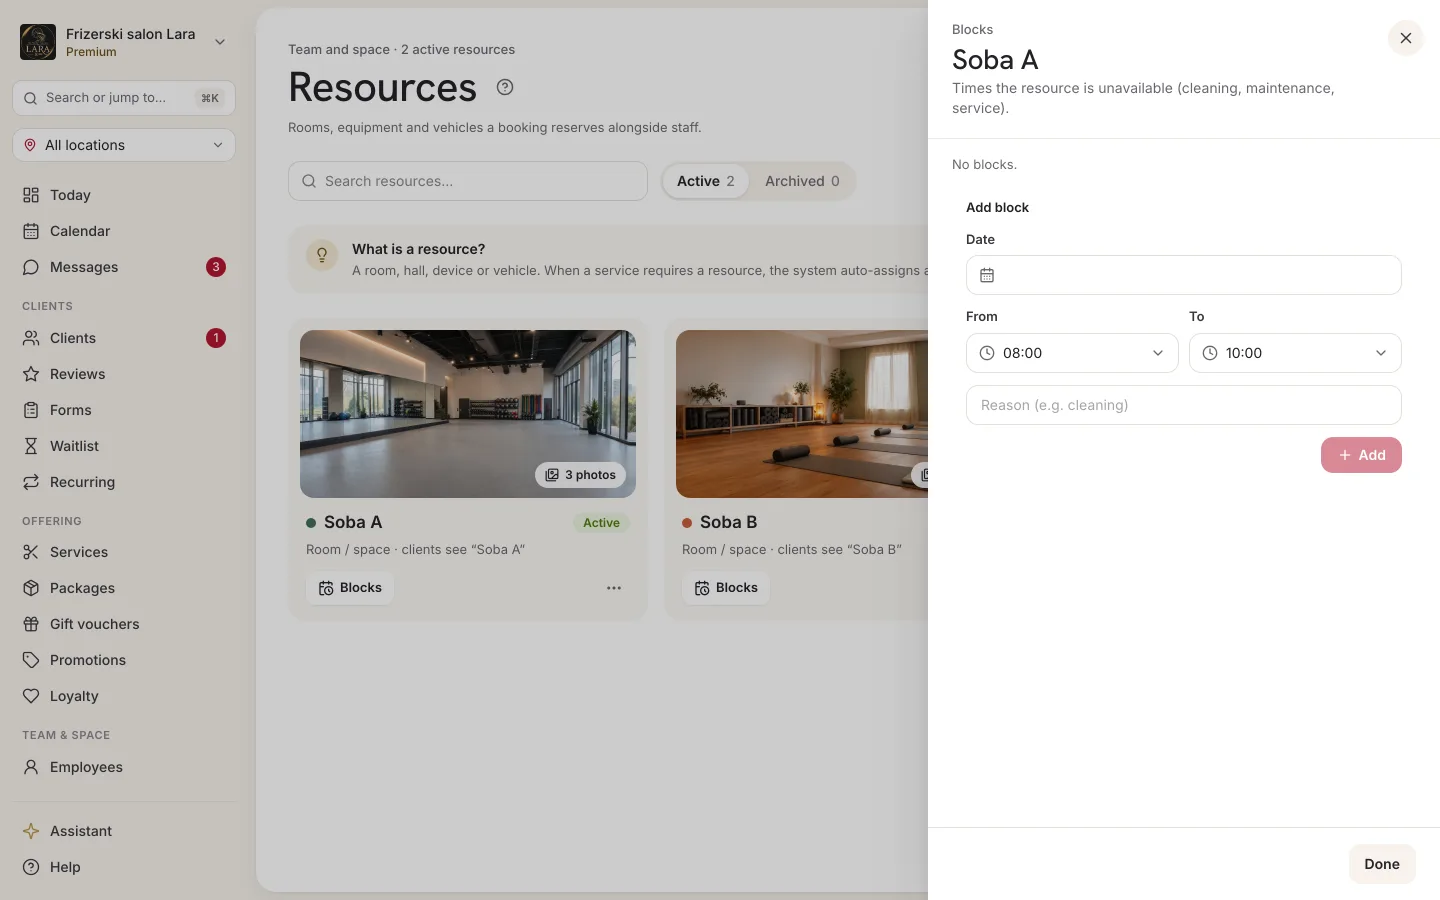
- In the resource list, click the Blocks (maintenance) icon in the resource's row. The Blocks panel opens, with the resource's name in the title and a list of existing blocks.
- Under Add block, choose a Date.
- Choose the From and To times (08:00–10:00 by default, in 15-minute steps).
- If you like, enter a reason (e.g. “cleaning”).
- Click Add, and when you're finished, Done.
- Block times are entered in your business's time zone, wherever you happen to be.
- A block applies only to the day and hours entered. For the rest of the day the resource works normally. For several days, add a block for each day.
- You remove a block by clicking the × next to it (Remove block).
If a block overlaps appointments already booked that hold the resource, the Resource already has appointments window opens, showing the number of appointments. Block anyway saves the block, but the appointments aren't cancelled. The block only prevents new bookings. Move or cancel the existing appointments yourself.
Archiving
Resources aren't deleted, they're archived. That way, past appointments still show which resource they used.
- In the resource's row, click the Archive icon.
- Confirm in the Archive resource? window with the Archive button.
- The message Resource archived appears at the bottom, with an Undo button.
An archived resource is no longer assigned to new appointments, and existing appointments remain. In the Resources view, an archived resource no longer has a column. You bring it back with Show archived and the Restore icon.
Editing a resource
Click the row of an active resource, change the details in the Edit resource panel and click Save. An archived resource can't be opened until you restore it.
You can always change the name, the name shown to clients, the color and the photos. You can't change the Kind while upcoming appointments hold the resource. In that case, the message “Can't save: …” appears with the number of appointments holding the resource. Cancel or move those appointments first.
What the client sees
- When booking, the client doesn't choose or see the resource. The flow looks the same as for any other service.
- The booking confirmation shows a line with the kind of resource (Room, Equipment, Vehicle or Resource) and the name shown to clients, e.g. “Room 1”.
- The email reminder includes a line with the resource, e.g. “Room: Hall A”.
- In the client app, the appointment details show the resource, and tapping it opens its name, kind and photos.
- The client never sees the internal name if you've entered a Name shown to clients.
Frequently asked questions
I have two rooms, but the client can't choose which one they'll be in. Can I turn that on?
No. In online booking, the resource is always assigned automatically. You can choose it when you enter the appointment in the calendar, or change it by dragging the appointment in the Resources view.
A service requires a room, and clients can't see any time slots. Why?
Check that there's at least one active resource of that kind and that it's free during the employee's working hours. Check the blocks too.
What happens to appointments when I archive a resource?
They stay as they are. An archived resource is simply no longer assigned to new appointments. Move the appointments that hold it to another resource if needed.
Do resources cost extra?
No. Resources are included in all plans.