Locations
How to add a branch, edit its address and contact details, set working hours per location, switch locations in the admin and what clients see.
A location is one branch of your business: an address with its own working hours. Every business starts with one location, the primary one. As long as that's the case, there's no location picker and no extra steps. If you work at several addresses, on the Premium plan you add more locations and manage them from the same account. On this page you'll learn how to add and edit a location, set its working hours, switch between locations, and what happens to services, employees and appointments.
Before you start
- Locations are edited by the owner and managers. Staff don't see the Locations menu item.
- You can edit the primary location and its working hours on any plan. You can add a second and any further location only on the Premium plan.
The location list
In the sidebar, select Locations. Each location has its own card; the primary one is first and highlighted with a border.
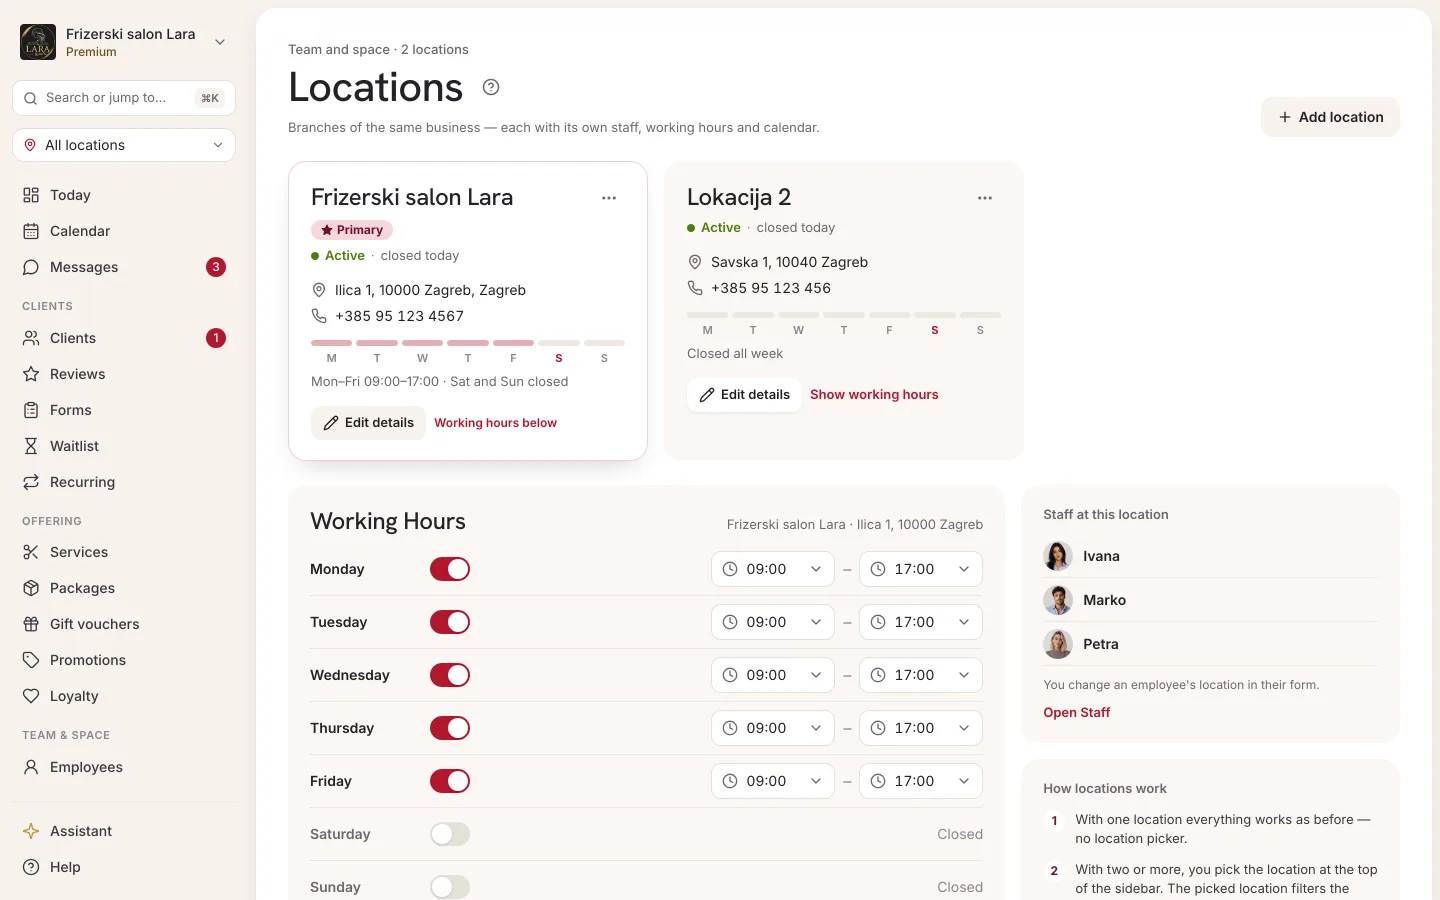
| Part of the card | What it means |
|---|---|
| Name and the Primary badge | The primary location (see Primary location). |
| active / inactive | Whether the location is offered to clients (see Deactivation). |
| Address, Phone | The location's details. A dash (—) means they haven't been entered. |
| Working hours | Opens the location's page with its working hours. |
| Edit | Opens the Edit location panel. |
| Set as primary | Only on locations that aren't primary. |
| Deactivate / Activate | Temporarily switches the location off or back on. |
| Delete | Permanently deletes the location (see Deleting a location). |
Below the cards is the How locations work box with a short reminder. An accurate description of what is and isn't tied to a location is in the How locations relate to everything else section.
Adding a location
- In the menu, open Locations.
- Click Add location. The New location panel opens on the right.
- Enter the Location name (e.g. “City Centre” or “Trešnjevka”). It's the only required field.
- If you like, enter the Street, City, Postal code and Phone.
- Click Save. The button only becomes active once a name has been entered.
- On the new location's card, click Working hours and enter them (see Location working hours).
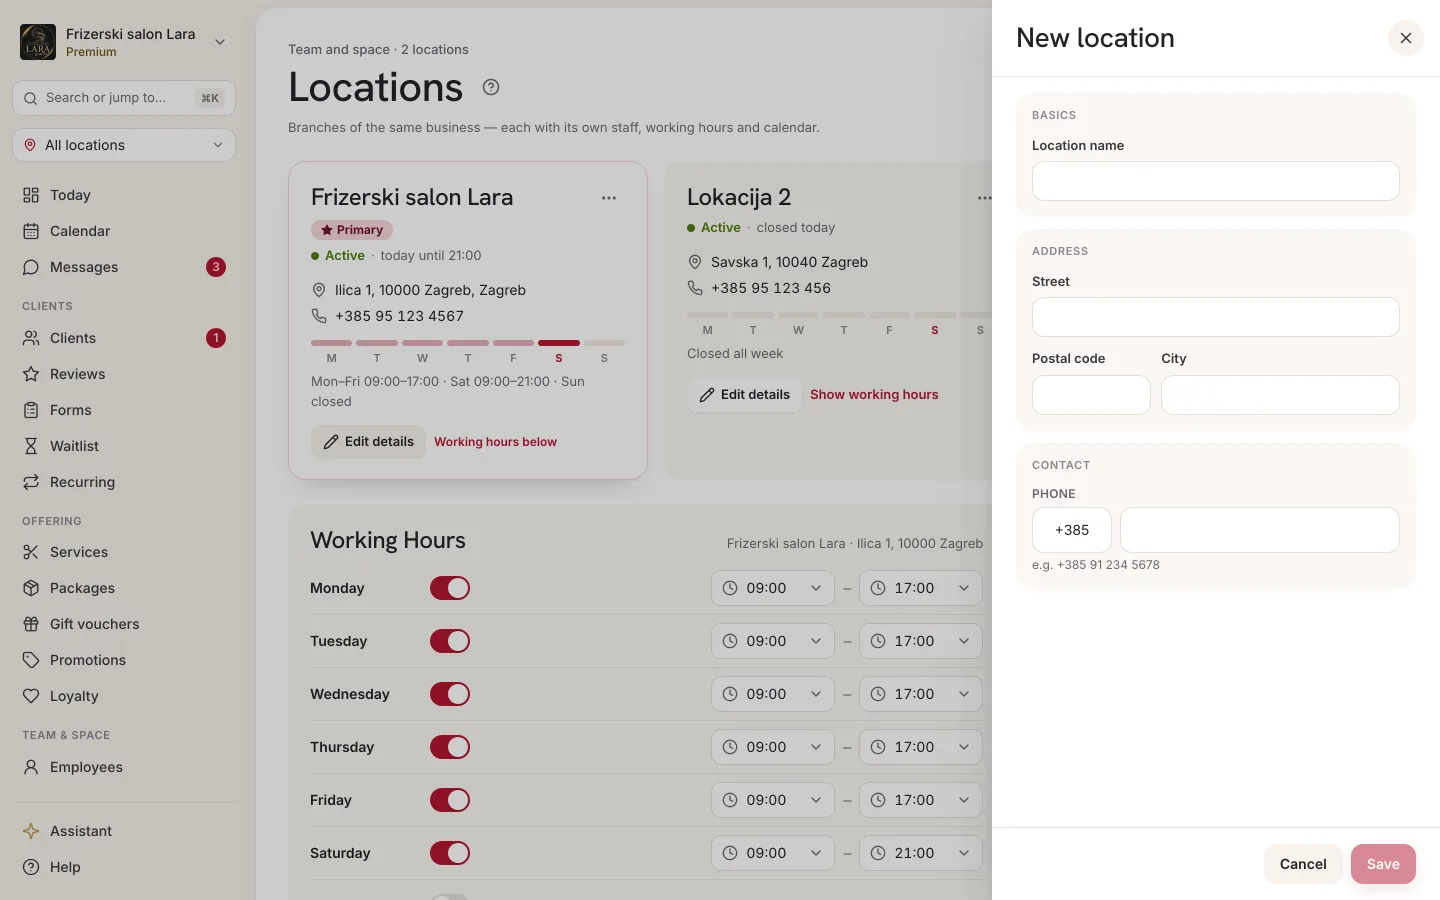
| Field | Required | Note |
|---|---|---|
| Location name | yes | The client sees it when choosing a location while booking. Up to 255 characters. |
| Street, City, Postal code | no | Shown on the location card. |
| Phone | no | On the left is the country code (+385 by default), on the right the phone number. |
If the phone number isn't valid, the message “That phone number isn't valid — enter at least 6 digits (e.g. 0991234567).” appears.
On the Starter and Pro plans, the Add location button is greyed out and below the title it says “Multiple locations are available on the Premium plan.” You change your plan on the Billing page (see Starter, Pro and Premium plans).
Editing a location
- On the location card, click Edit.
- In the Edit location panel, change the name, address or phone number.
- Click Save.
The location's address is for you and your team. The address on your public page is entered separately, in Settings → Business (see Business settings).
Location working hours
Each location has its own working hours for each day of the week. Open them with the Working hours link on the location card. The location's page shows its name, address, phone number and the Working Hours card with a switch and times for each day. The procedure is described on the Working hours and time off page.
A location's working hours are the upper limit for that location's employees: shifts can't start before opening or end after closing. Business closures and public holidays aren't entered per location. They apply to all locations at once (see Closures and holidays).
Primary location
The primary location has the Primary badge. It:
- is the default in online booking, so it's preselected for the client;
- provides the working hours shown on your public page;
- is preselected in the Location field when you add a new employee, and receives bookings from the client app (see How locations relate).
To make another location the primary one, click Set as primary on its card. The previous primary location automatically stops being primary.
Deactivation and activation
When a branch is temporarily not working (e.g. during a refurbishment), click Deactivate on its card. A deactivated location:
- isn't offered to clients in online booking;
- doesn't appear in the location picker in the admin area. If it was selected in the picker, the Calendar and Employees show all locations again.
You bring a location back by clicking Activate. The location's appointments and settings don't change.
Deleting a location
- On the location card, click Delete.
- Confirm in the Delete this location? window with the Yes, delete button.
There are two restrictions:
| Message | What to do |
|---|---|
| “Can't delete the primary location — promote another first.” | Set another location as primary, then delete the old one. |
| “A business must have at least one location.” | The last location can't be deleted. |
Switching between locations
When you have two or more active locations, a location picker appears at the top of the sidebar, below the business card. Click it and choose:
- All locations — shows everything at once;
- a single location — the primary one is marked with a star (★).
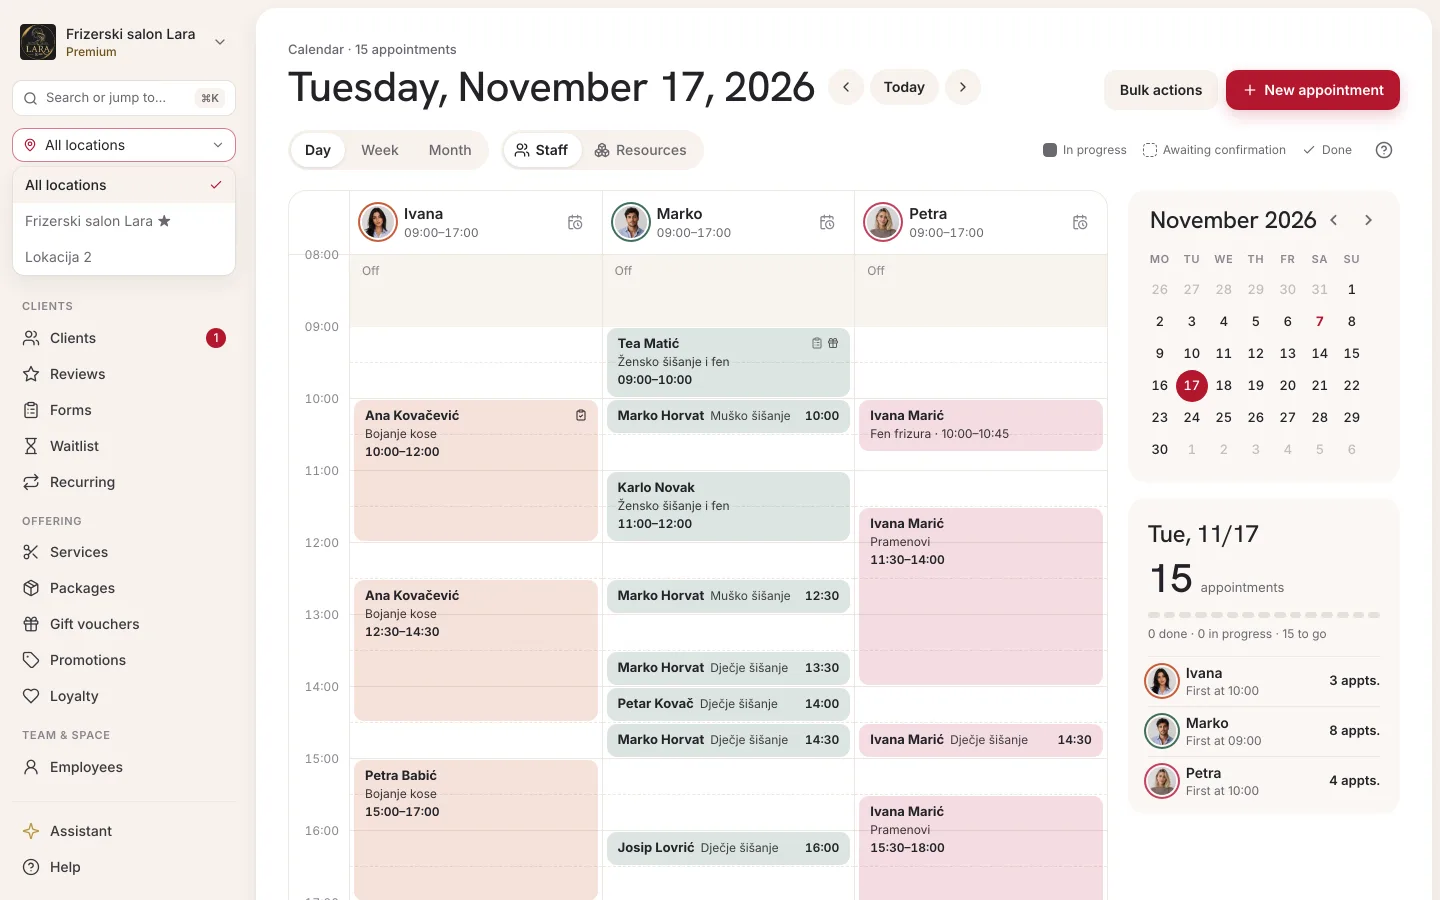
Your choice changes what you see in the Calendar (the appointments and employee columns of the selected location) and on the Employees list, and Bulk actions (cancelling a whole day) then cancel only that location's appointments. Other screens, such as services, clients and analytics, don't depend on the picker and show the whole business. Invoices have their own location filter. Appointa remembers your choice in that browser, so you don't have to pick it again next time.
How locations relate to everything else
| What | How it relates to a location |
|---|---|
| Working hours | Separate for each location. |
| Closures and holidays | For the whole business, all locations at once. |
| Services | Shared by all locations: one price list for the whole business. |
| Employees | Each employee belongs to one location, which you choose in their form (see Employees by location). |
| Appointments from web booking | Belong to the location the client chose. |
| Appointments from the client app | Belong to the primary location. |
| Appointments you enter in the calendar | Belong to the location of the employee they're entered for. |
| Resources | A resource added in the admin area is available at all locations. |
Employees by location
Each employee works at one location. Clients book them at that location in web booking, and the appointments you enter for them in the calendar belong to it.
- In the menu, open Employees.
- On the employee's card, click Edit (or Add staff member for a new one).
- In the Location field, choose the location. The primary one is marked with a star (★).
- Click Save.
The Location field only shows when you have two or more active locations. For a new employee, the primary location is preselected.
What the client sees
- When the business has two or more active locations, the client chooses a Location at the start of web booking, above the first step. The primary one is preselected.
- The client app doesn't offer a choice of location yet. Bookings from the app go to the primary location.
- When only one location is active, there's no such choice and booking looks the same as before.
- For the chosen location, time slots are offered based on its working hours and its employees. At the Choose a staff member step, the client still sees the whole team. If they choose an employee from another location, they won't get free time slots for that day.
- The client doesn't see the location's address and phone number when booking, only its name.
Frequently asked questions
I have one branch. Do I need to do anything here?
No, apart from the working hours. Your only location is the primary one and holds the working hours you entered in the setup wizard. Change them with the Working hours link on the location card.
Why can't I see the location picker?
The picker only appears once there are at least two active locations. Deactivated ones don't count.
Can I have a different price list at another location?
No, services are shared by all locations. If a price differs, create a separate service (e.g. “Haircut — City Centre”).
Can I move an employee to another location?
Yes. Open the employee in Employees, choose another location in the Location field and save. Changing the primary location doesn't move employees. See Employees by location.
I can't add a location on the Pro plan. Why?
Multiple locations are only available on the Premium plan. On Starter and Pro you have one location, the primary one.